Chapter 3 of 11
Talking to the AI
The editor: asking the AI for changes and watching them applied.
On this page
- 3.1Your site's editor
- 3.2Easy mode and Advanced mode: where the thing you can't find is
- 3.3Asking the AI for changes
- 3.4The send options (and what they cost)
- 3.5Following your request: the query queue
- 3.6Choosing how you touch the page: the seven modes
- 3.7Drawing on the page to point at what you mean
- 3.8Talking to Sofi: a call instead of typing
- 3.9Asking by pointing
- 3.10Changing things yourself, without spending on the AI
- 3.11Seeing your site as it looks on a phone or a tablet
- 3.12Reporting a bug
- 3.13Tools that only exist in Advanced mode
- 3.14Auto-repair notices
- 3.15The questions people ask most
This is the screen you'll spend almost all of your time on. On the right you see your site as it's shaping up; at the bottom there's a text box where you ask the artificial intelligence (from here on, "the AI") for changes in plain, everyday words. You don't need to know how to code: you write what you want and it does it.
3.1Your site's editor
What it's forIt's your site's workshop: you see the site, you ask for changes and you check them straight away, without publishing anything until you say so.
How to get thereFrom the projects dashboard, click on your project's card. The editor opens directly.
What's on screen
- Top left, the arrow back to your projects, the project's name and its address (
/my-project). - The four screen-size icons (phone, tablet, monitor and the double arrow) change the width you see your site at. The current width is shown beside them:
100%. - The Easy / Advanced switch. It's the most important control on the whole screen and it has its own section further down: half the tools are hidden behind it.
- The orange "Unpublished changes" bar warns you that what you're looking at isn't visible to anyone outside yet. Until you press Publish, your public site stays as it was.
- The purple strip at the top appears while the AI is working: it reads "Preparing request..." with a timer and the request number.
- The column of icons on the left are the tools (pages, blog, images…). How many you see depends on Easy or Advanced mode.
- Right at the bottom, the chat box and, above it, the mode bar.
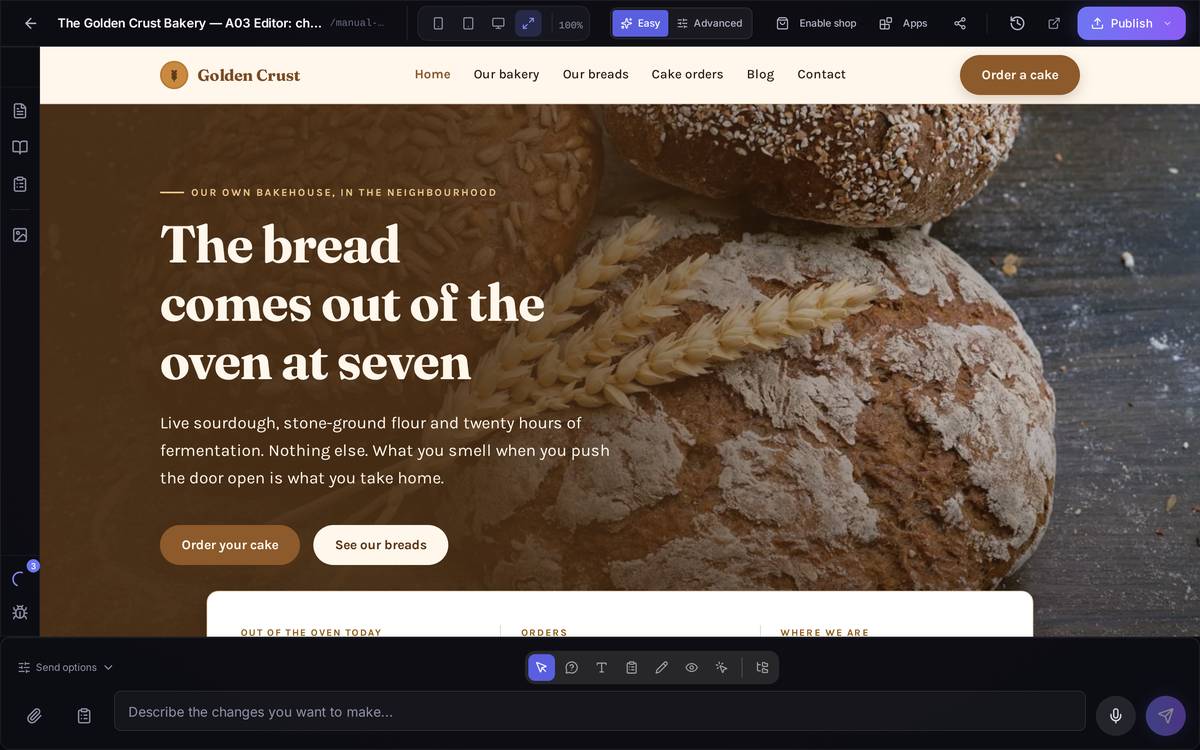
Watch out for… the orange "Unpublished changes" bar. The fact that it looks right here doesn't mean your visitors can see it: that only happens when you press Publish.
3.2Easy mode and Advanced mode: where the thing you can't find is
What it's forEasy mode leaves only what everybody uses in sight. Advanced mode adds the rest of the tools. It's the number-one cause of "this used to be here and now I can't see it".
How to get thereIn the editor's header, the pair of buttons Easy | Advanced. It's always visible in both modes, so you can never get locked into one.
What changes, exactly
- In Easy the left-hand bar has six things: Pages, Blog, Forms, Media, the Query queue and Report bug.
- In Advanced these appear as well: Search, Languages, SEO, Styles, GTM, Google Ads, Analytics, Settings, Sofi and Agents. And Connect GitHub is added to the header.
- What does not change: the chat box, the preview, the five modes on the bottom bar, the screen sizes and the Publish button. All of that is identical in both modes.
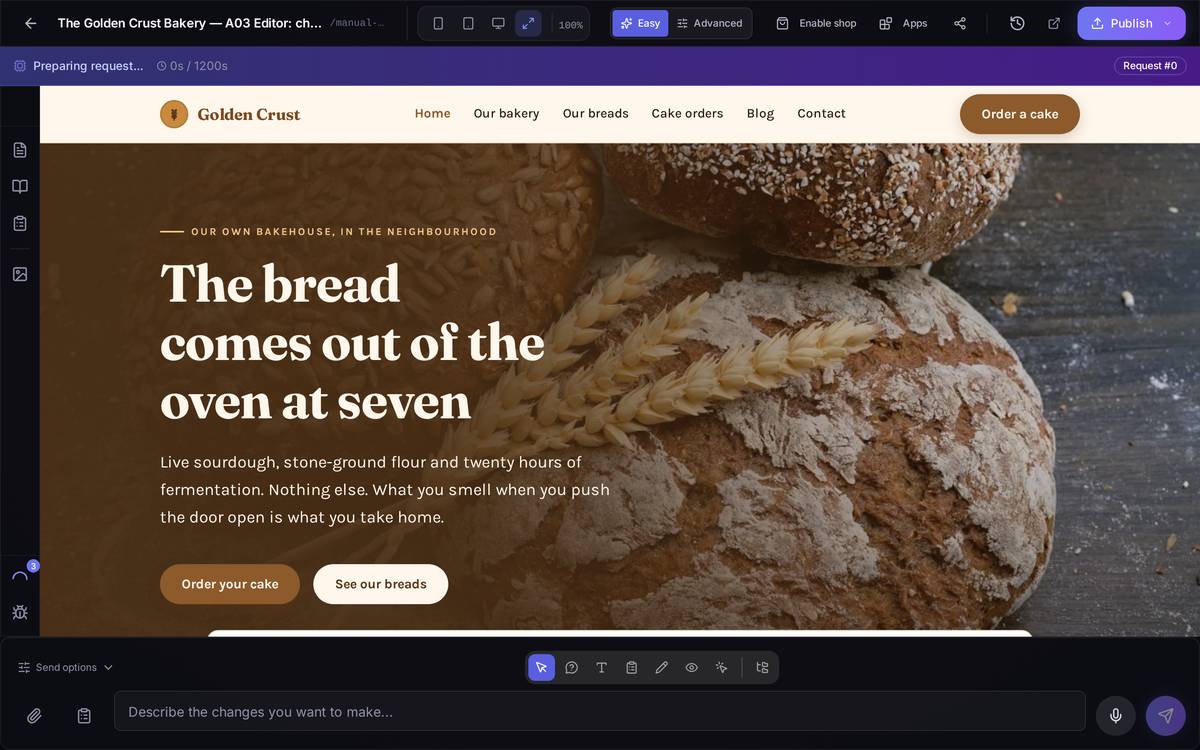
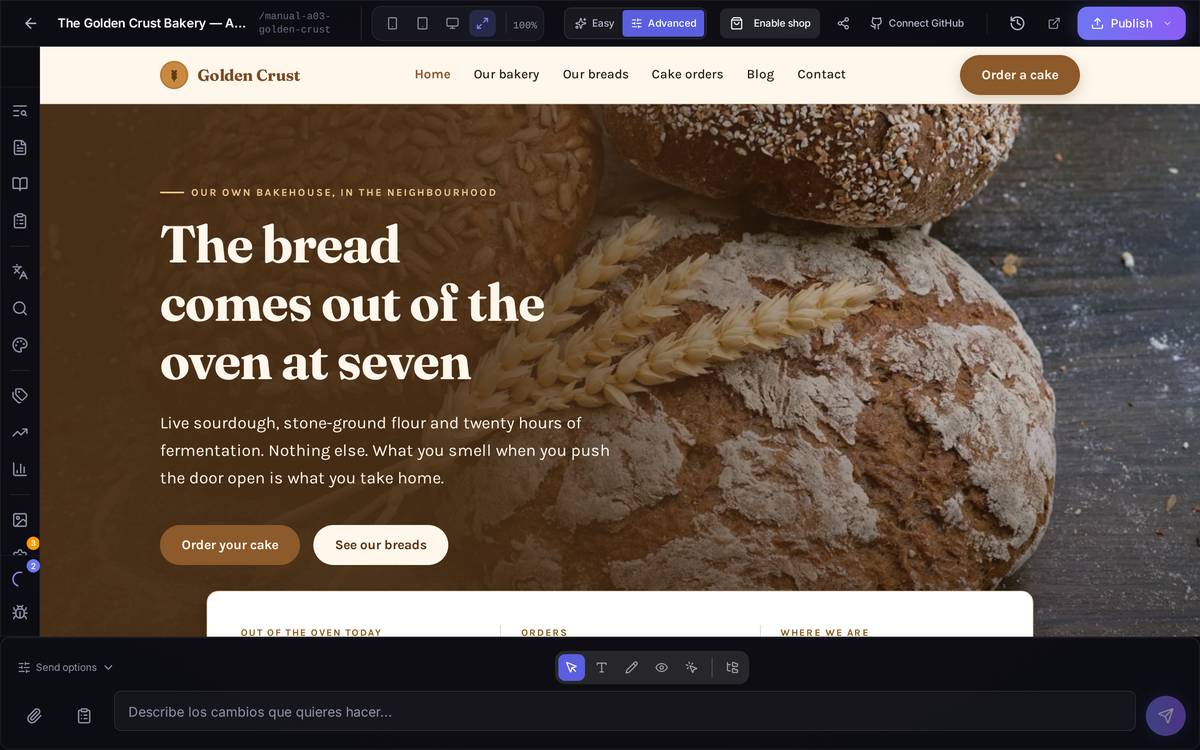
Watch out for… two things. First: the mode is saved to your account, not to the project, so if you change it here you'll see it changed on all your projects and the next time you sign in. Second: if you're following an instruction that mentions a tool and you can't find it in the bar, you are almost certainly in Easy; press Advanced before you write anything off as broken.
3.3Asking the AI for changes
What it's forIt's the heart of the product: you write what you want changed and the AI does it on the page you have open.
How to get thereIt's always at the bottom, in both modes: the box that reads "Describe the changes you want to make…".
What's on screen
- The text box. Write in your own words. The example text changes according to what you have selected on the page (for instance "Changes for
h1…"). - The paperclip on the left attaches reference images. You can also paste them with Ctrl+V or drag them over the chat: a blue frame appears reading "Drop files here". The thumbnails sit above the box; you remove them with the red X and they clear themselves when you send.
- The send button is the paper plane on the right.
- "Send options", bottom left, opens the settings that widen the request — or make it more expensive. They have their own section below.
How to write a request that works
A vague request gets a vague answer. Compare:
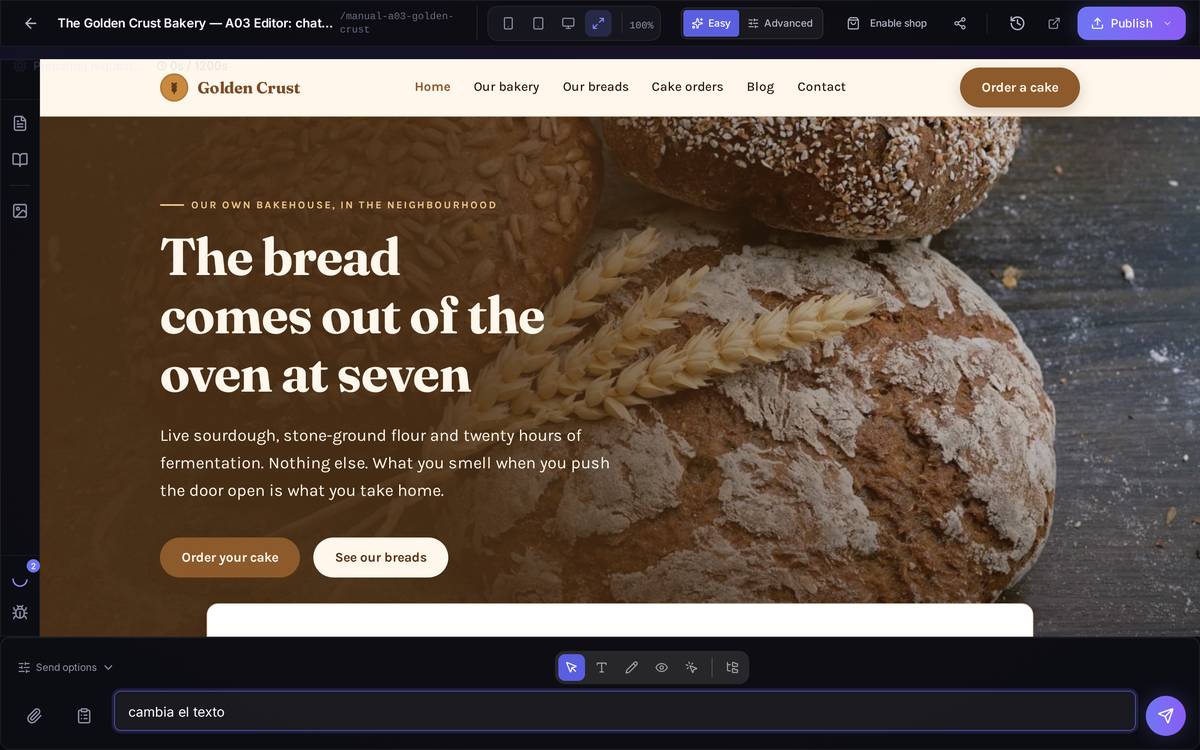
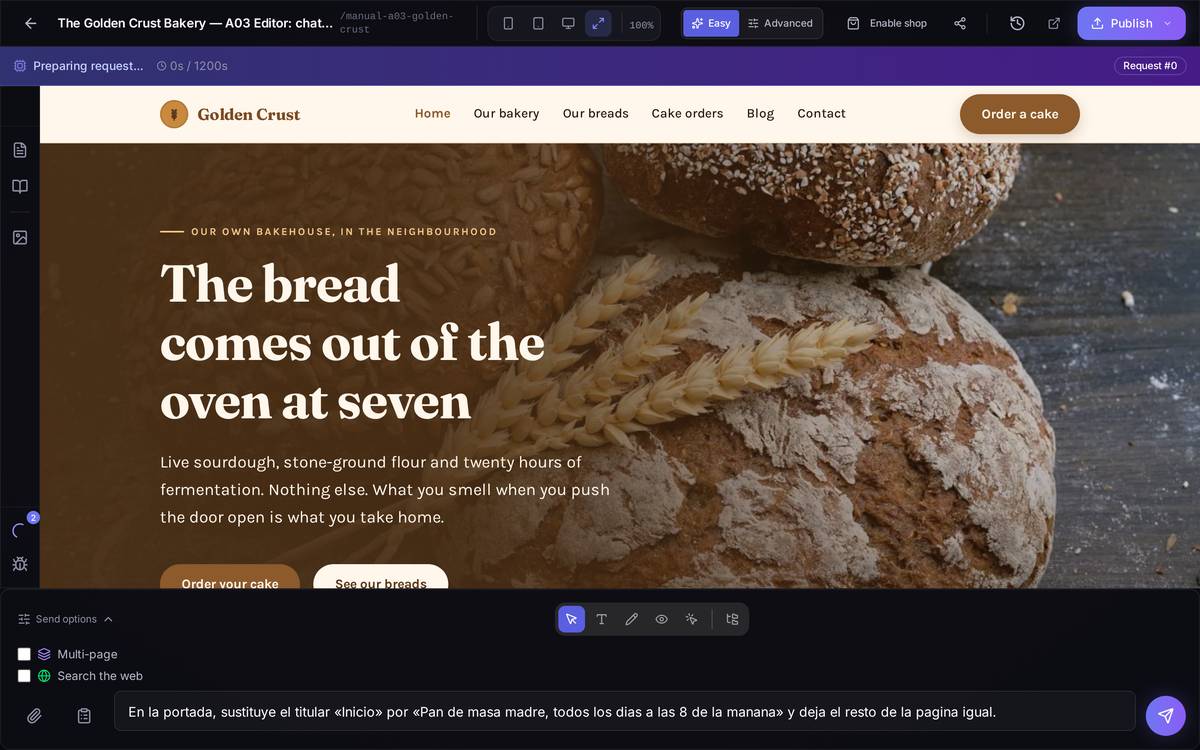
The recipe is always the same: where (which page and which part), what (the specific change, with the exact wording if you have it) and what to leave alone.
A full example, start to finish. You want to change the headline on the home page:
- Open your project's editor. Check at the top that you're on the page you want to change.
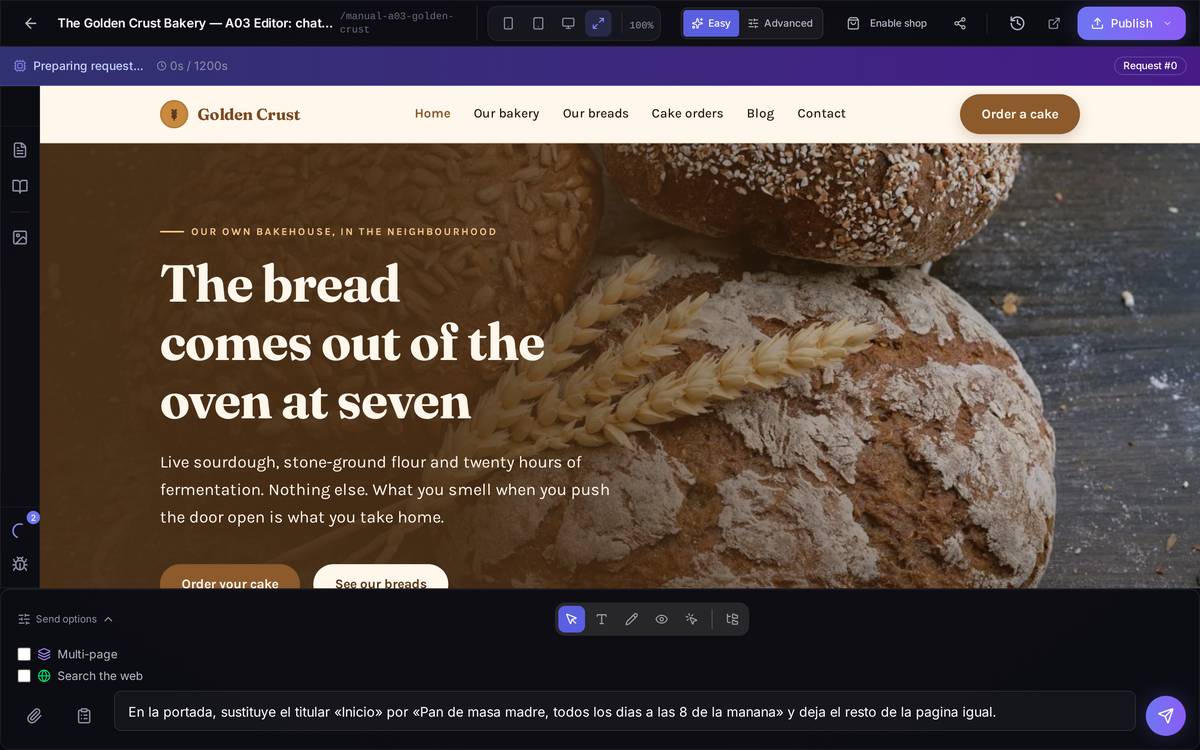
- In the box at the bottom write: "On the home page, replace the "Home" headline with "Sourdough bread, straight out of the oven every day at 8 in the morning" and leave the rest of the page exactly as it is."
- Press the paper plane.
- The purple "Preparing request..." strip appears at the top with its timer: the AI is working.
- When it finishes, the preview on the right updates by itself with the new headline. If it wasn't what you wanted, write the correction in the same box; there's no need to start over.
Watch out for… asking for several different things in one message. One request per change works out better: if something comes out wrong, you know exactly what to fix.
3.4The send options (and what they cost)
What it's forThey widen the reach of your request. They only appear when they make sense for your project, so you won't always see the same ones.
How to get therePress "Send options", below the chat box.
- Multi-page (layers icon). Appears when your project has more than one page. Without it, the AI can only touch the page you have open and its controller: it is forbidden from going into other pages, into the shared template or into the configuration. With it on, it can read any page as a reference, change several at once and touch the shared files (the template, the styles). It still uses its judgement: if you ask for something on a single page ("change the contact form"), it only touches that one. Cost: it tells you how many pages the project has; it uses more because the AI receives far more context.
- Apply to all languages (languages icon, in blue). Appears when the page you have open has versions in other languages. After applying the change to the current page, it translates that same change into all the other versions. Underneath it lists the targets (for example
→ contact-en, contact-fr). Cost: it shows you the estimate, along the lines of "+1 translation, ~2x tokens". Careful with what it does NOT do: it doesn't read the other versions. If you're on the Spanish page and ask it to "make it like the English version", it isn't going to go and look at the English one; it only translates the final result. - Insert form (clipboard icon, green). Appears if you have forms created in the Forms tool. You pick one from the dropdown and the AI inserts it wherever you tell it: "Put the contact form in the bottom section".
- Search the web (globe icon). Lets the AI look up outside information while preparing the change.
If you combine Multi-page with Apply to all languages, every modified page gets translated into all of its languages, and instead of the list of targets you'll see an estimate of the total.
Watch out for… leaving Multi-page on "just in case". It costs more and you're giving it permission to touch the shared template, so a change meant for one page can end up showing across the whole site.
3.5Following your request: the query queue
What it's forEverything you ask the AI for goes into a queue. Here you see what's being worked on, what's waiting its turn and what has finished.
How to get thereIn the left-hand bar, the icon with the number (the blue bubble tells you how many are running). It's available in Easy mode.
What's on screen. Three tabs: Processing, Queued and Completed. Each task shows the text you asked for, the page it was aimed at and when it was launched. Pressing a task opens its detail.
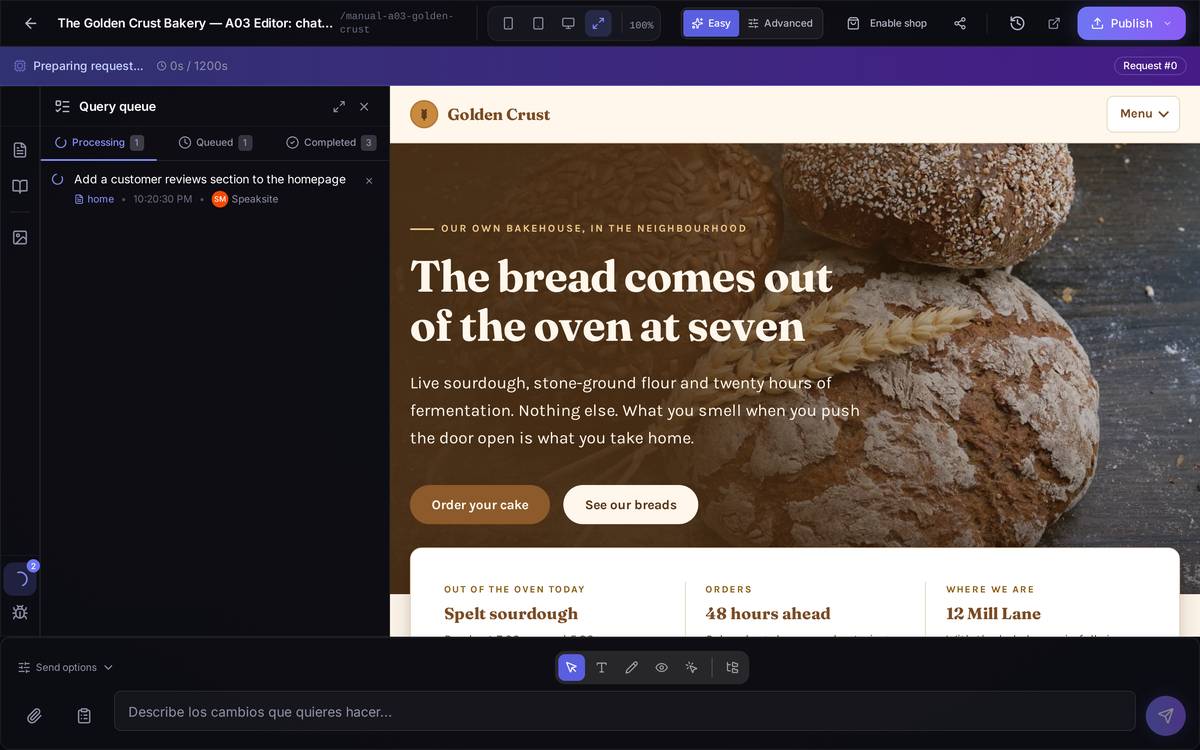
Watch out for… closing the editor thinking that cancels the request. It doesn't: it runs its course and you'll find it under "Completed" when you come back.
3.6Choosing how you touch the page: the seven modes
What it's forThe bar of eight icons just above the chat box decides what happens when you click on your site in the preview.
How to get thereIt's always visible, in both modes, centred above the chat.
- Select (arrow). This is the normal mode. You click an element and it's outlined: green if the system identifies it beyond doubt, amber if the element looks like others on the page. A label with its name (
h1,img…) appears above the chat box and the example text in the chat changes to "Changes for h1…", so you no longer have to explain where you want the change. Pressing that label brings up the quick actions: Delete, Edit, Duplicate and View code; each one leaves the instruction already written in the box. Holding Alt or Shift you can select several elements at once; they're numbered in purple. - Ask (speech bubble with a question mark). You tap an element and ask Sofi about it, without changing anything. Its own section below ("Asking by pointing").
- Edit text/image (the T). You change text, images and links yourself, without going through the AI. It has its own section below.
- Forms (clipboard). You tap a form on your site and edit it right there, field by field, without going through the AI.
- Draw (pencil). You mark an area with strokes. Its own section below.
- View only (eye). The preview behaves like your real site: you navigate, press buttons and try out forms like a visitor. In this mode the chat box is hidden.
- Navigate (arrow with a click). Your site's links work inside the editor: press an internal one and you switch to that page without leaving the editor. Unlike "View only", the chat stays in sight here.
- The eighth icon (folder tree), set apart by a small divider, isn't a mode: it opens and closes the file panel.
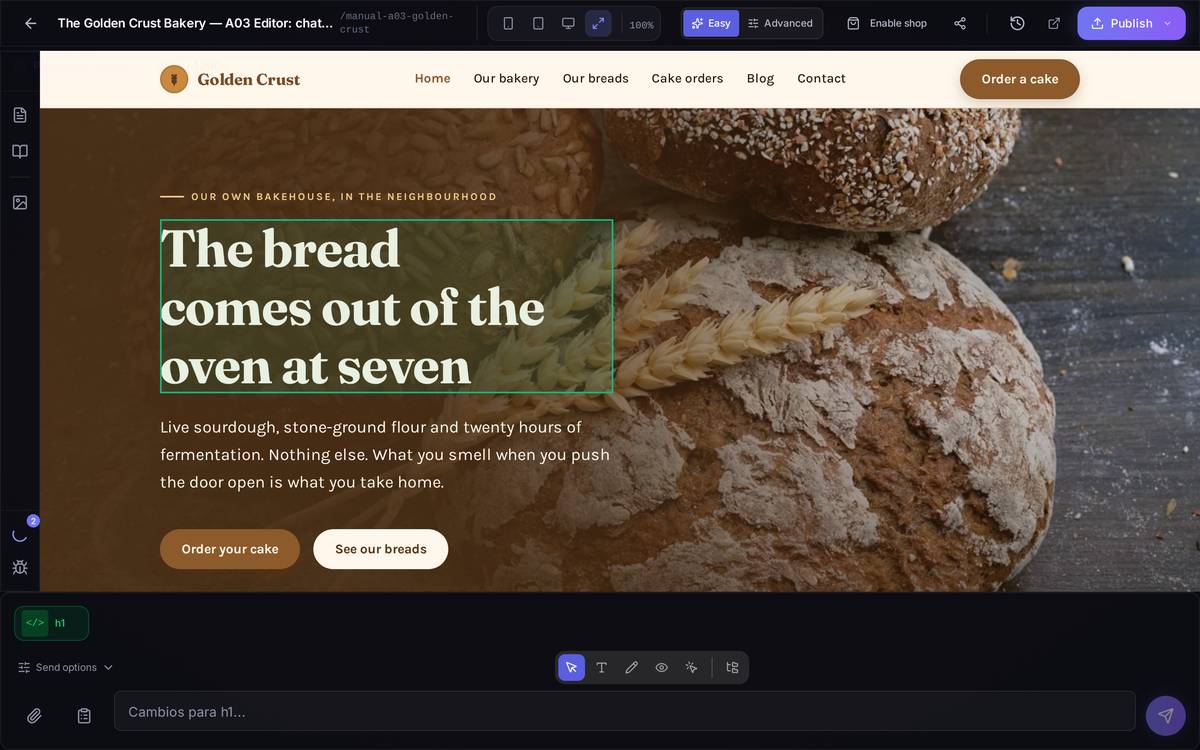
Watch out for… the amber outline. It means the element you've pointed at looks like others: if you send the request as it is, the AI could change the wrong one. Better to add a hint in your text ("the first one", "the one in the footer").
3.7Drawing on the page to point at what you mean
What it's forFor when explaining in words where the problem is takes longer than pointing at it with your finger.
How to get thereDraw mode (the pencil), then draw with the mouse over the preview.
What's on screen. The strokes come out yellow, like a highlighter. A small bar appears underneath with four buttons: the microphone to dictate, the bin (labelled "Limpiar") to clear the strokes, the X to cancel and the tick ("Listo") to confirm — this little toolbar is still in Spanish today. The bin and the tick are greyed out until you draw something.
When you press the tick, the system takes a photo of the marked area, works out which elements are inside it and returns to Select mode; the photo stays as a thumbnail above the chat box, ready for you to write what you want changed.
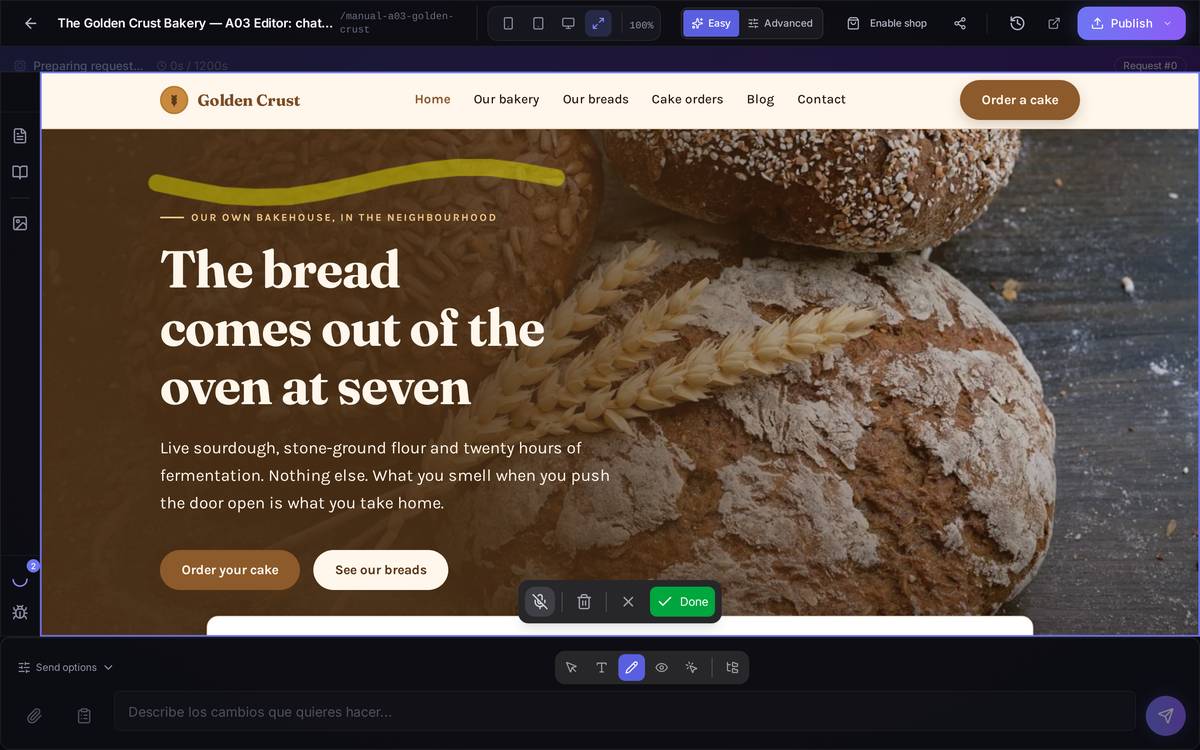
About voice dictation. The Draw bar keeps its microphone so you can dictate what you want in the marked area. To talk to the AI anywhere else in the editor there's the call with Sofi, covered in "Talking to Sofi", a little further down.
Watch out for… drawing and not pressing the tick. If you switch modes without confirming, the strokes are lost and the AI receives nothing.
3.8Talking to Sofi: a call instead of typing
What it's forAsking for changes and asking questions out loud, as on a phone call: "change the button text to Sign in", "how many pages does my site have?", "remove this photo" while pointing at it in the preview.
How to get thereAbove the chat bar, to the right of the modes, there's the Talk to Sofi button (on a phone, just the phone icon). It's the only voice button in the editor: next to the chat box you're left with attachments and Send.
What's on screen. When you press it, the first time the browser asks for permission to use the microphone. Sofi says hello and stays listening; the button turns green ("On a call") and pressing it again hangs up. Sofi listens the whole time, answers straight away with her voice and you can interrupt her. What she already knows about your site (which pages it has and how many, what it's about, what's on the page you're looking at, whether it has a blog) she answers instantly; if she needs to look at the code, she tells you she's looking. Ask her for changes the way you'd ask a person ("make the button green", "change this" while pointing in the preview): she tells you while she does it, and confirms when she's done. If the job is a big one (a blog with articles, new pages), she first asks you the essentials, for example whether you have your own images or prefer stock images, warns you it will take a few minutes and, while she works, keeps telling you she's still on it. In the bar you can see what each of you says, which microphone she's hearing you through, how long the call has lasted, a button to mute the microphone and a red one to hang up. Every change or question Sofi carries out counts as one request, just like typing it; talking in itself costs nothing.
Sofi also makes suggestions. When she picks up she already knows what your site is missing and what's broken. If the menu links to pages that don't exist or there are images that don't load, she tells you when she says hello and sends it off to be fixed without you asking (it counts as one request). If the phone number, the email or the legal details are missing, she asks you for them when the time comes. Ask her "what is my site missing?" and she'll suggest one or two concrete improvements; she doesn't do any of it without your yes. And when she has to write new text, she tells you first what she's going to write and reads it back when she's done, so you can confirm it or change it.
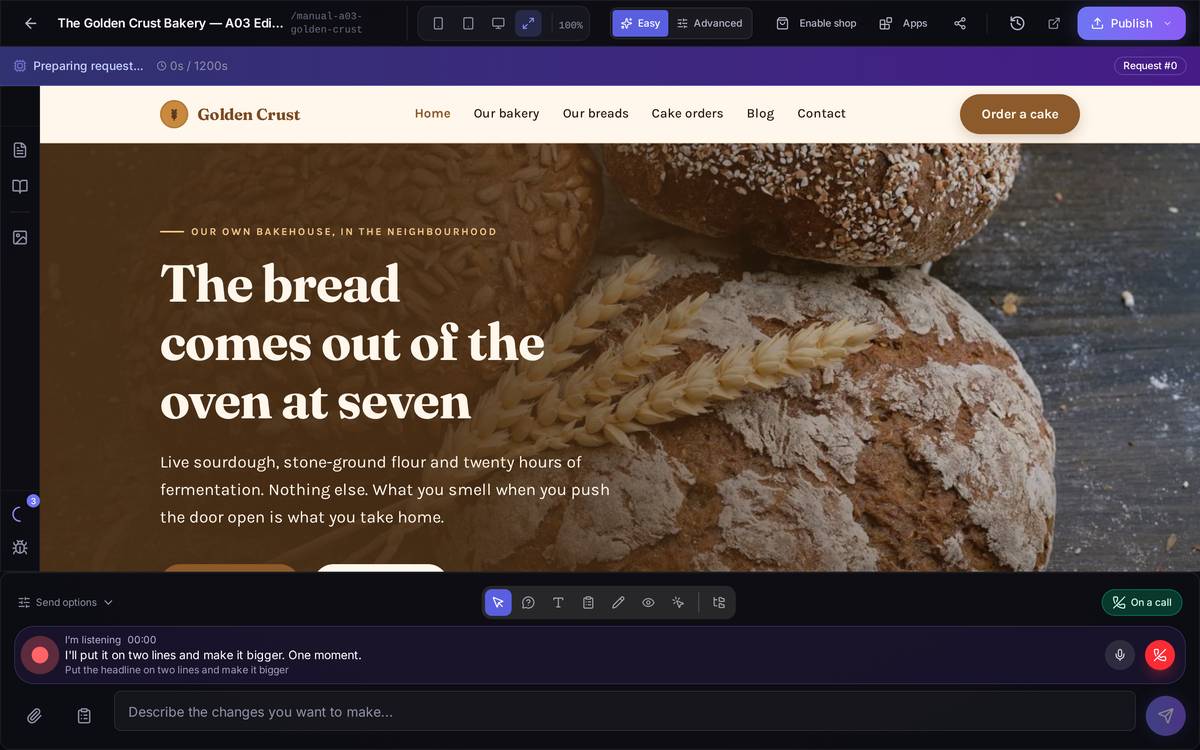
If she can't hear you. Before picking up, Sofi chooses by herself a microphone that gives a signal: this happens, for example, with headsets that have one channel for games and another for voice. While she listens, the bar says which microphone she's hearing you through; if within a few seconds not even background noise reaches her, it warns you ("I can't hear you through…"), Sofi tells you out loud and you can pick another microphone right there, without leaving the editor. And while Sofi works on what you asked for, she tells you ("On it, one moment") so the wait doesn't look like a hang.
If you don't see the "Talk to Sofi" button. The call is switched on by whoever runs Speaksite. Where it isn't available, there's a microphone next to the chat box instead, for dictating: you press it, speak, and what you say appears in the box as you talk, in grey while it's provisional. When you pause for a moment, the sentence is confirmed and a two-second countdown ring appears: if you don't touch anything, the request sends itself; if you tap the ring, it stays written so you can correct it and send it yourself. When the change is done, Sofi confirms it out loud.
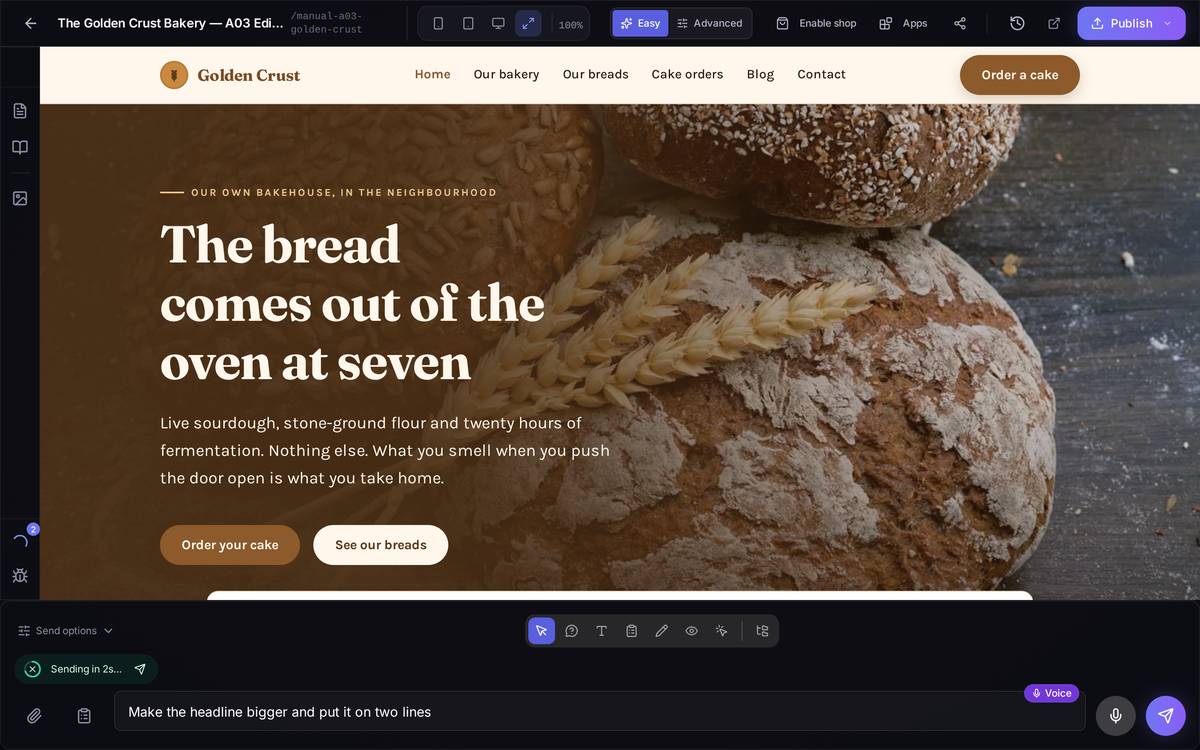
Watch out for… the browser. The call and dictation need the microphone: Chrome, Edge and Safari work well. If the browser can't recognise speech, the dictation microphone appears crossed out and hovering over it explains why; everything else keeps working.
3.9Asking by pointing
What it's forUnderstanding your site without changing it: what a button does, why a block doesn't show on phones, what text would suit a headline. The answer comes in plain language and, if Sofi sees a clear fix, she offers it.
How to get thereAsk mode (the speech bubble with a question mark) in the modes bar.
What's on screen. As you move the cursor over the preview, each element gets a box around it and a label tells you what it is and what it says. When you tap one, the chip "Asking about <h1> “…”" appears above the chat box with that element, and the box changes to "Ask about this <h1>…". Type or dictate the question and send it. The chip's X or Esc releases the element.
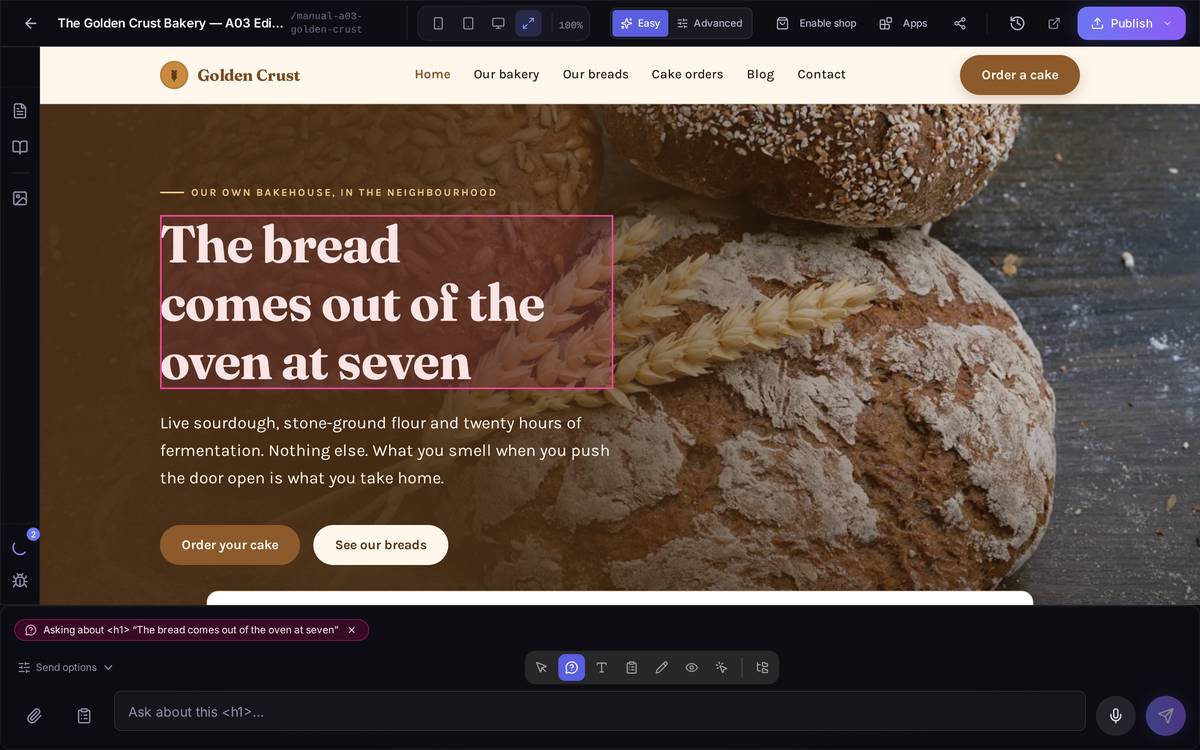
The answer appears in a Sofi bubble over the corner of the chat. If the question came in by voice, Sofi reads it aloud; with the bubble's speaker you can hear it again or silence it, with "Reply" you carry on the conversation and with the X you close it. When Sofi suggests a concrete change, the bubble brings a card with the change ("Show change detail" expands it) and the Apply this change button, which turns it into a normal request, with the element already pointed at.
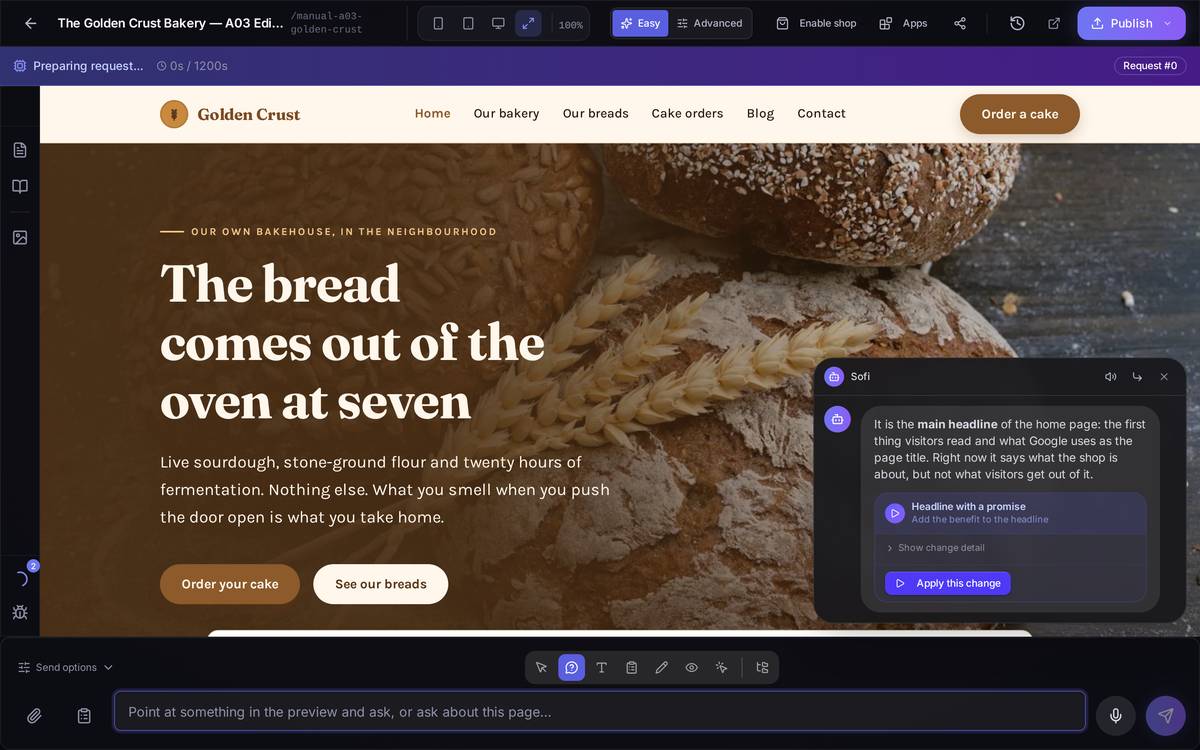
Watch out for… requests. Each question uses up one request, just like a change request. In Select mode, a sentence that's clearly a question ("why…?") also gets answered instead of edited; in Ask mode there's never any doubt that you don't want to touch anything.
3.10Changing things yourself, without spending on the AI
What it's forFor small fixes — a typo, an image, a link pointing to the wrong place — there's no need to bother the AI. These changes are saved directly and don't use up any credits.
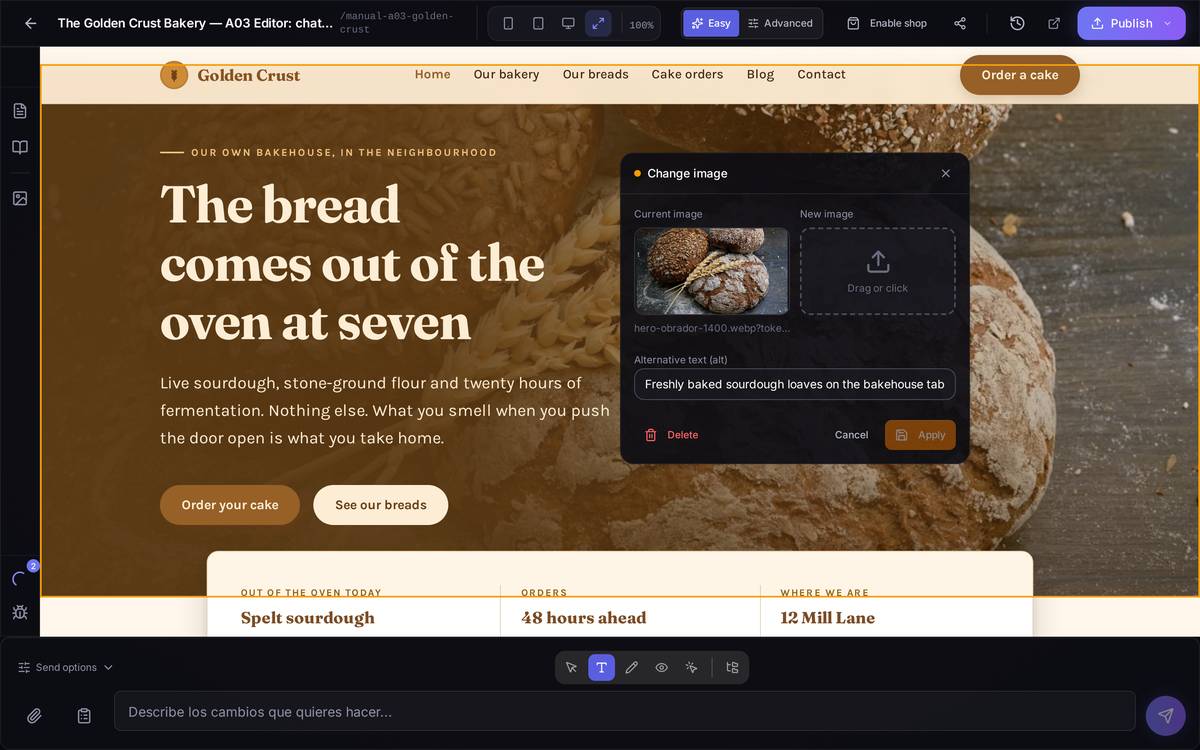
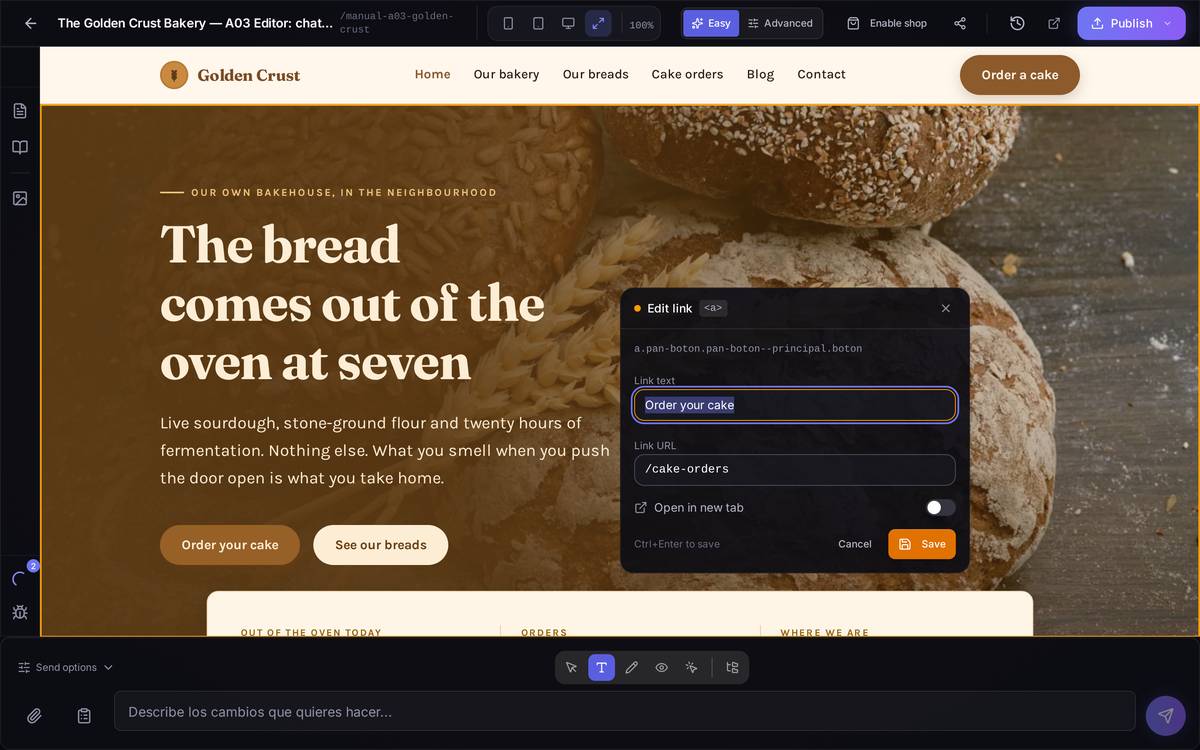
How to get thereEdit text/image mode (the T), then click the element in the preview. A small floating panel opens beside it. A green flash confirms it has been saved.
The four panels you may come across
- Text (headings, paragraphs, buttons). An editor with bold, italic, underline, link and remove formatting. Confirmed with Save.
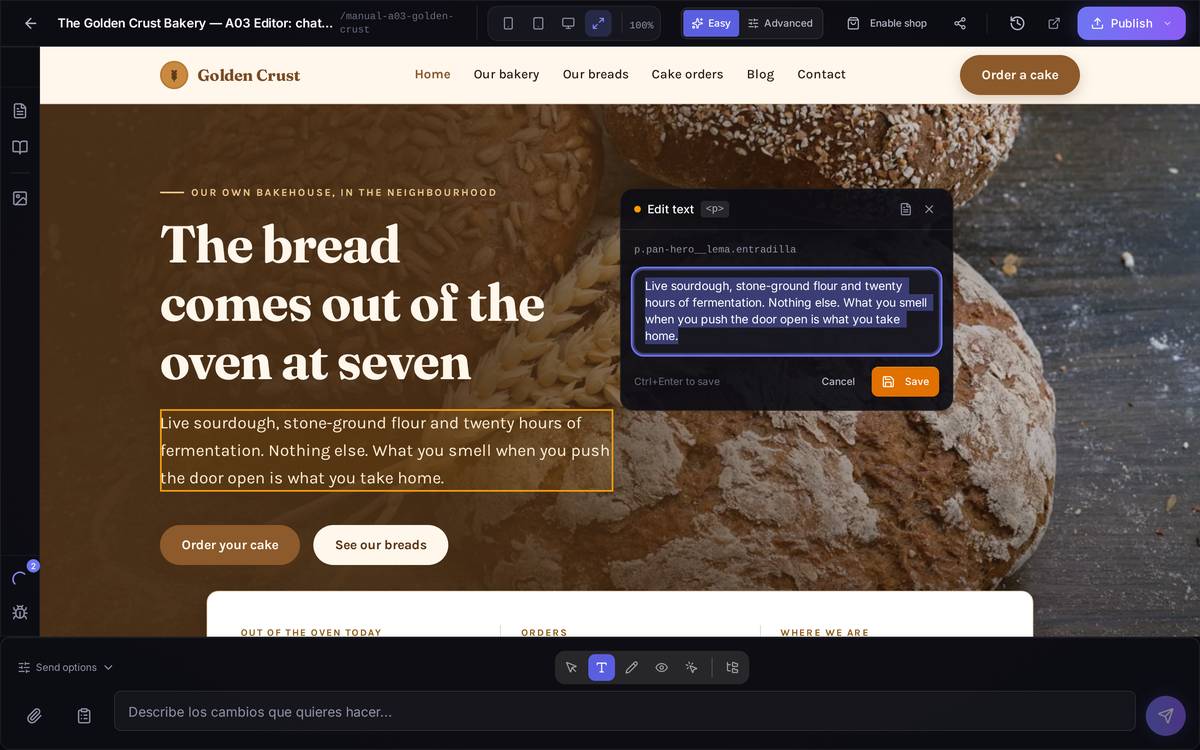
- Image. Lets you swap the image or change its alternative text, which is the description read by search engines and screen readers.
- Link. You change the visible text, the destination address and whether it opens in a new tab.
- Form field. You change the label, the helper text, the field's internal name, its type (email, text…) and whether it's required.
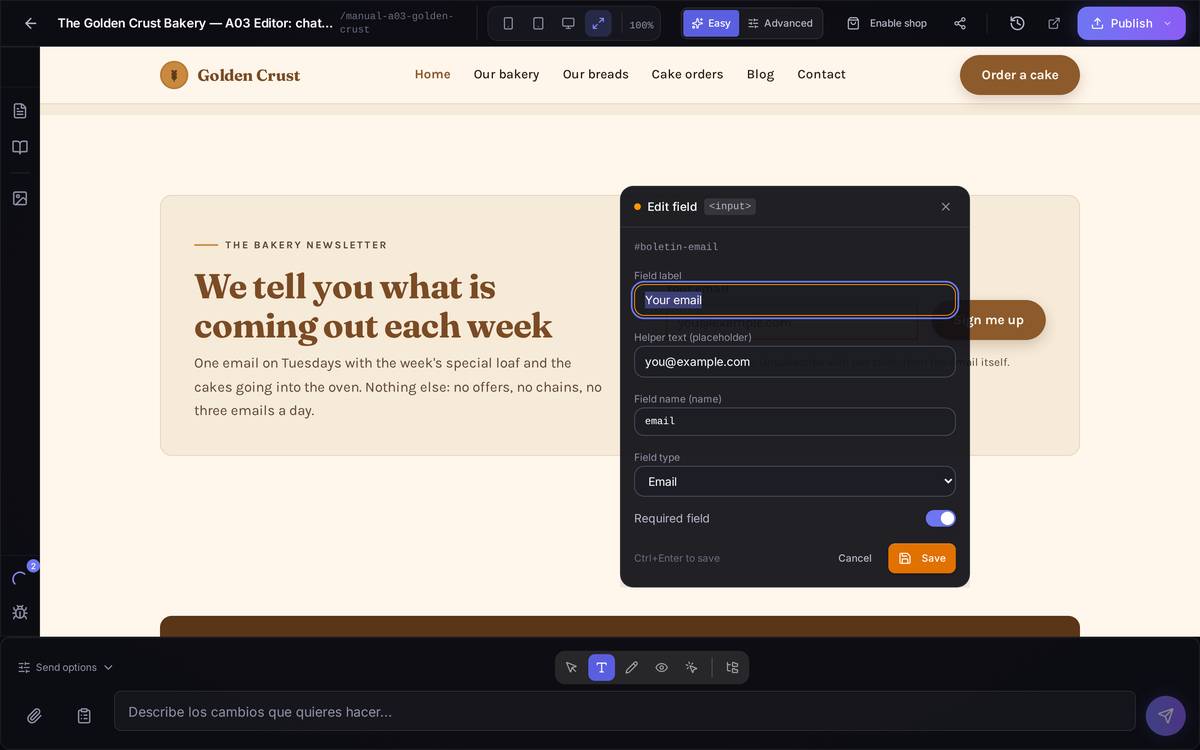
A full example. You've typed "bakerry" instead of "bakery" in the home page intro:
- Open the editor and press the T icon (Edit text/image).
- Click on the wrong wording in the preview.
- Fix the word in the little panel that opens.
- Press Save. The green flash confirms the change.
- It's still an unpublished change: press Publish when you want your visitors to see it.
Watch out for… confusing this mode with the AI. Here you're the one typing: if you delete a whole paragraph and save, there's no "ask it again". To undo it you'll have to type it back in or fall back on the version history in the header.
3.11Seeing your site as it looks on a phone or a tablet
What it's forMost of your visitors will arrive on a phone. This shows you what they'll see, without leaving the editor.
How to get thereThe four icons in the header: phone, tablet, monitor and the double arrow (full width). The width in pixels is shown beside them.
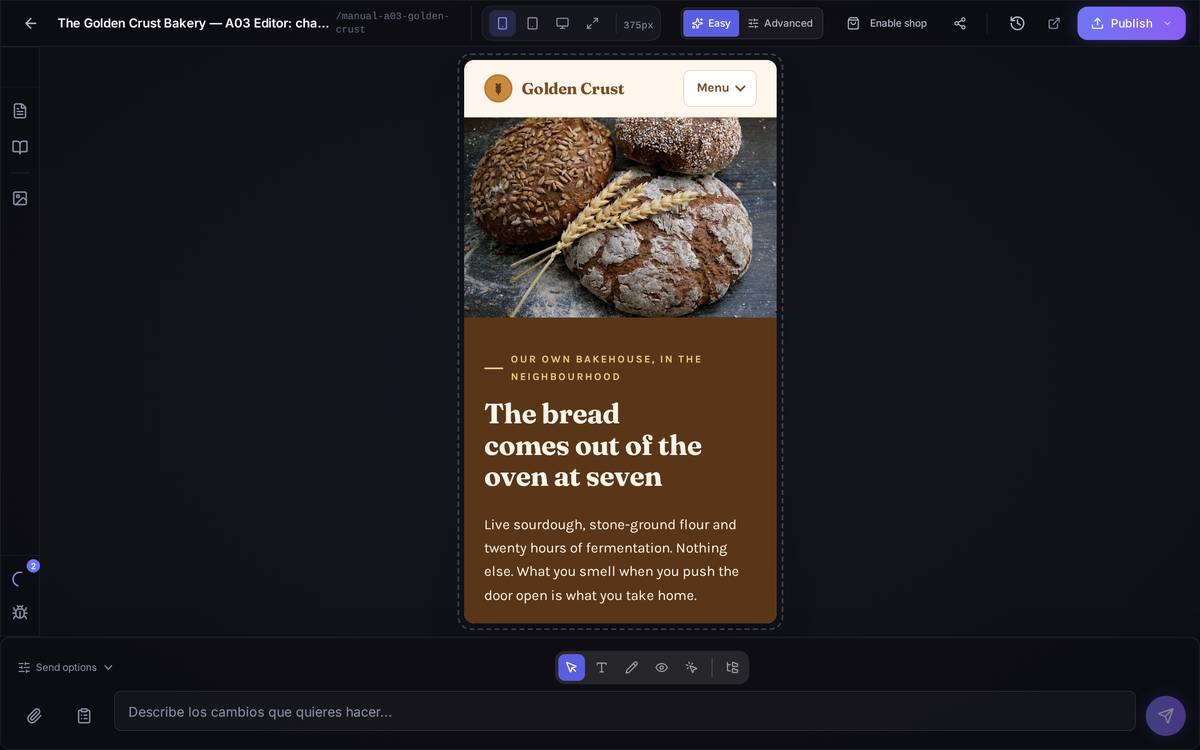
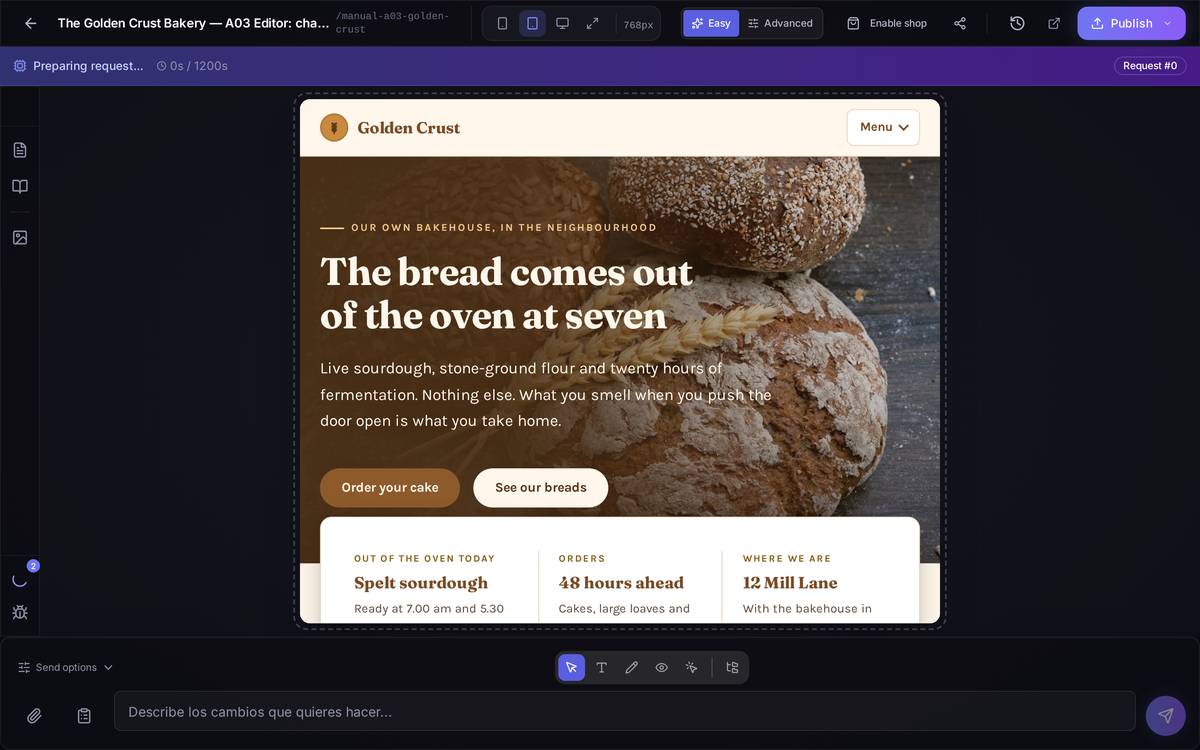
Watch out for… signing off on the desktop version and publishing. A headline that fits on a monitor can break in two on a phone: always look at all three sizes before you publish.
3.12Reporting a bug
What it's forTelling the Speaksite team about something that isn't working, without leaving the editor or hunting for an email address.
How to get thereIn the left-hand bar, the bug icon. It's there in Easy mode.
What's on screen. A title, a description (tell us what you were doing, what you expected and what happened) and an optional space to attach a screenshot, which you can drag in or paste with Ctrl+V.
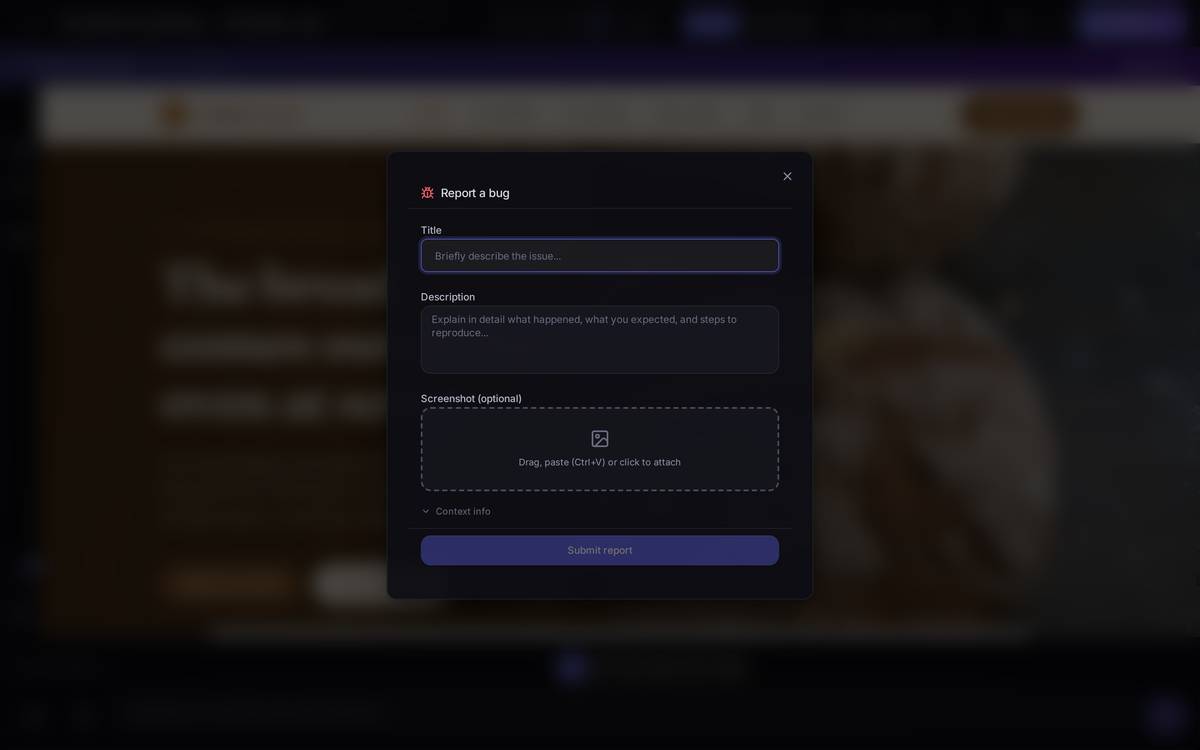
Watch out for… describing it in one line. "Doesn't work" doesn't let anyone fix anything: write down the exact steps you took.
3.13Tools that only exist in Advanced mode
The next four do not appear in Easy mode. If you can't see them, press Advanced in the header.
Asking the AI about your site's content (Sofi)
What it's forAsking questions about your own site and requesting general reviews, rather than changes to one particular page.
How to get thereAdvanced mode → the question-mark-in-a-speech-bubble icon.
What's on screen. A separate chat, with ready-made suggestions along the lines of creating a contact form, analysing your site in depth or improving the copy on the current page, plus a note of how many pages your project has. (Those starter suggestions still come through in Spanish today.)
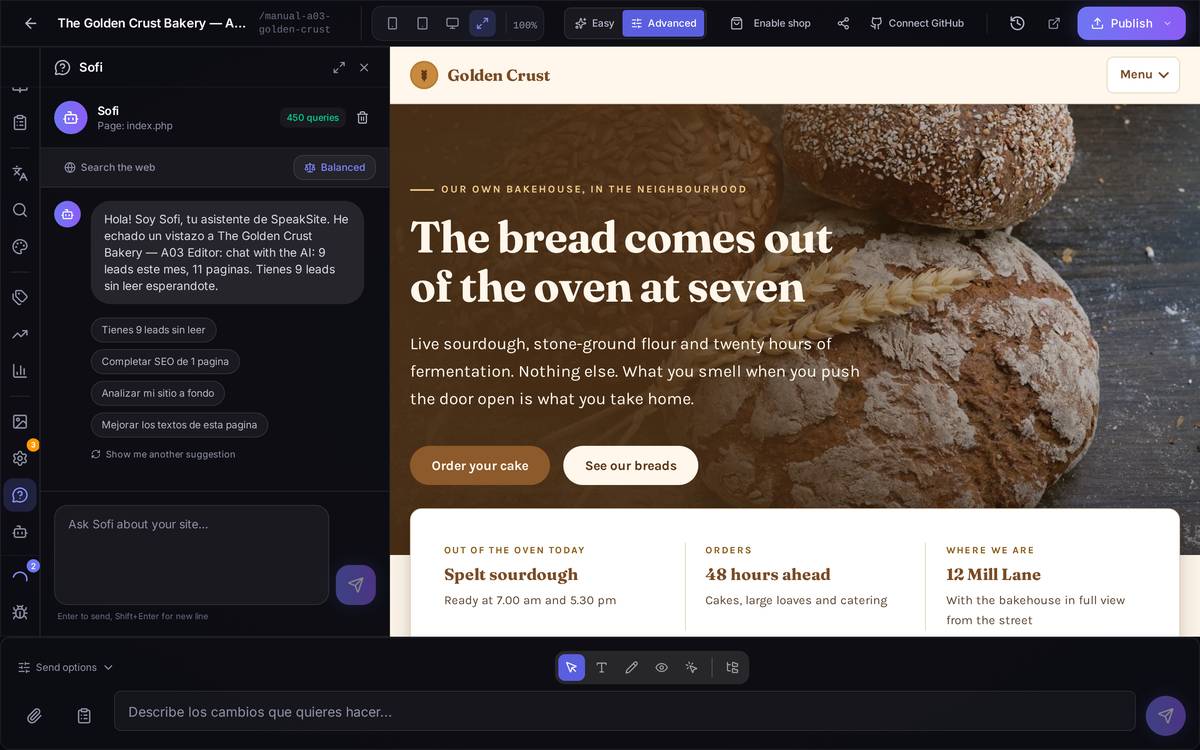
Watch out for… bulk SEO changes: they're shown to you so you can review them before they're applied. Read them, don't accept them wholesale.
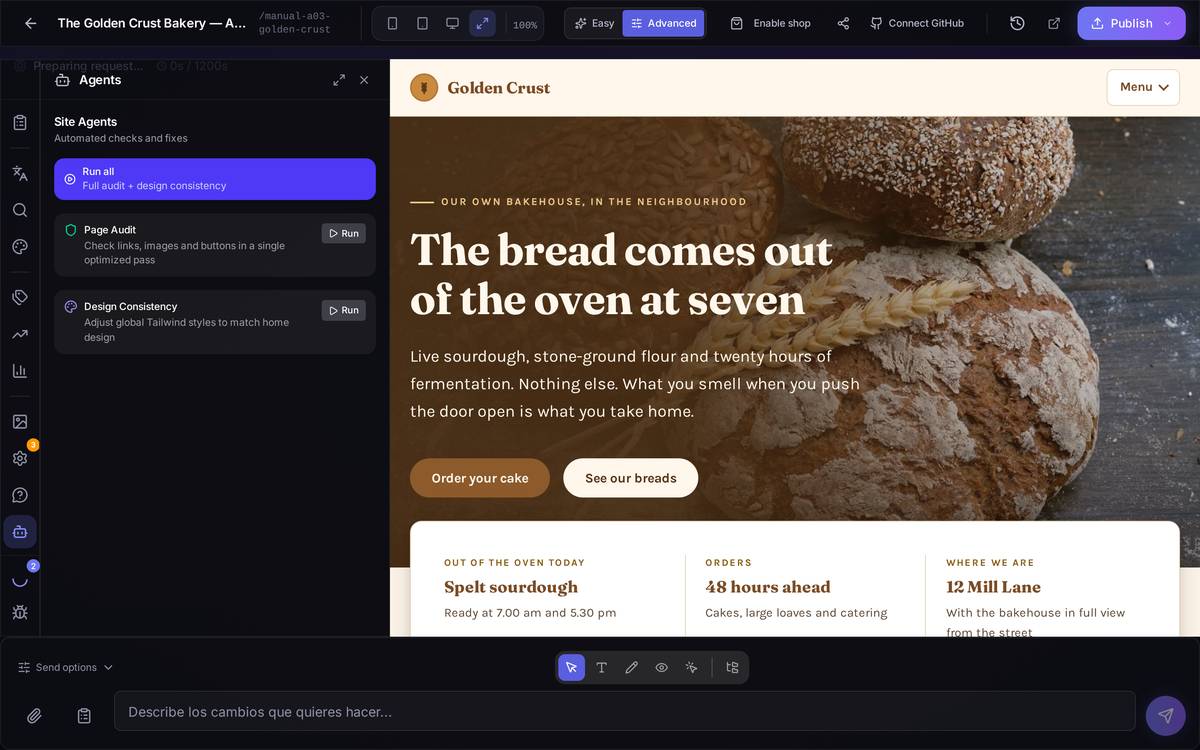
Agents that work for you
What it's forAutomated reviews of the whole site: checking links and images, or that the design is consistent across pages.
How to get thereAdvanced mode → the robot icon.
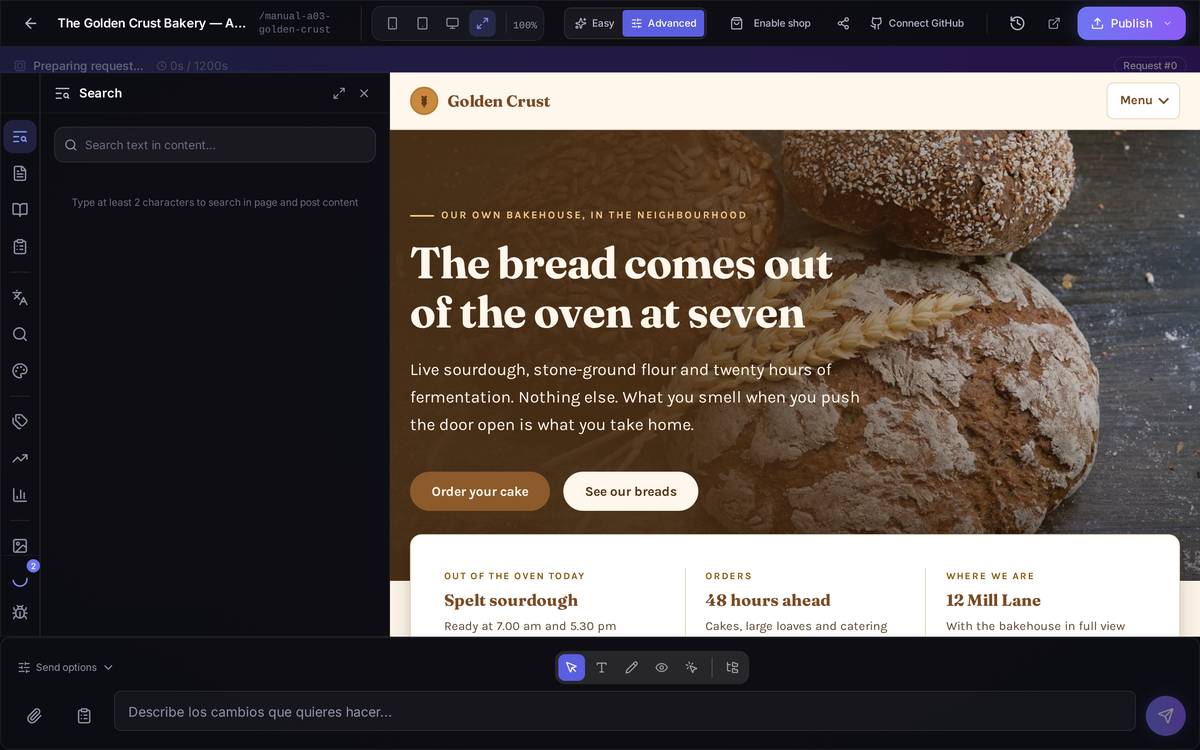
Searching for text across the whole site
What it's forFinding which pages a word appears on, without opening them one by one. Handy before changing a phone number or a price that's repeated.
How to get thereAdvanced mode → the magnifying-glass-with-text icon.
Seeing your site's files and reading the code
What it's forLooking under the bonnet. You don't need it to use Speaksite; it's there for anyone who wants to check something, or to work alongside a developer.
How to get thereThe folder-tree icon, to the right of the five modes.
What's on screen. Your project's folder tree (app, config, public, routes…) and a search box at the top. Clicking a file opens its contents on the right, with the full path above it and buttons to see its history and compare versions.
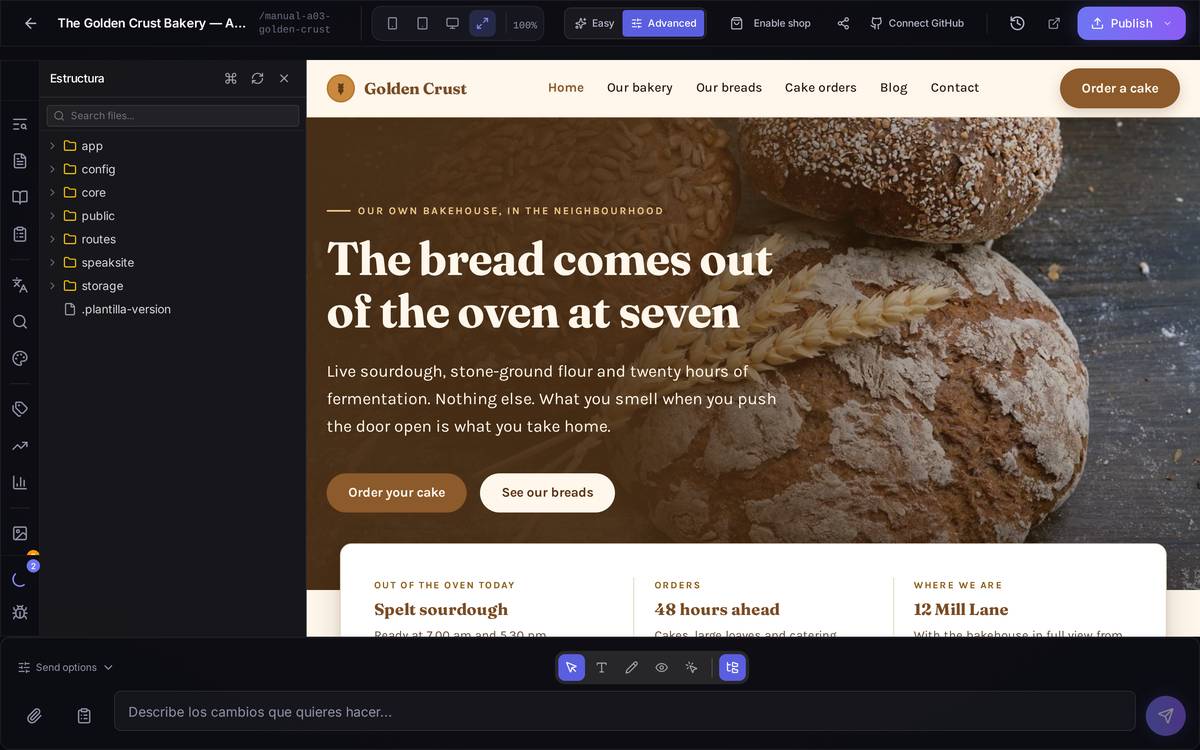
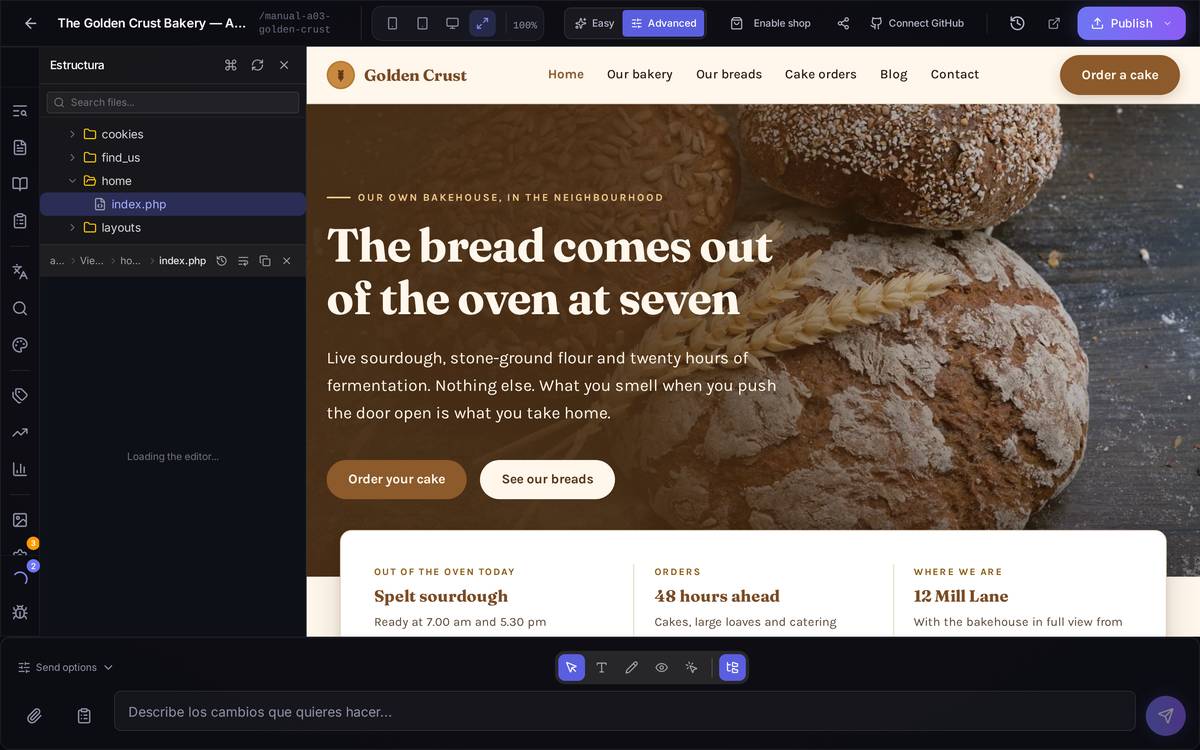
app / Views / home, with its path shown above.Watch out for… this panel's search box: it only finds what you already have unfolded in the tree. Search for "index" with the folders closed and it will tell you "Sin coincidencias" — no matches — even though the file exists. Keep opening folders until you reach it.
3.14Auto-repair notices
Every now and then you'll see a notice saying Speaksite has fixed something in your project by itself (a page that was left half-finished, a link pointing at a page that no longer exists). You don't have to do anything: it's there for information, and it tells you why something looks different from how you left it.
(There's no screenshot of this notice: it only appears when the system detects and repairs a real problem, and none came up in the demo project while this manual was being put together. Forcing one would have meant breaking the project on purpose.)
3.15The questions people ask most
- "I can't find a tool" → you're in Easy mode. Press Advanced.
- "I changed it and my customers can't see it" → you haven't pressed Publish.
- "The AI isn't doing what I ask" → say where, what and what not to touch, and one thing per message.
- "I want to fix a typo without spending anything" → Edit text/image mode (the T): those changes don't use up credits.
- "The change needs to go into the other language too" → switch on "Apply to all languages" before you send.