Chapter 6 of 11
SEO, languages and style
Getting found on Google, speaking several languages and setting your colours and type.
On this page
- 6.1The title and description Google sees for each page
- 6.2Your page's score and what to improve
- 6.3The links between your pages
- 6.4Structured data for Google (and for the AIs)
- 6.5The default SEO values for your whole site
- 6.6The sitemap
- 6.7The AI's recommendations for how your site looks
- 6.8Your site's colours
- 6.9Your site's typefaces
- 6.10Your site's languages
- 6.11Adding a new language, step by step
- 6.12Translating a page
- 6.13Measuring visits with Google Tag Manager
- 6.14Your Google Ads campaigns
- 6.15Your site's visits
- 6.16Choosing which part of your shop you're designing
- 6.17The shop screens you can design
- 6.18Search Console: whether your site is on Google
- 6.19Search Console: fixing a problem with the AI
- 6.20Google Tag Manager: connecting your account without pasting anything
- 6.21Measuring visits with your own Google Analytics account
- 6.22Measuring your ChatGPT ads, step by step
This part of the panel is where you get your site found on Google (and on the search tools that run on artificial intelligence), where you make it readable in several languages, and where you decide in one go which colours and typefaces your whole site uses.
Almost every screen in this area lives inside Advanced mode. You'll see an "Easy / Advanced" switch at the top of the editor: if you haven't set it to Advanced, you won't find most of what is explained here — it's the number one cause of "I can't find it". The two exceptions are your shop's design (screens 16 and 17 of this guide), which you can also reach in Easy mode from the shop menu.
A note about "GEO", or getting found in AI-powered search: there is no button in the panel that says "GEO". What exists today with that goal in mind are two tools you already have under the SEO icon: the score and analysis of each page, and "structured data" (further down, screen 4). The better your pages score and the more structured data they carry, the easier you make it for ChatGPT, Gemini or Google itself to understand your business and cite you when somebody asks about something related. It's one of the product's flagship ideas: this isn't only about appearing in a list of blue links, it's about an AI being able to read your site, understand it and recommend you.
6.1The title and description Google sees for each page
What it's forEvery page on your site has a title and a description, and they're the first thing anyone reads in Google's results (or in an answer from an AI). This is where you write them.
How to get thereOpen your project's editor, switch on Advanced mode at the top, and click the magnifying glass icon (SEO) in the left-hand bar. It opens on the Metadata tab.
What's on screen. The title and the description each have a character counter beside them (for example "49/60"): that number isn't decoration, it's the length Google usually shows in full; going over means it gets cut off with an ellipsis. There's also a Regenerate SEO with AI button that proposes a title and description on its own, a "Keywords" field, and an advanced area with the Twitter Card type, the image shown when the link is shared (OG Image) and the canonical URL.
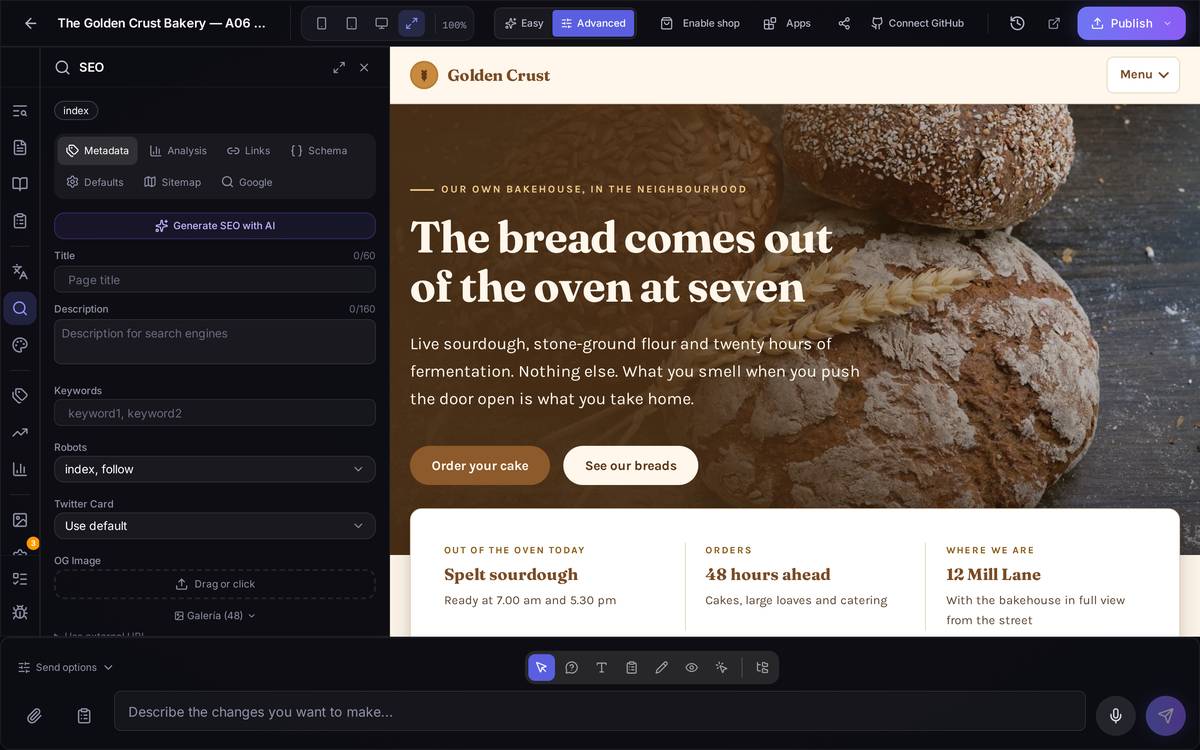
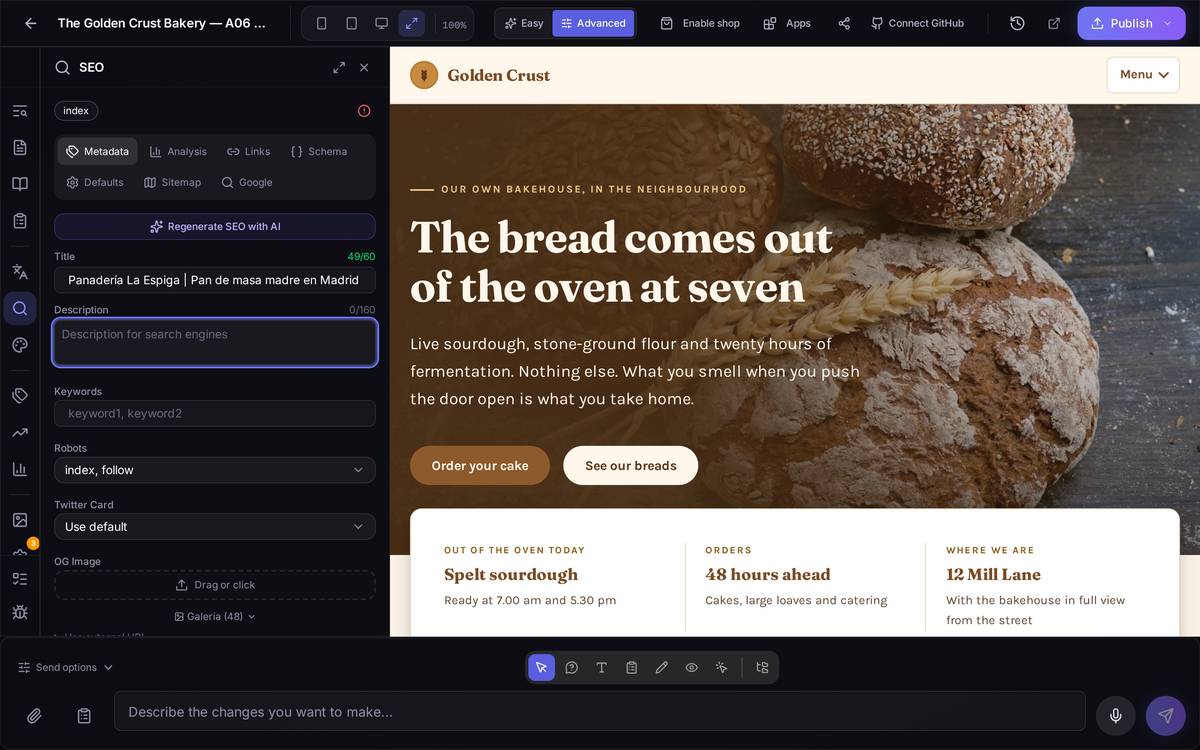
An example, step by stepYou want your Contact page to do better on Google. You go to Advanced → the SEO icon → the Metadata tab with the Contact page selected. In Title you write something like "Contact | [Your business name]" and in Description, two sentences with what people need in order to call you or write to you (opening hours, town, what you solve). Check the counter: if it's red, shorten it. Save. That's it — you don't need to publish for it to show up in the analysis on the next screen.
Watch out for… The "Regenerate SEO with AI" button overwrites whatever you have written on that page. If you'd already fine-tuned it by hand, keep a copy of the text somewhere else before clicking it.
6.2Your page's score and what to improve
What it's forIt gives each page a mark out of 100 and tells you, point by point, what it needs in order to climb. It's where you come back to after touching the title or the description, to check whether you've actually improved anything.
How to get thereWith the SEO panel open (Advanced mode), click the Analysis tab.
What's on screen. A large circle with the SEO Score (56, for example). Below it, the Readability of your text, using a formula built for English (Flesch-Kincaid) — the higher, the easier it reads. And an expandable SEO Structure list with coloured dots: green means fine, red means missing, and every line can be opened to see the detail. The "Focus keyword" field is the one that changes the result the most: leave it empty and the analysis only checks the basics (title, description, headings); type in the phrase you want to be found for and the analysis adds specific checks about that phrase.
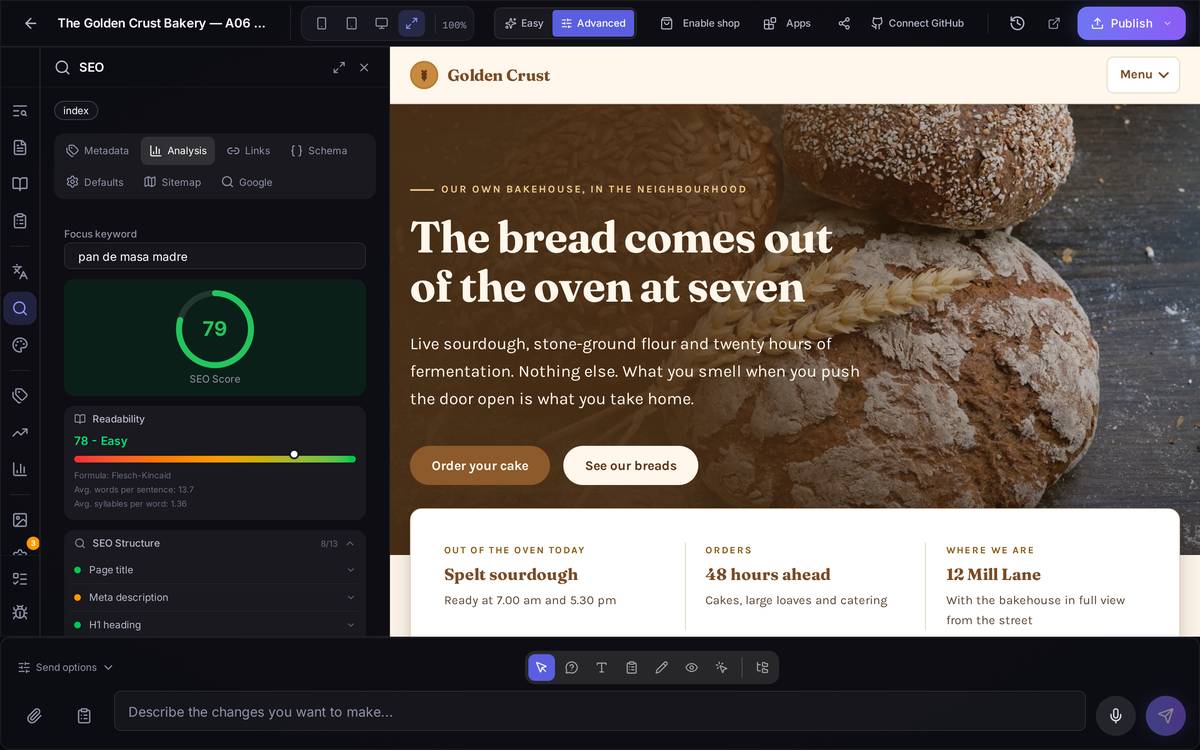
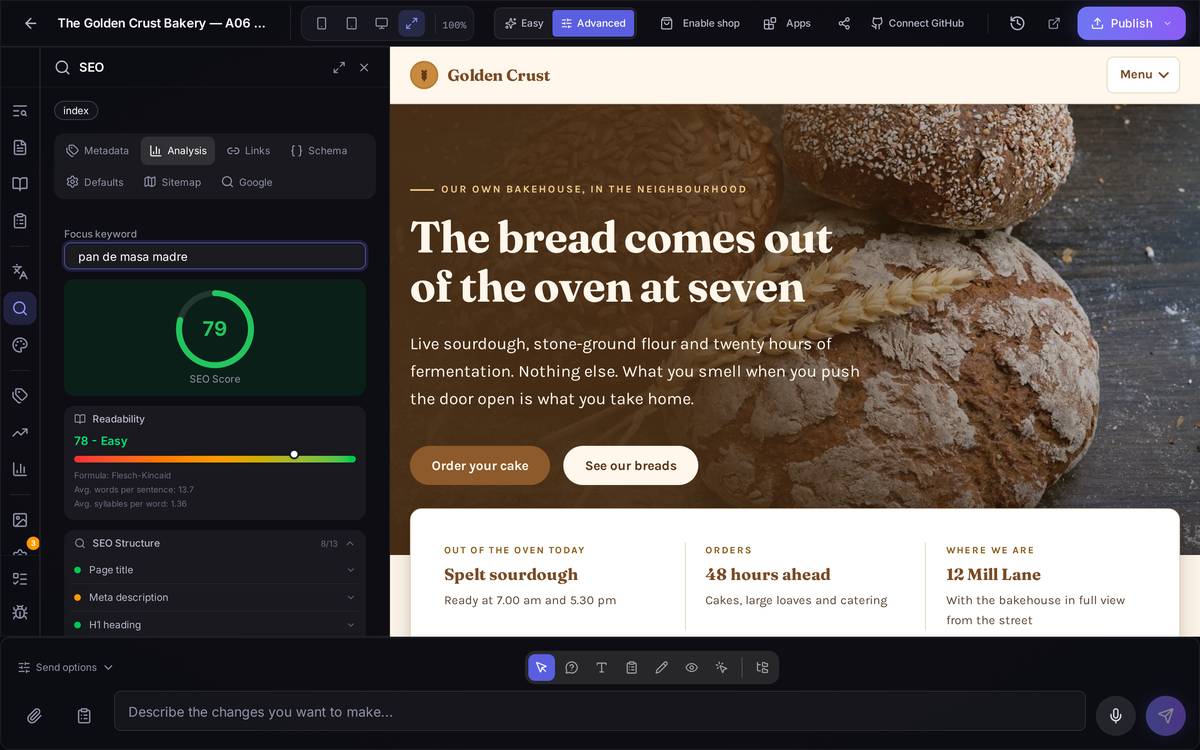
An example, step by stepYou're still on the Home page and you want to raise the score. You open Analysis and type into "Focus keyword" what your customer actually searches for (for example "sourdough bread in Dublin"). You look down the SEO Structure list: if "Meta description" is red, you go back to the Metadata tab, fill it in and come back to see whether the dot has turned green.
Watch out for… The score isn't an exam you pass once and forget: it changes every time you touch the page's content. Don't obsess over reaching 100; a high readability score and no red dots in the structure already means a well-made page.
6.3The links between your pages
What it's forIt shows you which pages on your site link to each other and, above all, which ones have been left with no link leading to them — those "orphan" pages you can only reach by typing the address by hand, and which Google finds much harder to discover.
How to get thereSEO panel (Advanced) → the Links tab.
What's on screen. Two views with tabs of their own: Current page (the links of the page you have open only) and Global view (the whole site at a glance). In the global view you'll see three numbers — pages, links and an average — and, most usefully, the list of Orphan pages with a warning in yellow.
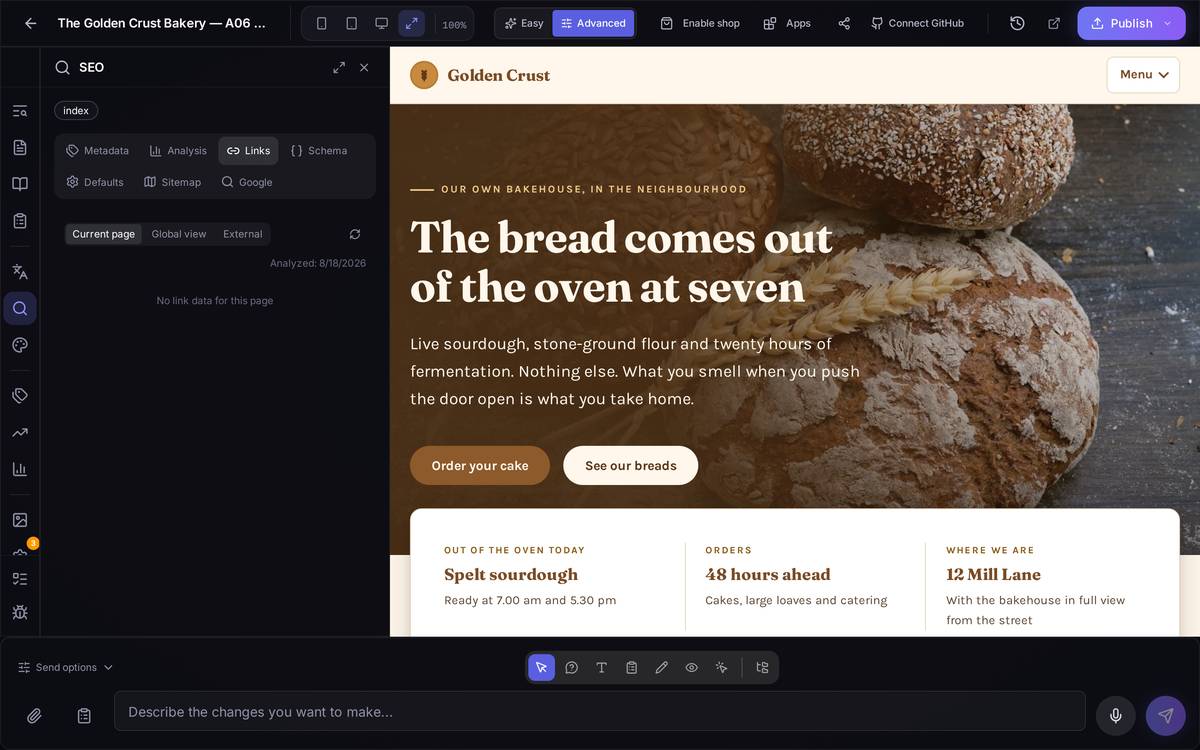
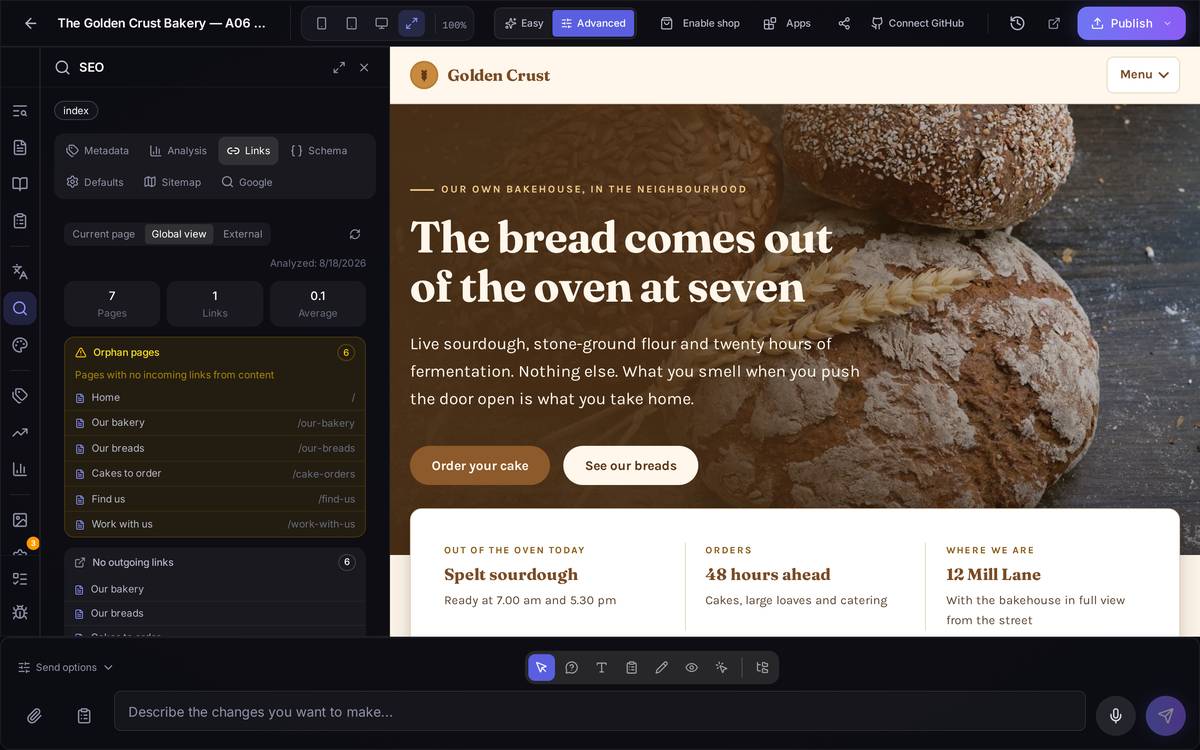
An example, step by stepYou see in the Global view that "Our breads" shows up as an orphan. You go to your Home page (or the menu), add a sentence with a text link pointing to "Our breads" ("discover our range of craft breads"), save, and come back to the Links tab to check that it has dropped off the orphan list.
Watch out for… This screen doesn't create links for you, it only warns you that they're missing; you have to add them by hand from the page's content (a button, a menu, a text link).
6.4Structured data for Google (and for the AIs)
What it's forIt's the tool most directly tied to getting AI-powered search to understand your business, not just your text: here you tell Google explicitly (and tools such as ChatGPT or Gemini when they crawl your site) what your page is — a local business with opening hours and an address, a product listing with its price, a list of frequently asked questions — in a format machines read without ambiguity. It's the closest thing the panel has today to "SEO for AI".
How to get thereSEO panel (Advanced) → the Schema tab.
What's on screen. If the page has nothing configured, you'll see "No structured data found on this page". The Add Schema button opens a dropdown with the available types: FAQPage (frequently asked questions), Organization, LocalBusiness (a business with an address and opening hours), BreadcrumbList, Product, Service, Article, WebSite. You can fill it in by hand (the "Manual (JSON)" tab) or let the AI generate it from your description of the page.
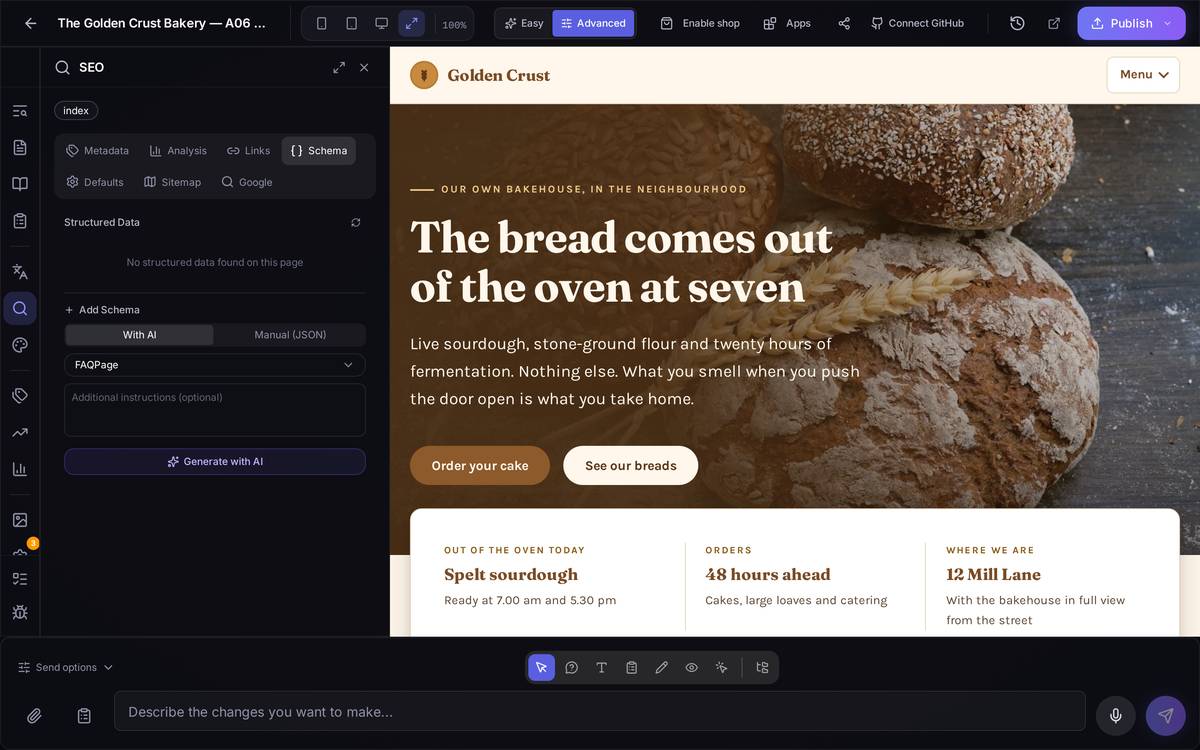
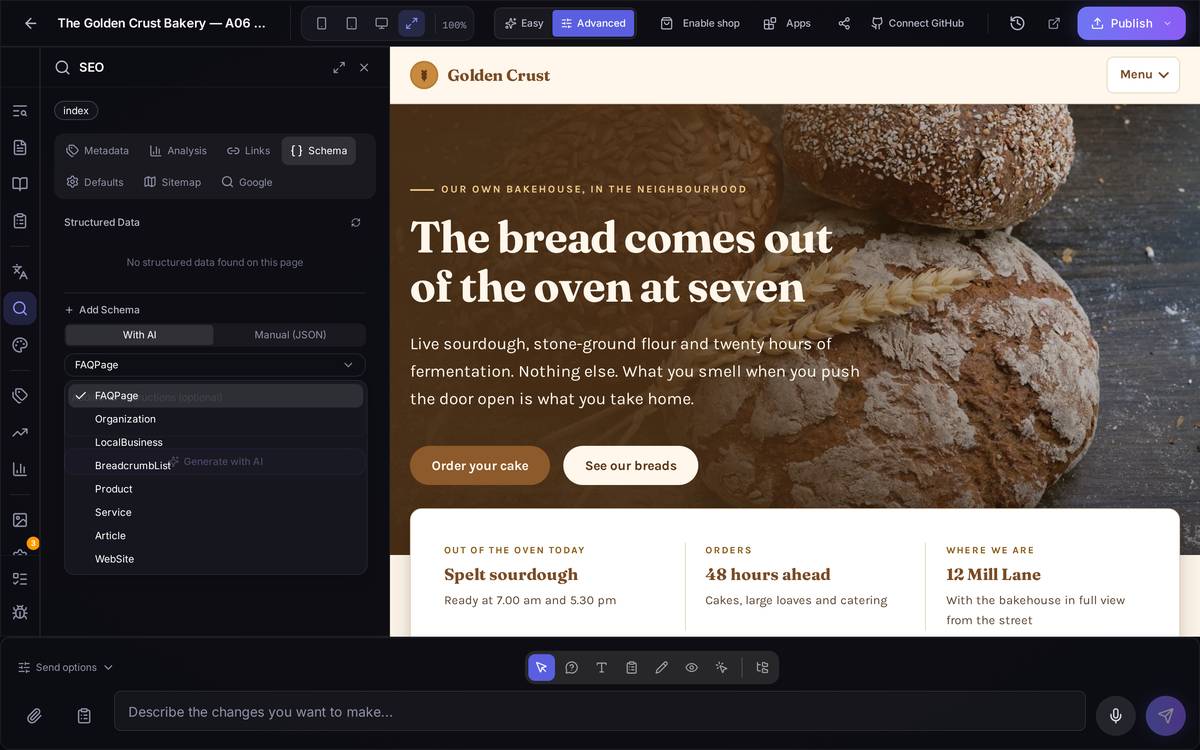
An example, step by stepYour business has a physical address and opening hours, and you want it to show up properly on Google Maps and for an AI to know where you are and when you open. On the Schema tab you click "Add Schema", choose LocalBusiness from the dropdown, write something like "a bakery at 12 Mill Lane, Dublin, open from 7:00 to 20:30" into "Additional instructions" and click Generate with AI. Review the result before saving: the AI proposes the fields, but the data (address, phone number) has to be exact.
Watch out for… A piece of structured data that's wrong (an address or a set of opening hours that don't match reality) can confuse more than it helps — Google and the AIs treat it as reliable, so review it with the same care as the text of the page itself.
6.5The default SEO values for your whole site
What it's forInstead of repeating the same thing on every page, this is where you define what gets applied automatically to all the pages that don't have a value of their own: the suffix added to the end of every title, the site name that appears when a link is shared, and the type of card shown on Twitter/X.
How to get thereSEO panel (Advanced) → the Defaults tab (the last one; it can end up hidden off to the right if your window is narrow — scroll with the tab arrows).
What's on screen. A purple notice reminds you that "these values apply site-wide unless overridden per page" — that is, what you put here is the fallback, not what wins if a particular page already has its own title. The fields are: Title suffix, Open Graph type, Site name (OG) and Default Twitter card.
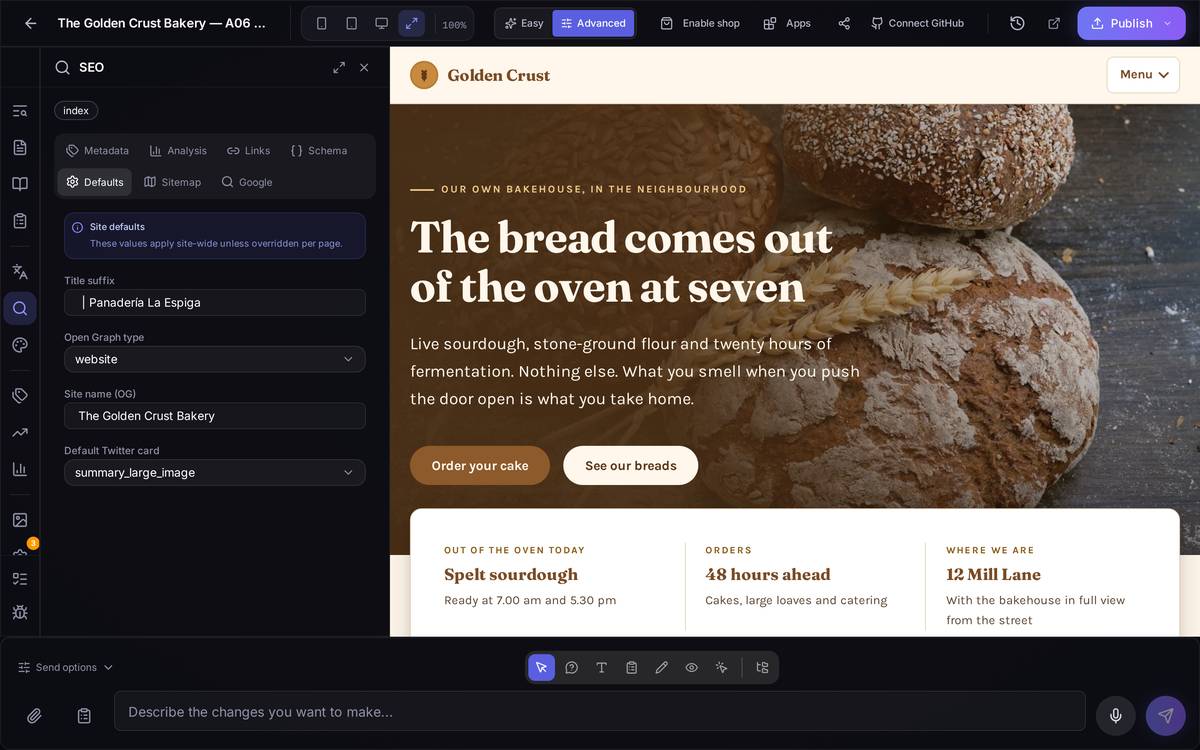
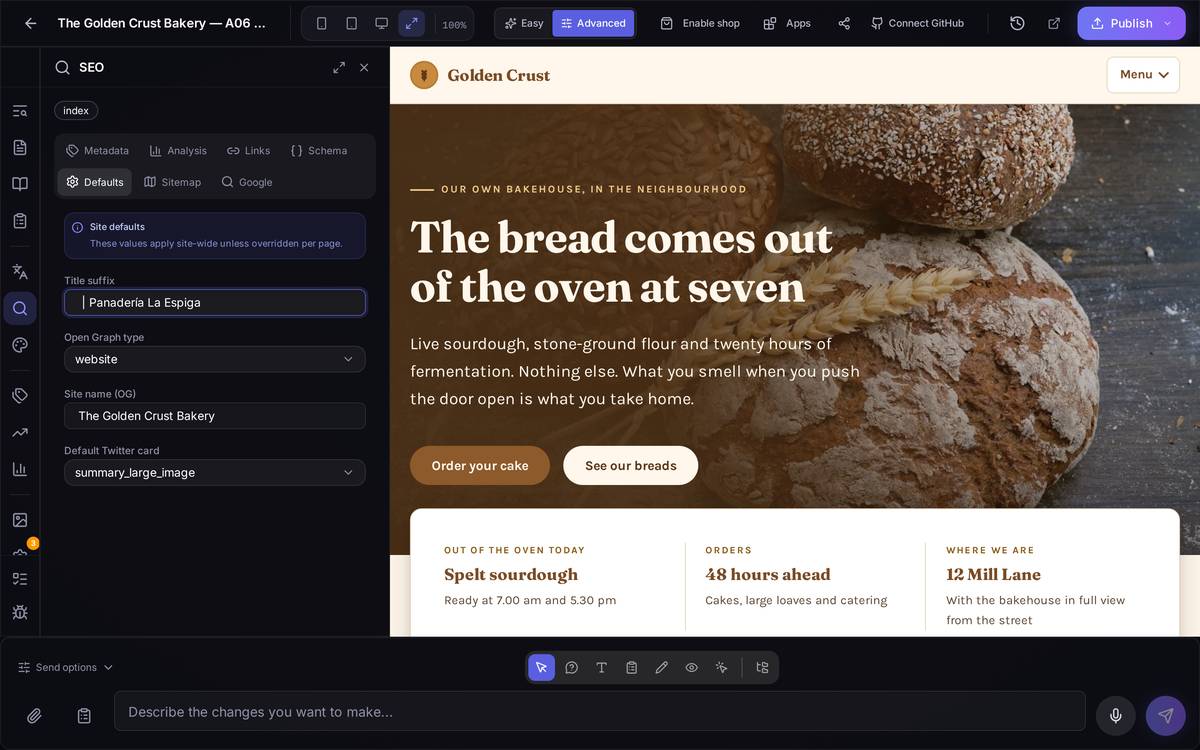
An example, step by stepYou want all your pages to end with your business name in the title, without having to type it a hundred times. In Title suffix you write " | The Golden Crust Bakery" and save. From then on, any new page without its own suffix will inherit this one.
Watch out for… If a page already has a complete title written by hand on the Metadata tab (screen 1), the suffix from here isn't tacked on to it — the default values only fill gaps, they don't add themselves to what already exists.
6.6The sitemap
What it's forThe sitemap is a technical listing of all your pages that you hand to Google so it crawls them faster and doesn't miss any. Here you generate it and review it without having to touch anything by hand.
How to get thereSEO panel (Advanced) → the Sitemap tab.
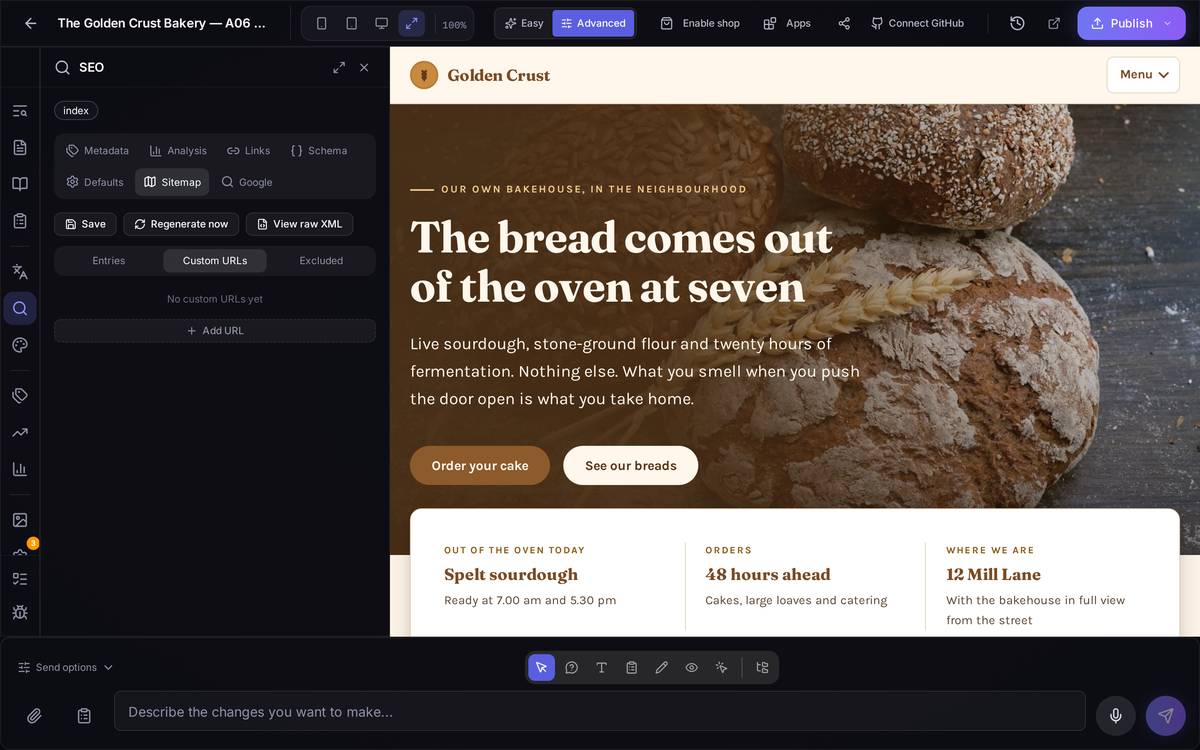
What's on screen. Three buttons at the top: Save, Regenerate now and View raw XML. Below them, three tabs: Entries (what has been generated automatically), Custom URLs (for adding addresses you want to include by hand, for example if you have content outside the editor itself) and Excluded (pages you don't want in the map, such as a draft).
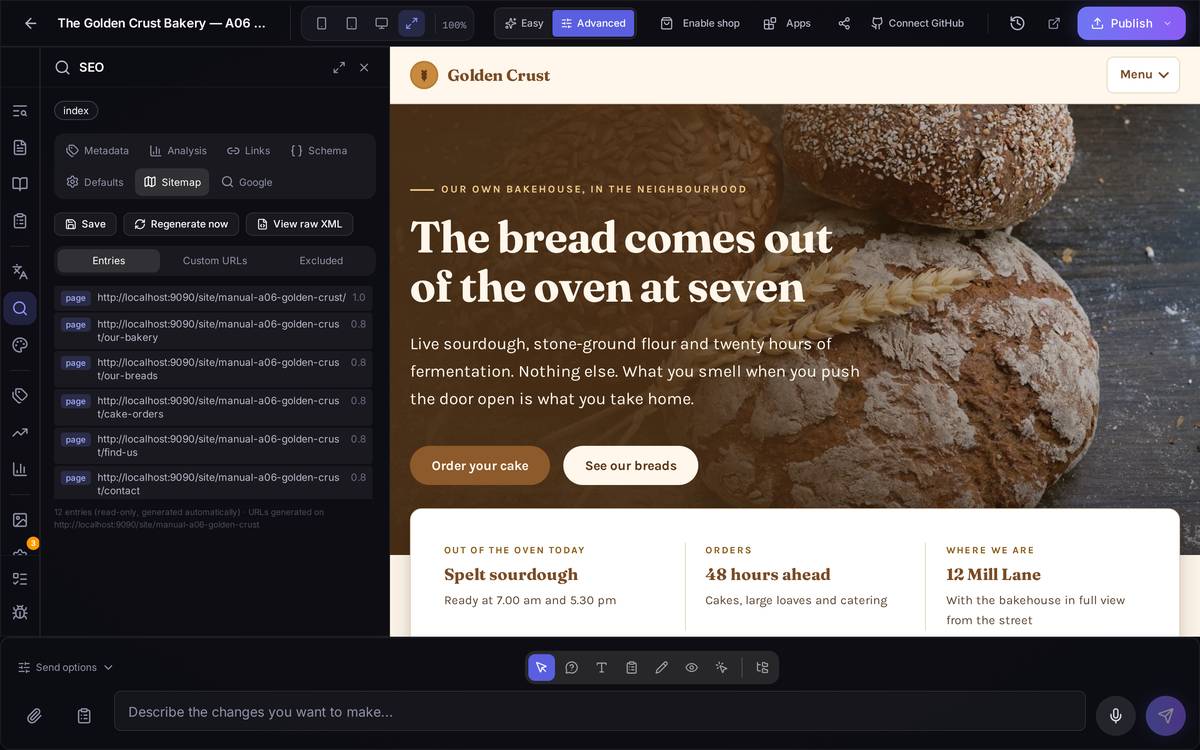
An example, step by stepYou've added new pages to your site and you want to be sure Google finds out. You open the Sitemap tab and click Regenerate now: this rebuilds the list of entries with your site's current pages. With View raw XML you can check the result exactly as Google would see it.
Watch out for… When you open this tab you may get the red "Failed to load sitemap" warning straight away. It's a known bug we're looking into (it's written up in this area's bug annex); the rest of the screen — Save, Regenerate now, View raw XML — carries on working normally, it's only the "Entries" list that fails to load on its own.
6.7The AI's recommendations for how your site looks
What it's forIt's the starting point of the style guide: you describe your business to the artificial intelligence and it proposes colours and typefaces that fit, instead of you having to choose them from scratch.
How to get thereIn the editor, in Advanced mode, click the palette icon (Styles) in the left-hand bar. It opens on the AI tab.
What's on screen. At the top, a summary of your current styles: the five colours and the two fonts (headings and body text) your site uses today. The Apply style guide to this page button dumps those styles onto the page you have open — with a separate checkbox, "Also apply to other languages", if your site has more than one. Further down, the Describe your business or website box, some "Quick inspirations" chips (an artisan coffee shop, a tech startup…) that fill the box for you, and the Generate with AI button.
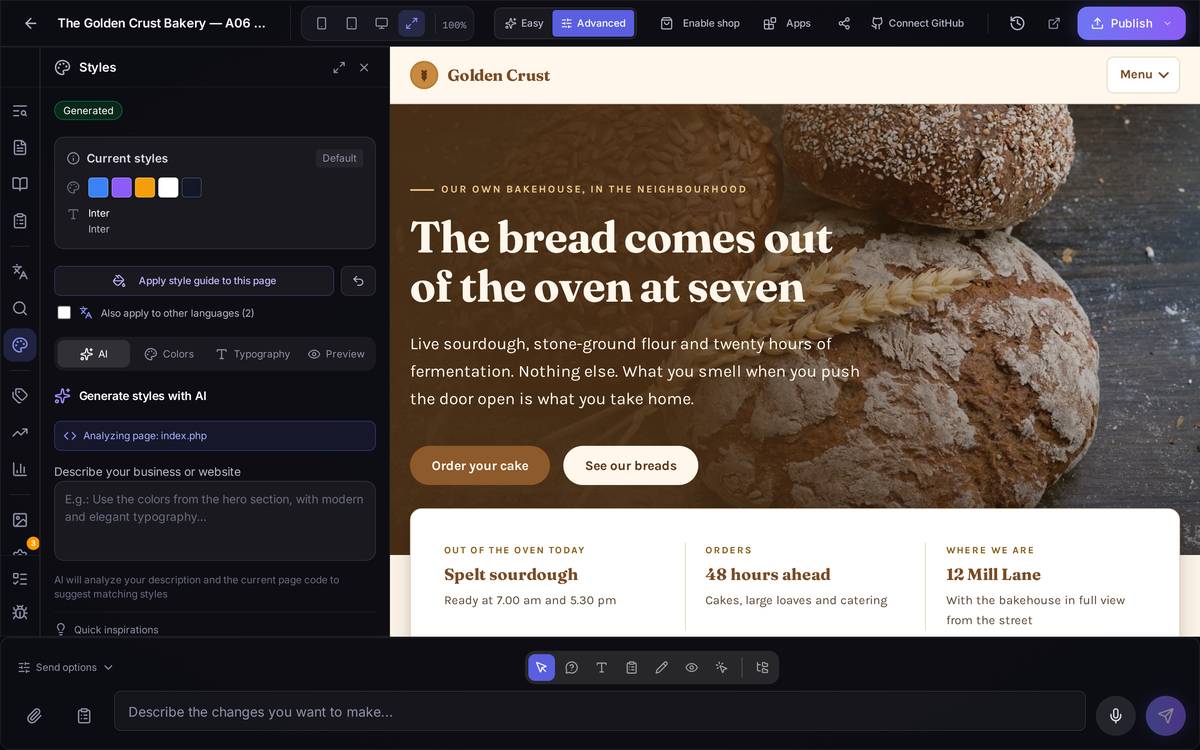
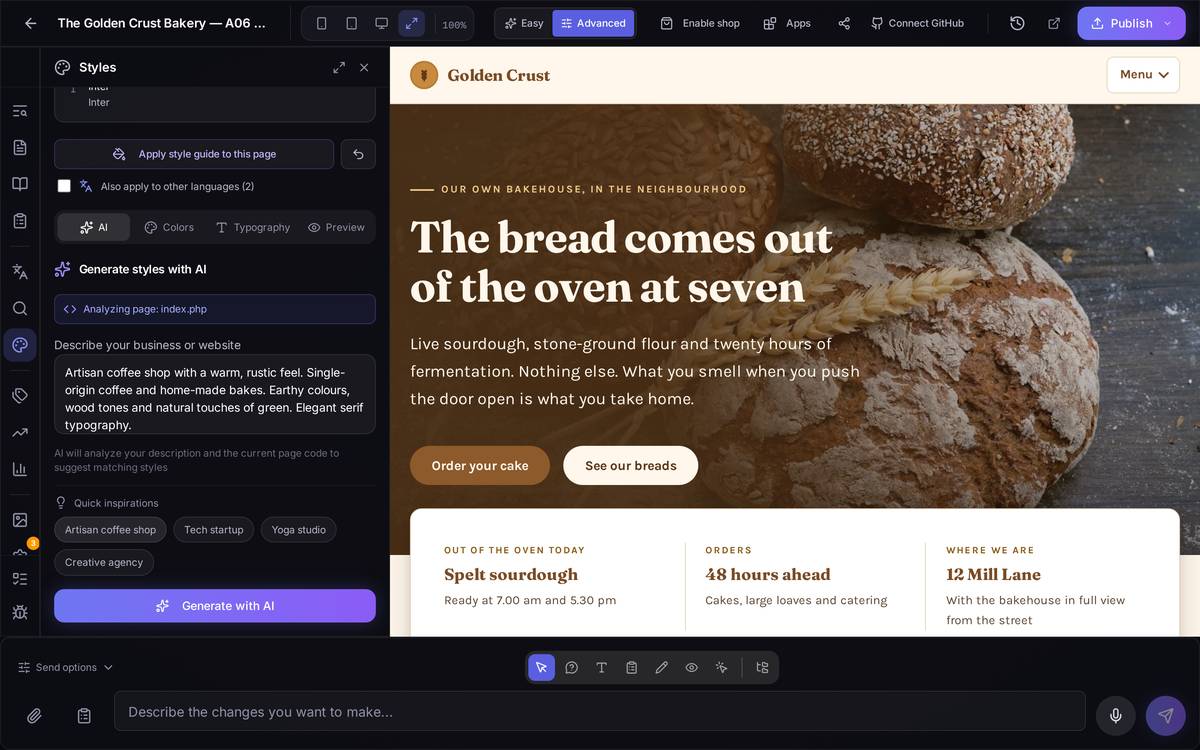
An example, step by stepYou want a look that says "neighbourhood bakery, warm and hand-made". You write something like "A neighbourhood bakery with a warm, hand-made feel, earth tones and typography with character" into the box and click Generate with AI. The AI proposes a palette and a pair of fonts; if you like them, you apply them from the Colors and Typography tabs (screens 8 and 9) or with the "Apply style guide to this page" button.
Watch out for… Generate with AI spends credits from your plan every time you click it — think the description through before you launch it rather than working by trial and error.
6.8Your site's colours
What it's forChange the colours of your entire site in one go: the main colour of the buttons, the secondary one, and the light and dark variants used in backgrounds and text.
How to get thereStyles panel (Advanced) → the Colors tab.
What's on screen. A box for extracting colours from an image: you upload your logo (or any image from your brand) and the platform pulls a ready-to-apply palette out of it. Below that, the Primary, Secondary, Light and Dark fields, each with its little colour square and its hexadecimal value (the six-character code, like #B5651D).
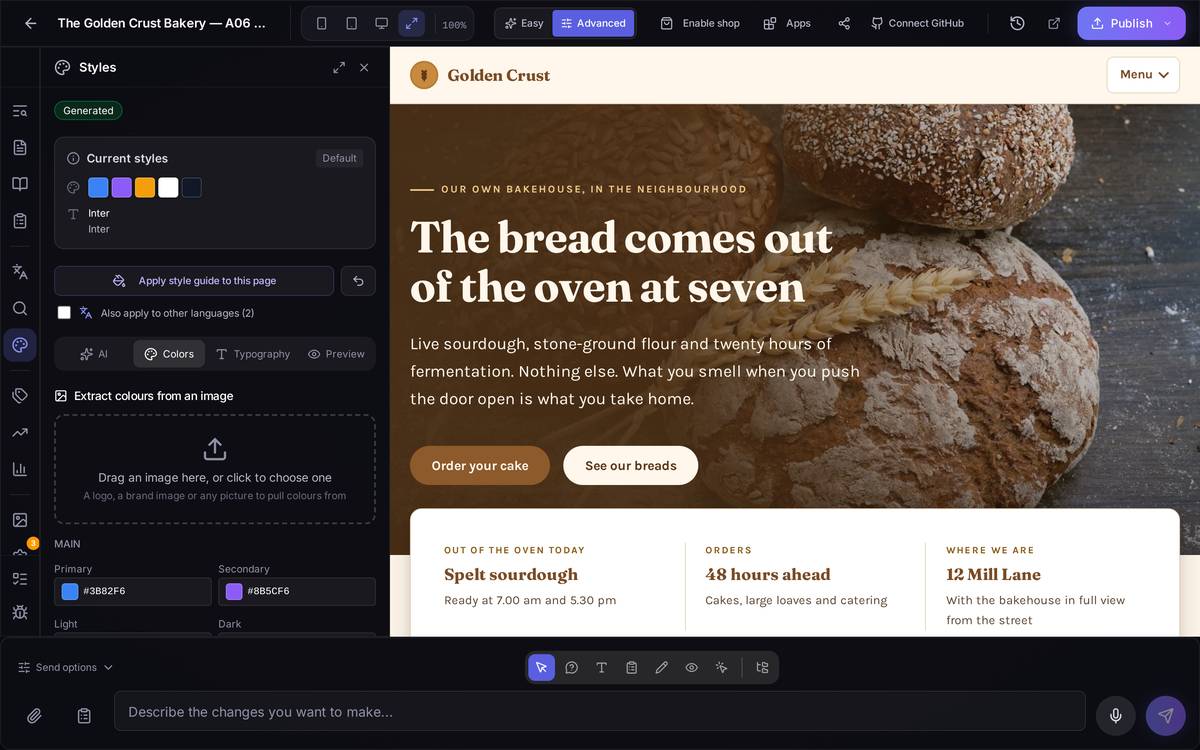
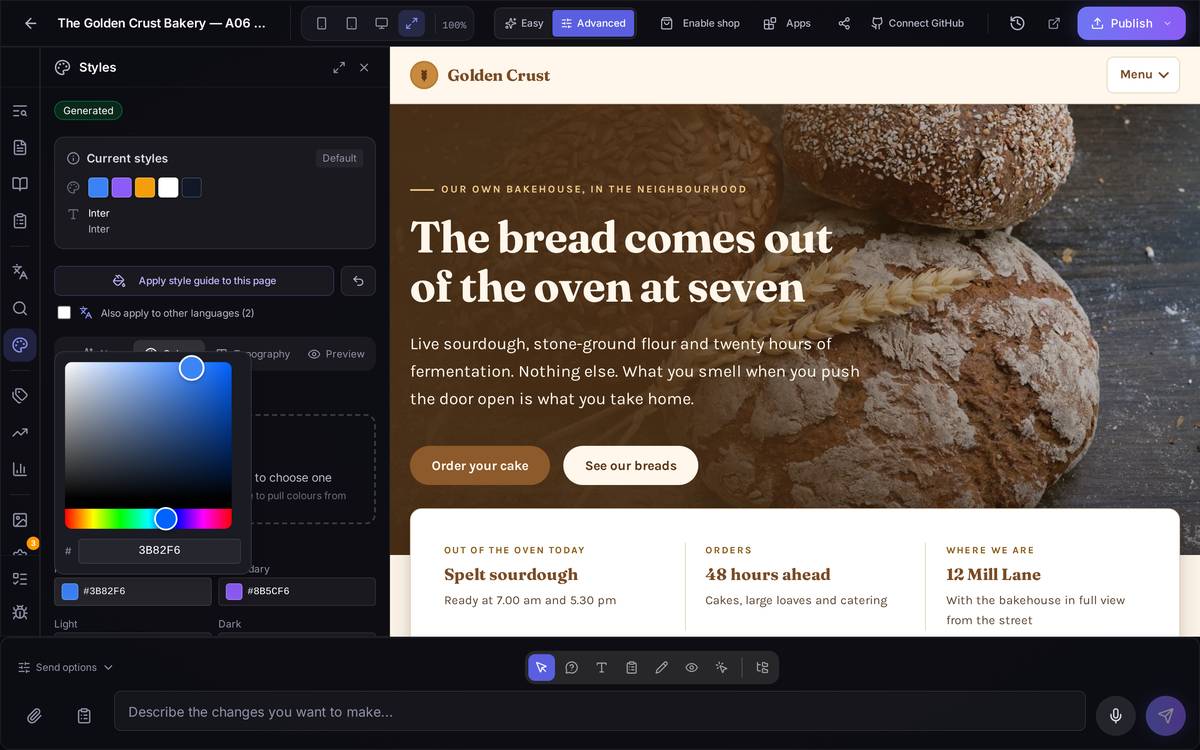
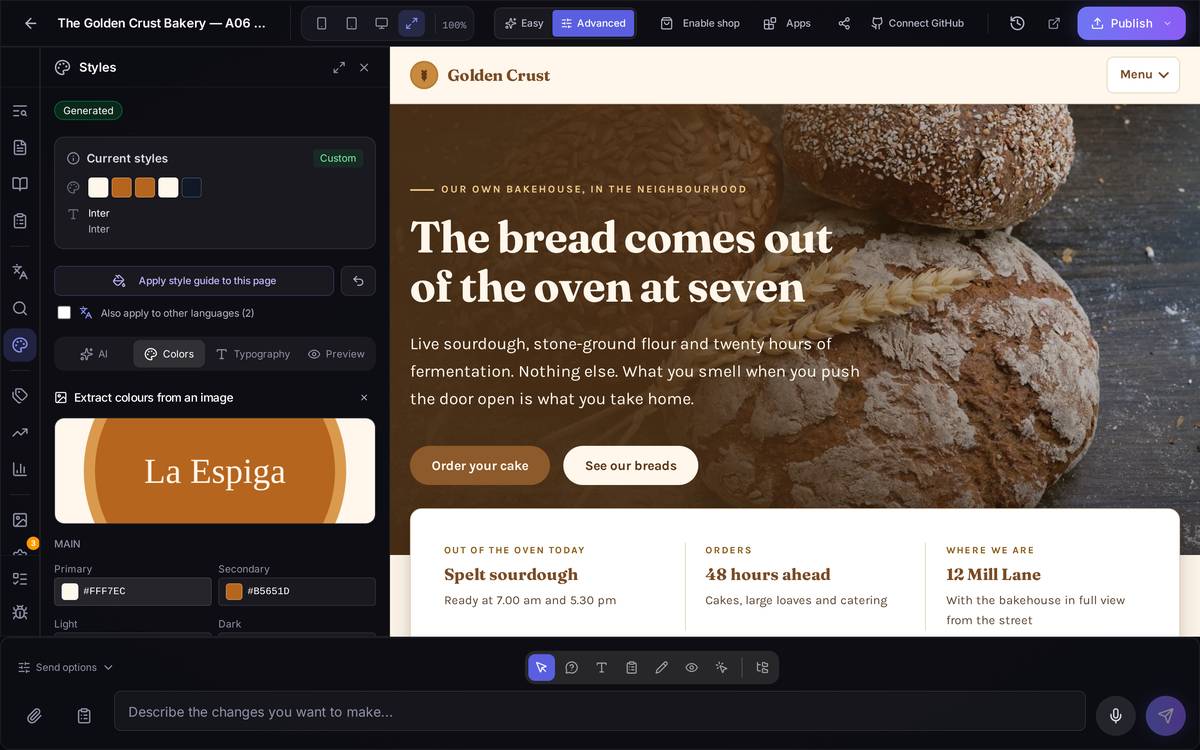
An example, step by stepYou have your logo in a file and you want your site's colours to go with it. On the Colors tab, you drag the logo into the extract-colours-from-image box. The platform proposes a palette based on the image: check that the result has enough contrast (if your logo is very pale or very flat in colour, the extracted palette can come out just as flat, as you can see in the second screenshot) and adjust by hand whichever colour doesn't convince you by clicking its square.
Watch out for… This is where one of the three known traps in this area comes in: there's an internal file that decides, in the last instance, which colours actually show on your published site. If you change a colour here and don't see the change reflected in some very specific corner of your site, it isn't you — we explain it in detail at the end of this section, in the general "watch out for the style guide" warning.
6.9Your site's typefaces
What it's forThe same as the colours, but for typography: which typeface the headings use, which one the body text uses, what size everything starts from, and the option to upload your own font if your brand has one.
How to get thereStyles panel (Advanced) → the Typography tab.
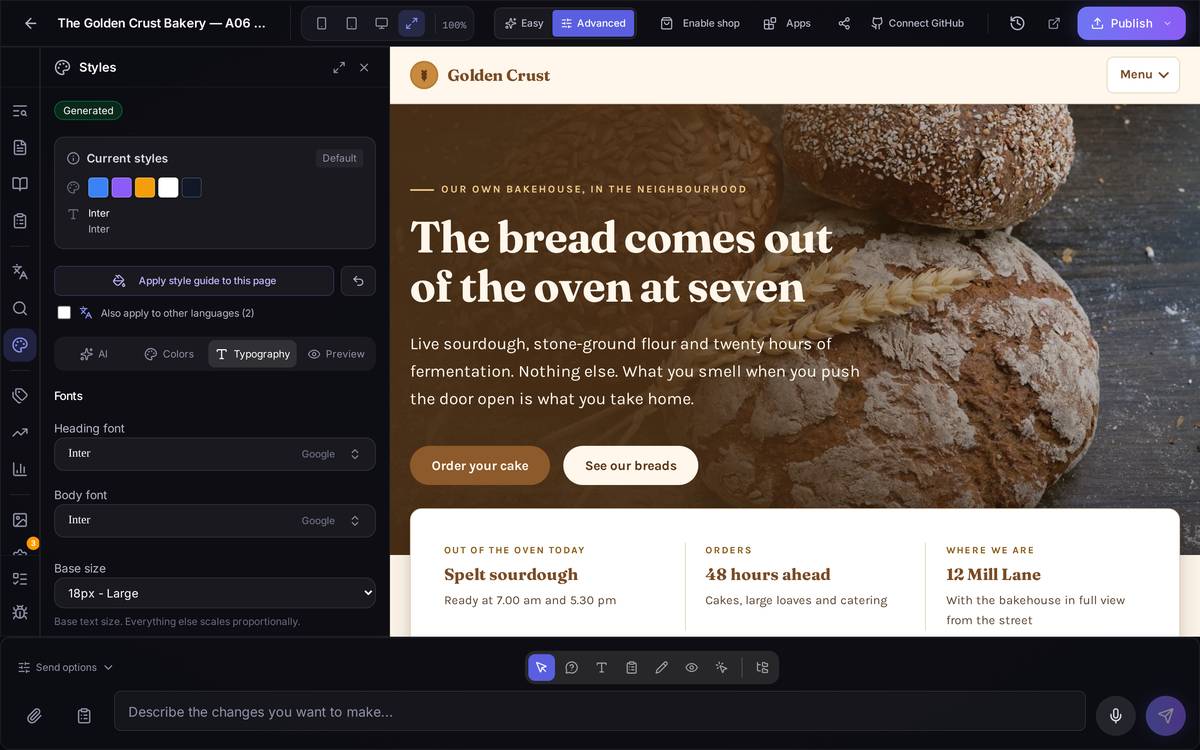
What's on screen. Two dropdowns, the heading font and the body font, with the available Google fonts (marked "System" or "Google" depending on whether they're on the system or have to be downloaded). A base size selector — the starting size for normal text, which every other size on your site scales proportionally from. Below, a live preview with a sample heading and paragraph. And, further down, a custom fonts area, where you can upload your own typeface file (.woff2 or .ttf format) if your brand has its own font that isn't in Google's catalogue.
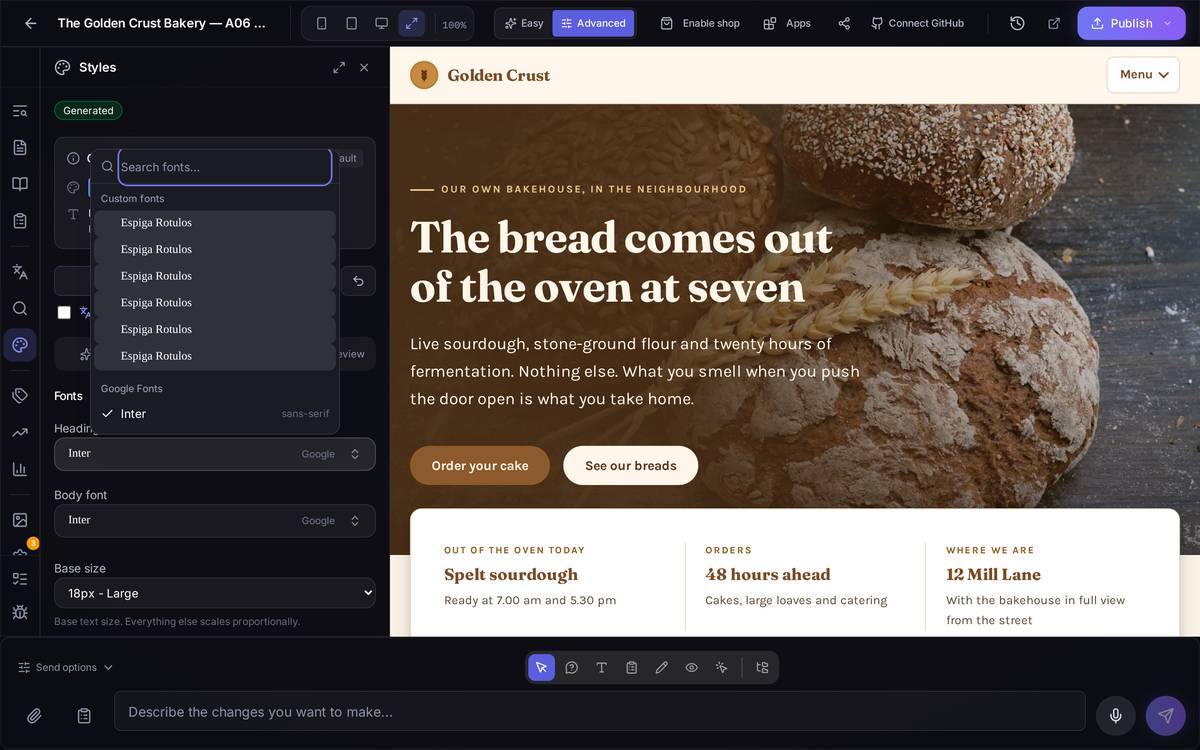
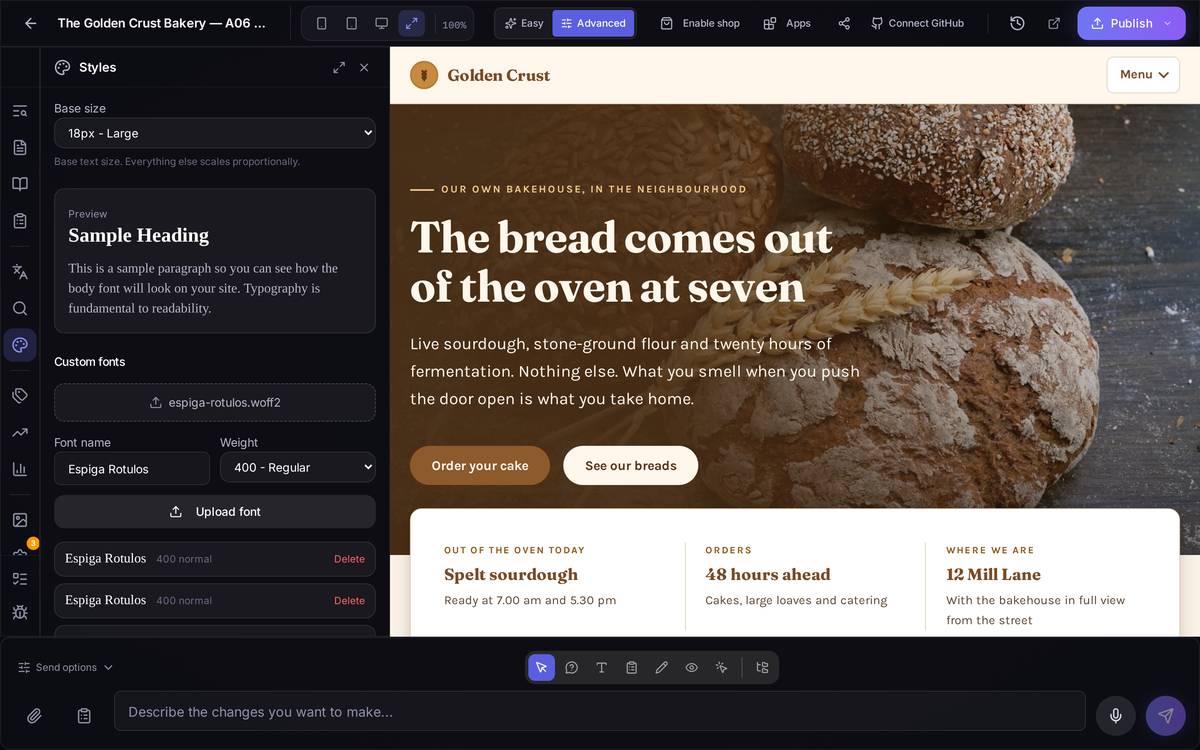
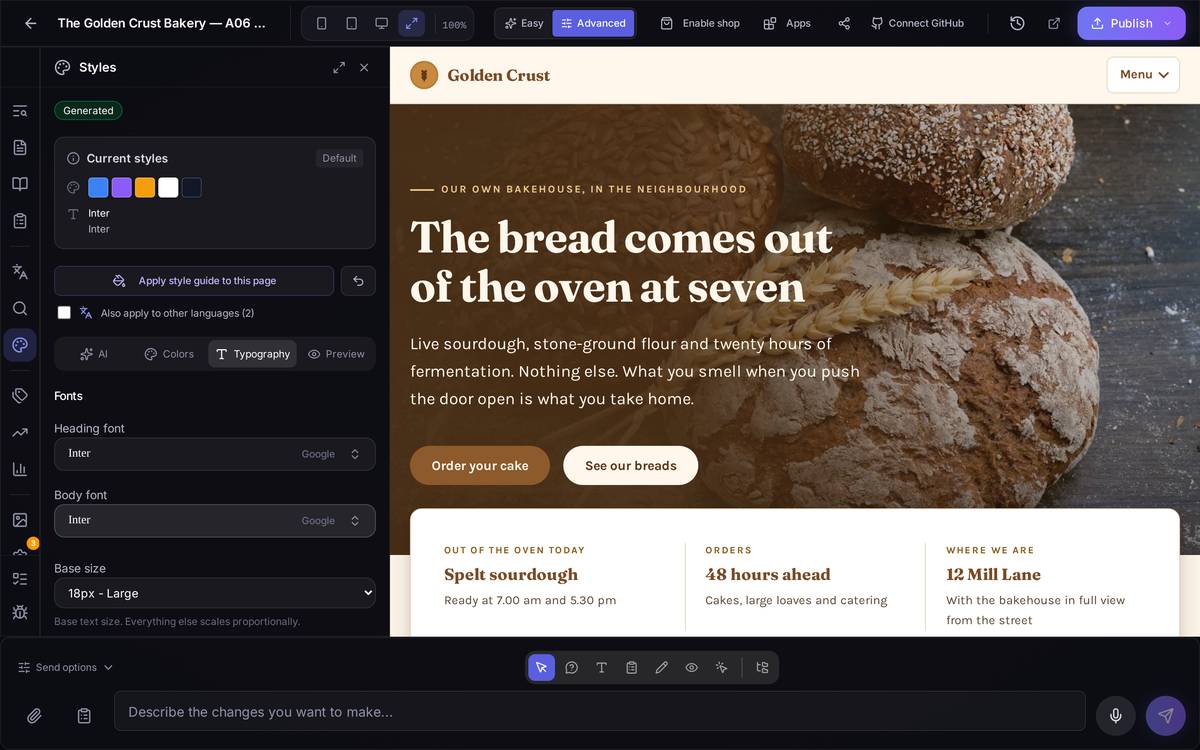
An example, step by stepYour brand has a shop sign in a special typeface and you want to use it for your site's headings. You scroll down to the custom fonts area and drag the .woff2 file into the box. The panel proposes a name based on the file name (you can change it) and asks you for the weight — normally "400 - Regular" if you don't know which it is. You click the upload button. When it finishes, that font is available to pick from the heading font dropdown.
Watch out for… This is the screen where the most serious of the three traps shows itself: if you later click "Apply style guide to this page" from the AI tab (screen 7), or regenerate the style guide, your own font can disappear from the list with no warning — and if that happens, there is no button to undo it: not even restoring a copy of your previous settings brings the font back. The only way to recover it is to upload the file again from scratch, right here. If you have a brand font uploaded, avoid applying the AI's recommendations or regenerating the guide without thinking twice.
6.10Your site's languages
What it's forIt switches on and governs the different language versions of your site: how many languages you have, which one is the main one, and how they show up in each page's address (URL).
How to get thereIn the editor, in Advanced mode, click the languages icon (an "A" with an accent) in the left-hand bar.
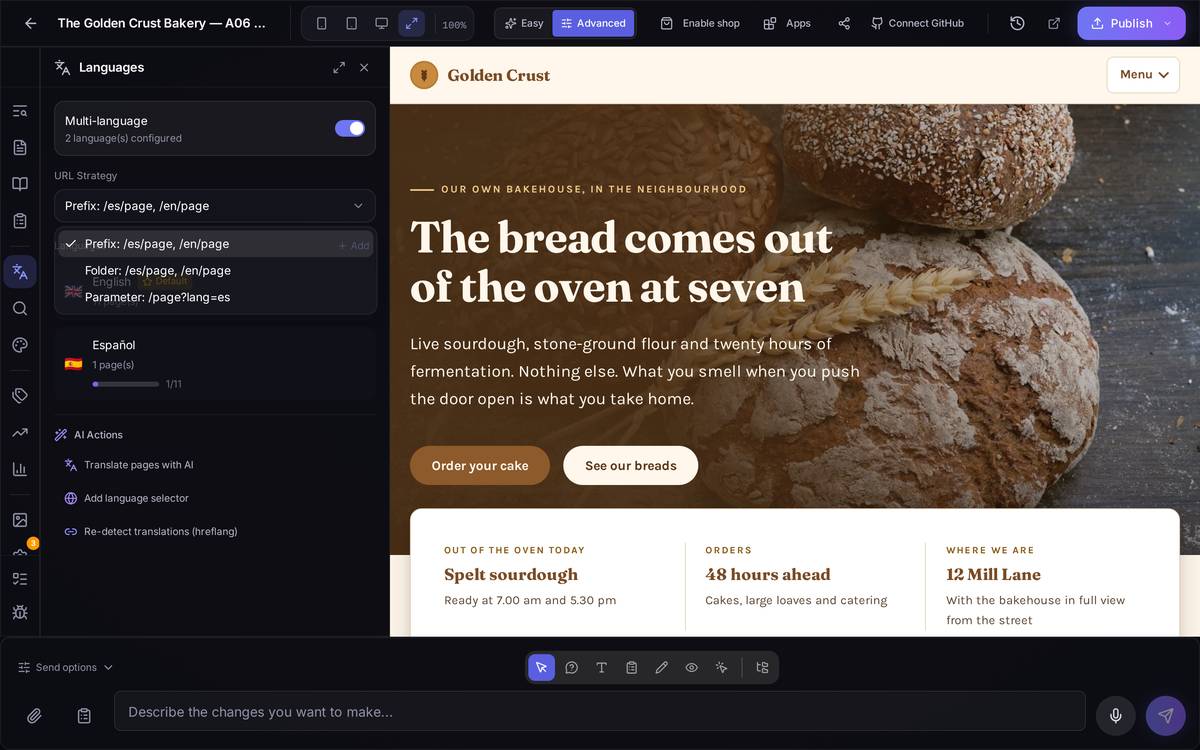
What's on screen. A Multi-language switch at the top: if it's off, your site only exists in one language and the rest of this screen stays empty. With it on, you'll see the URL Strategy — how languages are told apart in your site's address, with three forms to choose from (we explain them in the example) — and the list of active Languages, each with how many pages it already has translated and which one is the "Default" (the starting language, marked with a star). At the bottom, AI Actions: translate pages, add the language selector so it's visible on the site, and re-detect the technical tags that help Google tell each version apart.
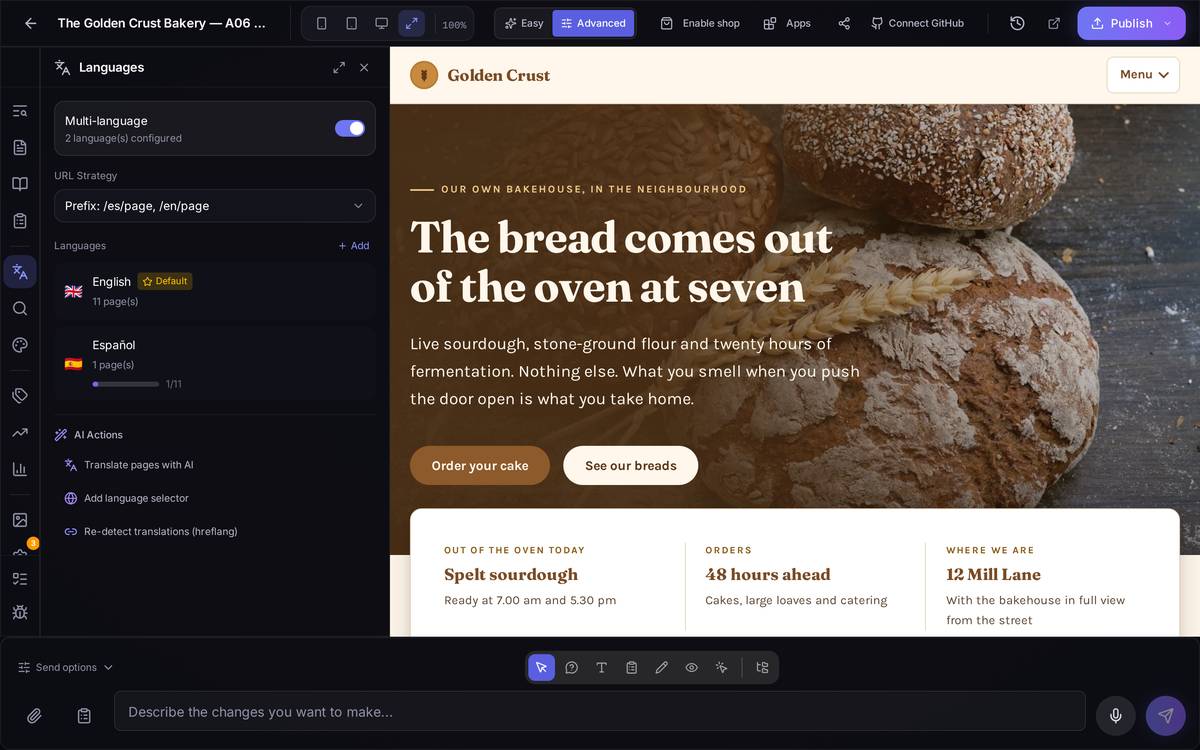
An example, step by stepYou want to know why your site in Spanish is empty even though the language already appears in the list. You go into the Languages icon: you see "Español — 0 page(s)" with a progress bar at 0/7. That means the language has been registered but not a single page has been translated yet — the next step is to go to "Translate pages with AI" (screen 12) so they start appearing.
Watch out for… Changing the URL Strategy once you have published pages changes all their addresses at once. If you've already shared links or have them indexed in Google, think it over before touching it — this isn't something you undo with one click.
6.11Adding a new language, step by step
What it's forIt's the wizard that walks you through registering a new language on your site without having to configure anything loose on your own.
How to get thereLanguages panel (Advanced) → click the Multi-language switch (if you're turning it on for the first time) or the add-language button if you already have at least one.
What's on screen. A three-step wizard, with dots at the top right marking which one you're on.
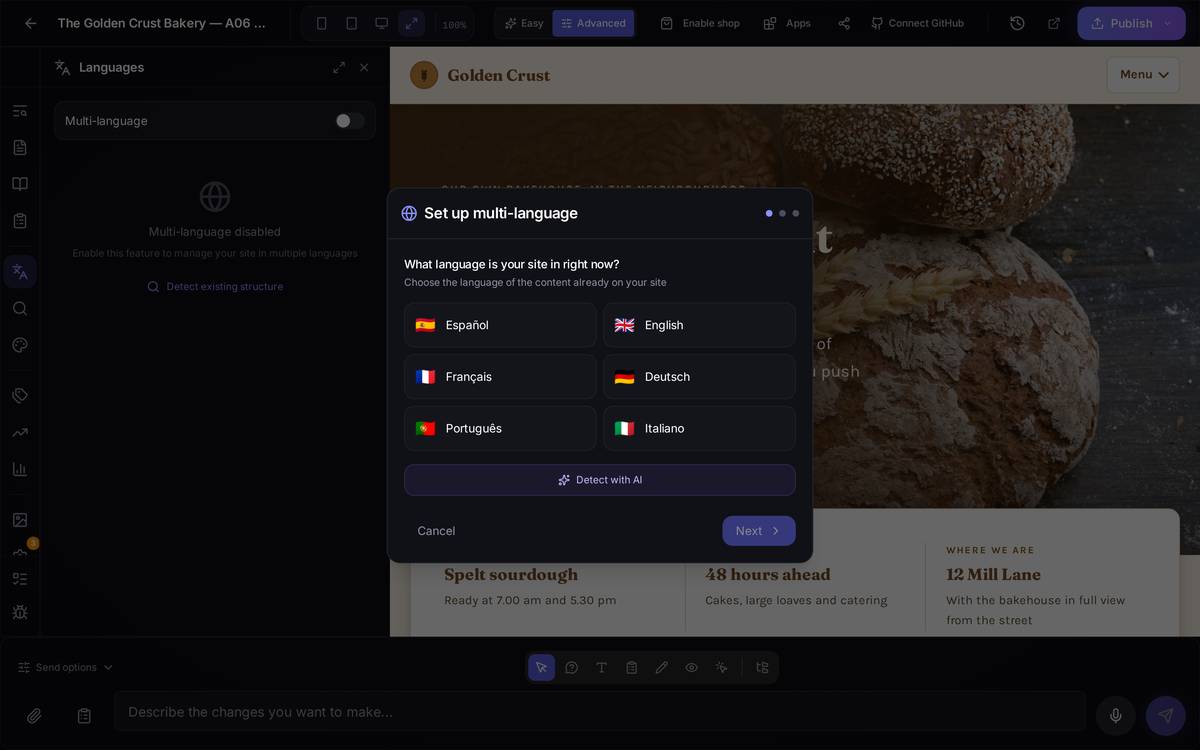
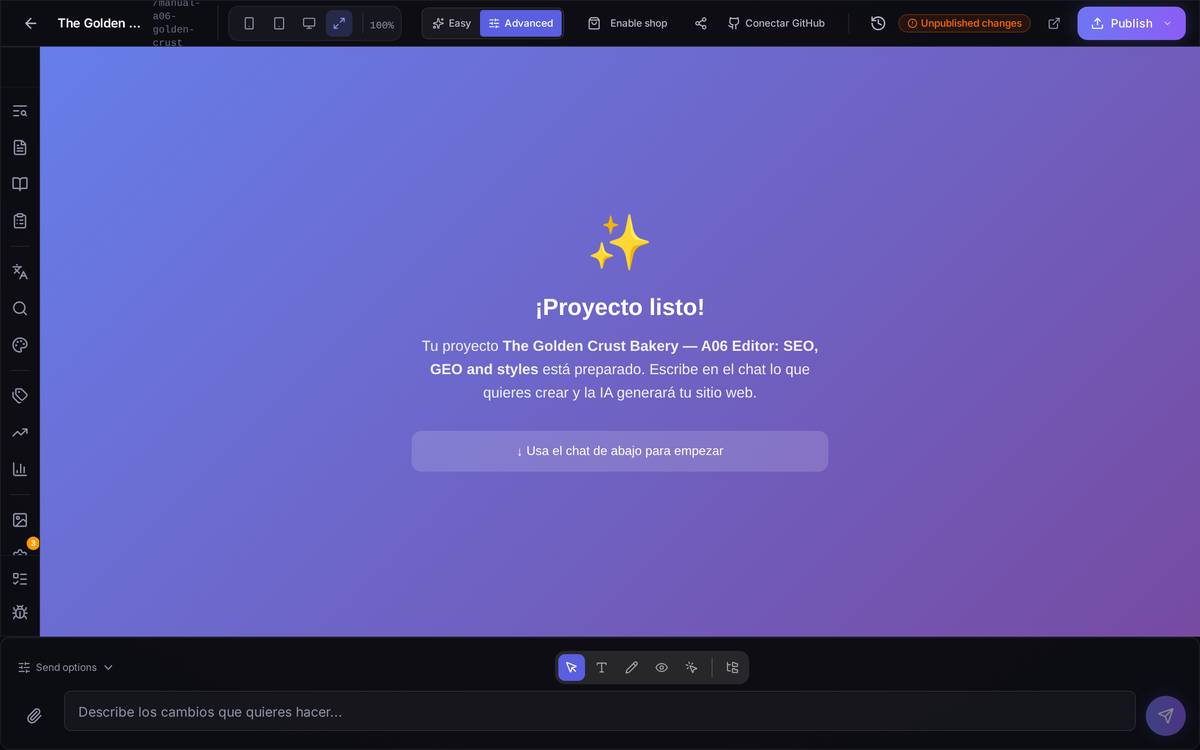
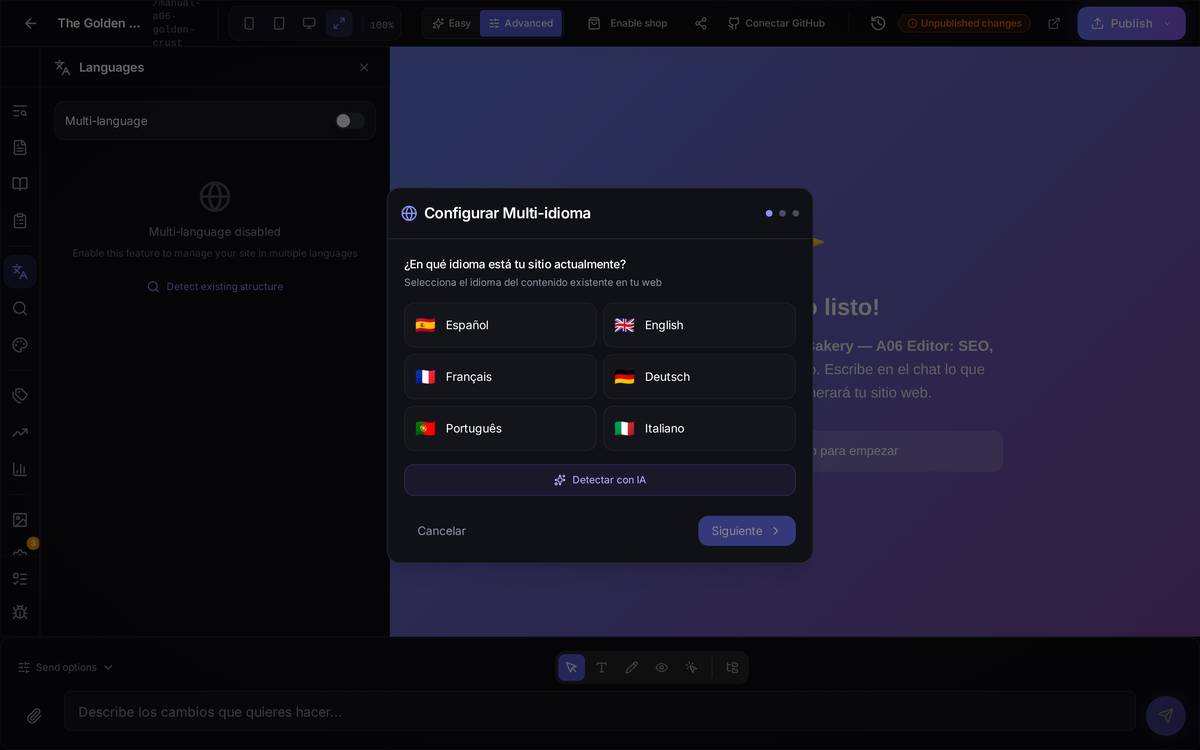
An example, step by stepYou want to add French to your site. You click to add a new language: in Step 1 you confirm that your site is currently in English (or let the AI detect it); in Step 2 you confirm that your existing pages are tagged as English; in Step 3 you choose Français from the list and click finish. From then on, French appears in the list of languages (screen 10) with 0 pages, ready for you to start translating.
Watch out for… You can skip the wizard with the configure-later option if you aren't sure yet what your target language is — you don't have to finish it in one sitting.
6.12Translating a page
What it's forIt automatically translates the content of a particular page into the language you choose, without you having to copy and paste any text.
How to get thereIn the Pages list, open a page's menu (the three dots or the translation icon beside it) and click Translate; you can also launch it from the Languages panel.
What's on screen. A Translate with AI window that confirms which page you're about to translate and lets you choose the target language from those you have configured. Below, a summary of what the AI is going to do: pull the texts out of the page, translate them, create the translation files it needs and generate the translated page.
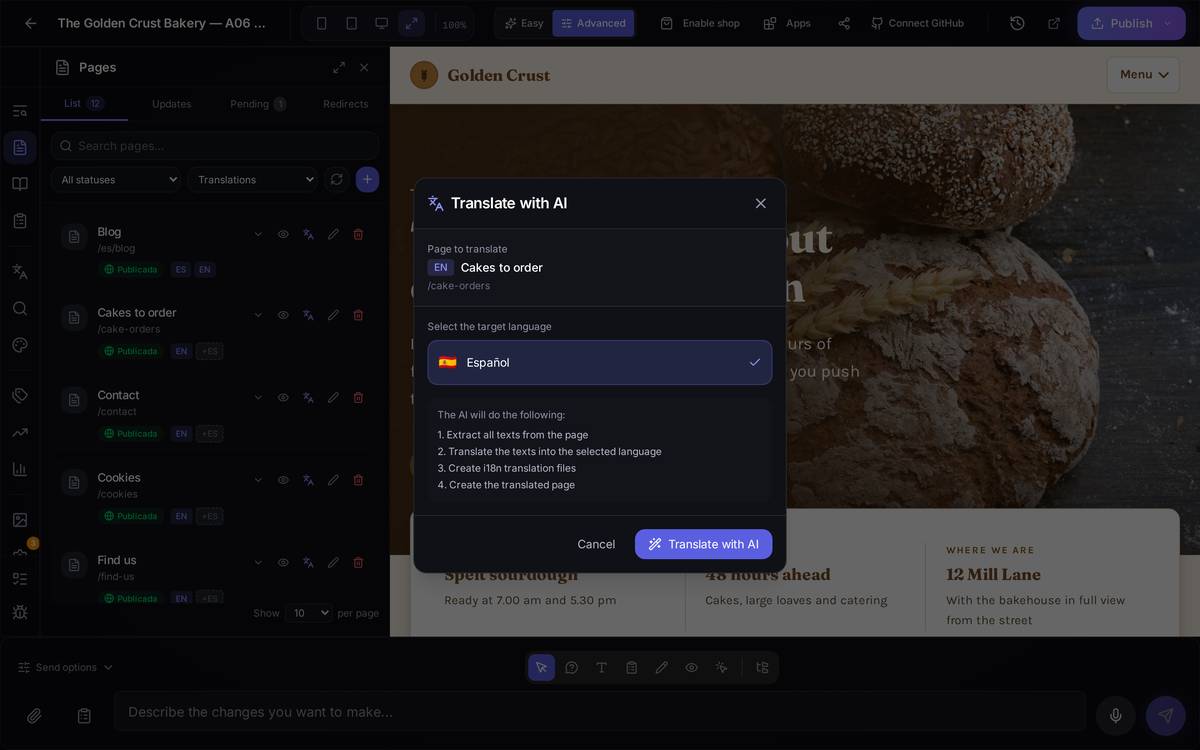
An example, step by stepYou have the "Contact" page in English and you want its Spanish version. From the Pages list, you open the "Contact" menu, click Translate, choose Español as the target language and click Translate with AI. When it finishes, the translated page appears in the list with its own address (for example, /es/contact if your site uses the prefix strategy).
Watch out for… Machine translation is a good starting point, not the final text: review it yourself before publishing, especially proper names, prices and turns of phrase that a literal translation can leave sounding odd.
6.13Measuring visits with Google Tag Manager
What it's forGoogle Tag Manager is Google's tool for managing all your site's measurement "tags" (ads, statistics, social media pixels) from a single place. Here you connect your account so the panel can manage them for you.
How to get thereIn the editor, in Advanced mode, click the tag icon (GTM) in the left-hand bar.
What's on screen. Until you've set it up, you'll see GTM not configured and a Configure Credentials button. Once inside, there are several tabs: Status, Credentials, Resources, AI and Settings.
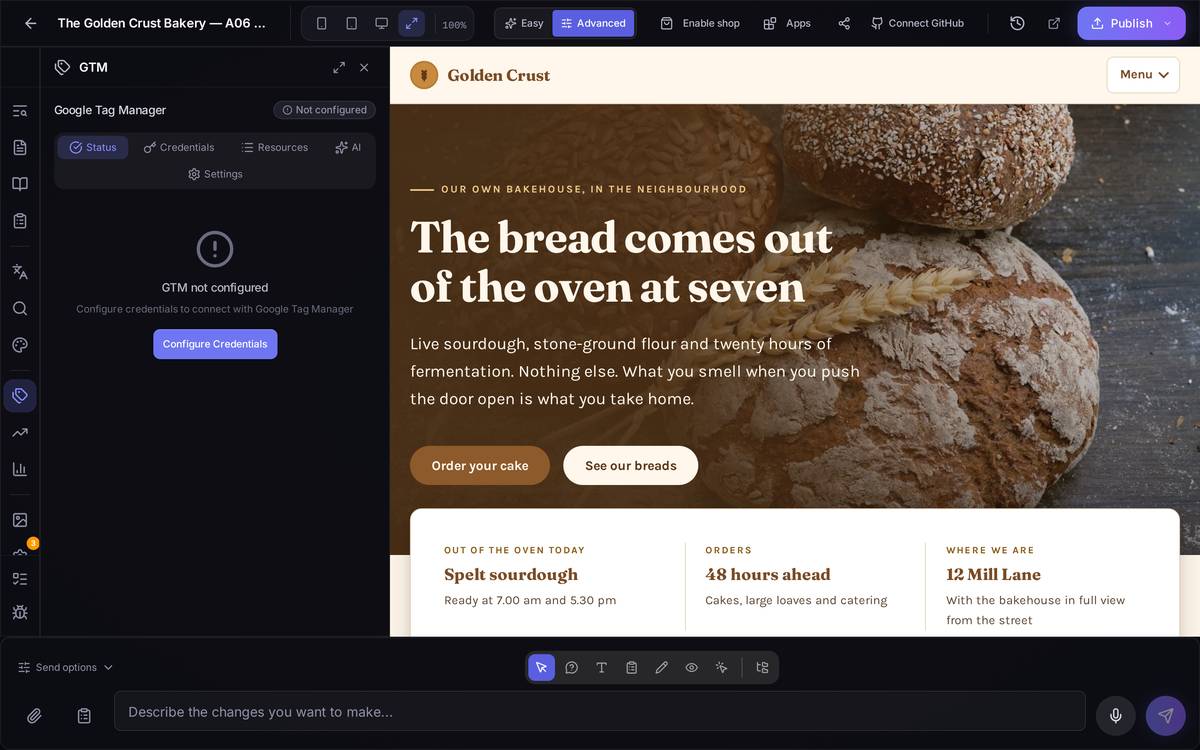
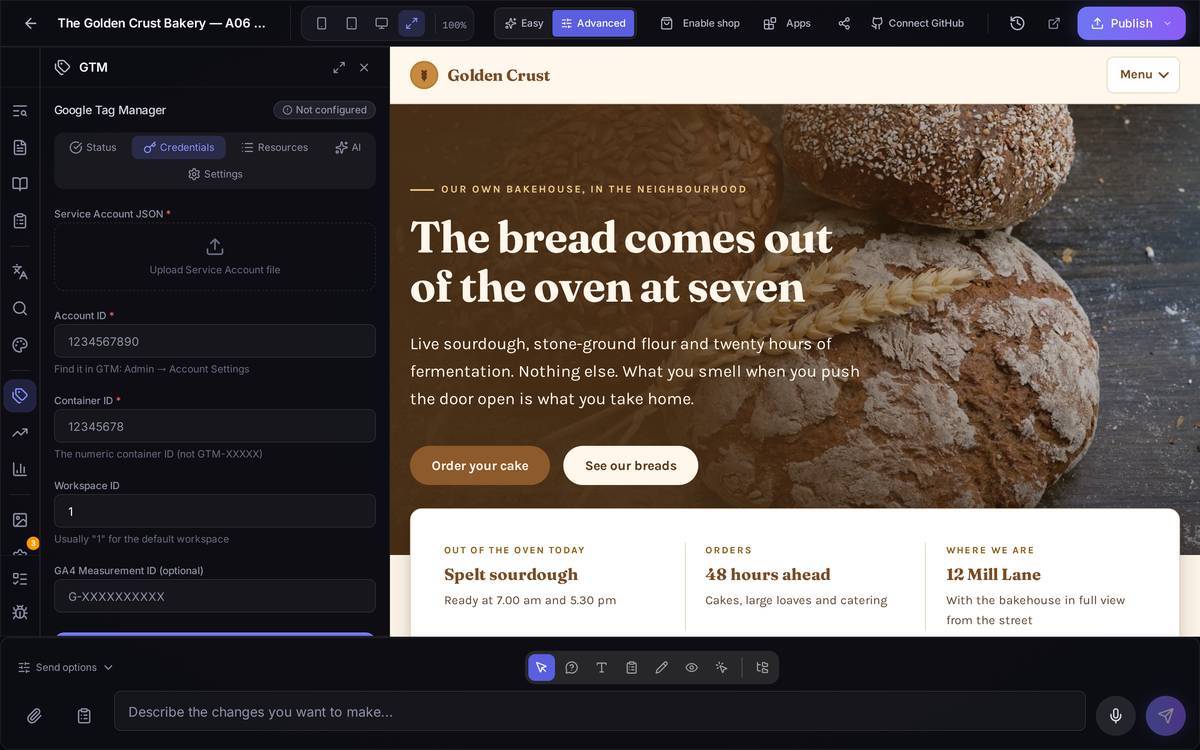
An example, step by stepYou already have a Google Tag Manager account and you want to connect it. You click "Configure Credentials", go to the Credentials tab, and fill in what Google Tag Manager gives you in its own panel: the service account file, the "Account ID" and the "Container ID" (you find them in GTM, under Admin → Account Settings, as the help text under each field tells you). You save.
Watch out for… You need to already have a Google Tag Manager account created outside Speaksite — this screen connects an existing account, it doesn't create a new one for you.
6.14Your Google Ads campaigns
What it's forConnect your Google Ads account so you can see how your ad campaigns are performing without leaving the panel.
How to get thereIn the editor, in Advanced mode, click the trend icon (Google Ads) in the left-hand bar.
What's on screen. A field for Your account Customer ID (the identifier you find in Google Ads, under Settings → Customer ID) and an important warning in yellow: your account has to be linked to the MCC account (Speaksite's "master" account) for the automatic connection to work.
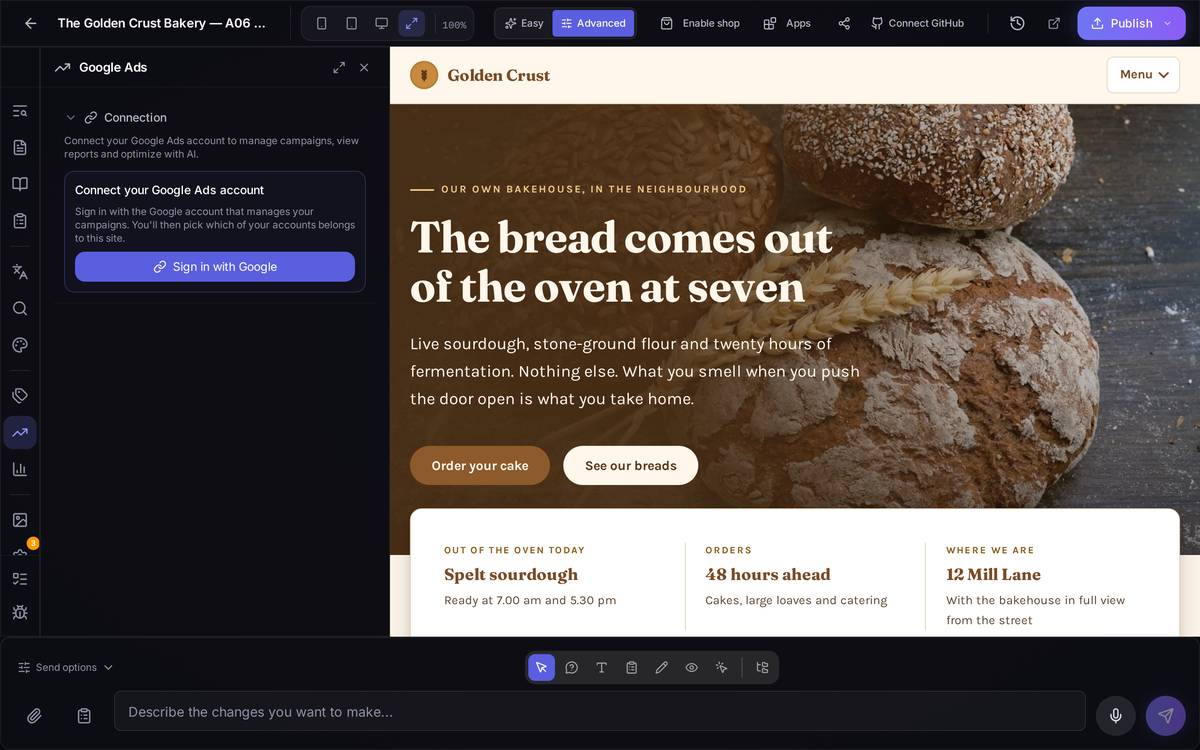
An example, step by stepYou want to see your Google Ads campaigns from here. You copy your Customer ID from your Google Ads account (it has the format 123-456-7890), paste it into the field, and click Connect Google Ads. If your account isn't linked to Speaksite's MCC account yet, you'll have to ask for that link before the connection fully works.
Watch out for… The MCC account requirement isn't optional, and it isn't something you can get around from here: without the link, typing the Customer ID isn't enough to see real data.
6.15Your site's visits
What it's forIt switches on and centralises your site's analytics: how many people visit, where they come from, what they do. From here you turn on Google Analytics, Microsoft Clarity and the pixel for your ChatGPT ads, and consult the same Google Tag Manager data as on screen 13.
How to get thereIn the editor, in Advanced mode, click the bar-chart icon (Analytics) in the left-hand bar.
What's on screen. One expandable block per service: Google Analytics (GA4), Google Business Profile, Google Tag Manager, Microsoft Clarity and ChatGPT ads (OpenAI), plus an Events block at the end. Google Business Profile connects your business's Google profile so that its address, phone and opening hours appear on your site by themselves. Clarity is still just a switch and an ID. Google Analytics and Tag Manager no longer open straight onto the switch: first they show the recommended route — connecting your Google account, without copying anything — explained in detail on screens 20 and 21 of this guide. The good old ID is still there as an emergency exit: in Analytics (G-…), folded under the "Paste the code manually" link; in Tag Manager (GTM-…), always visible just below, after a dividing line.
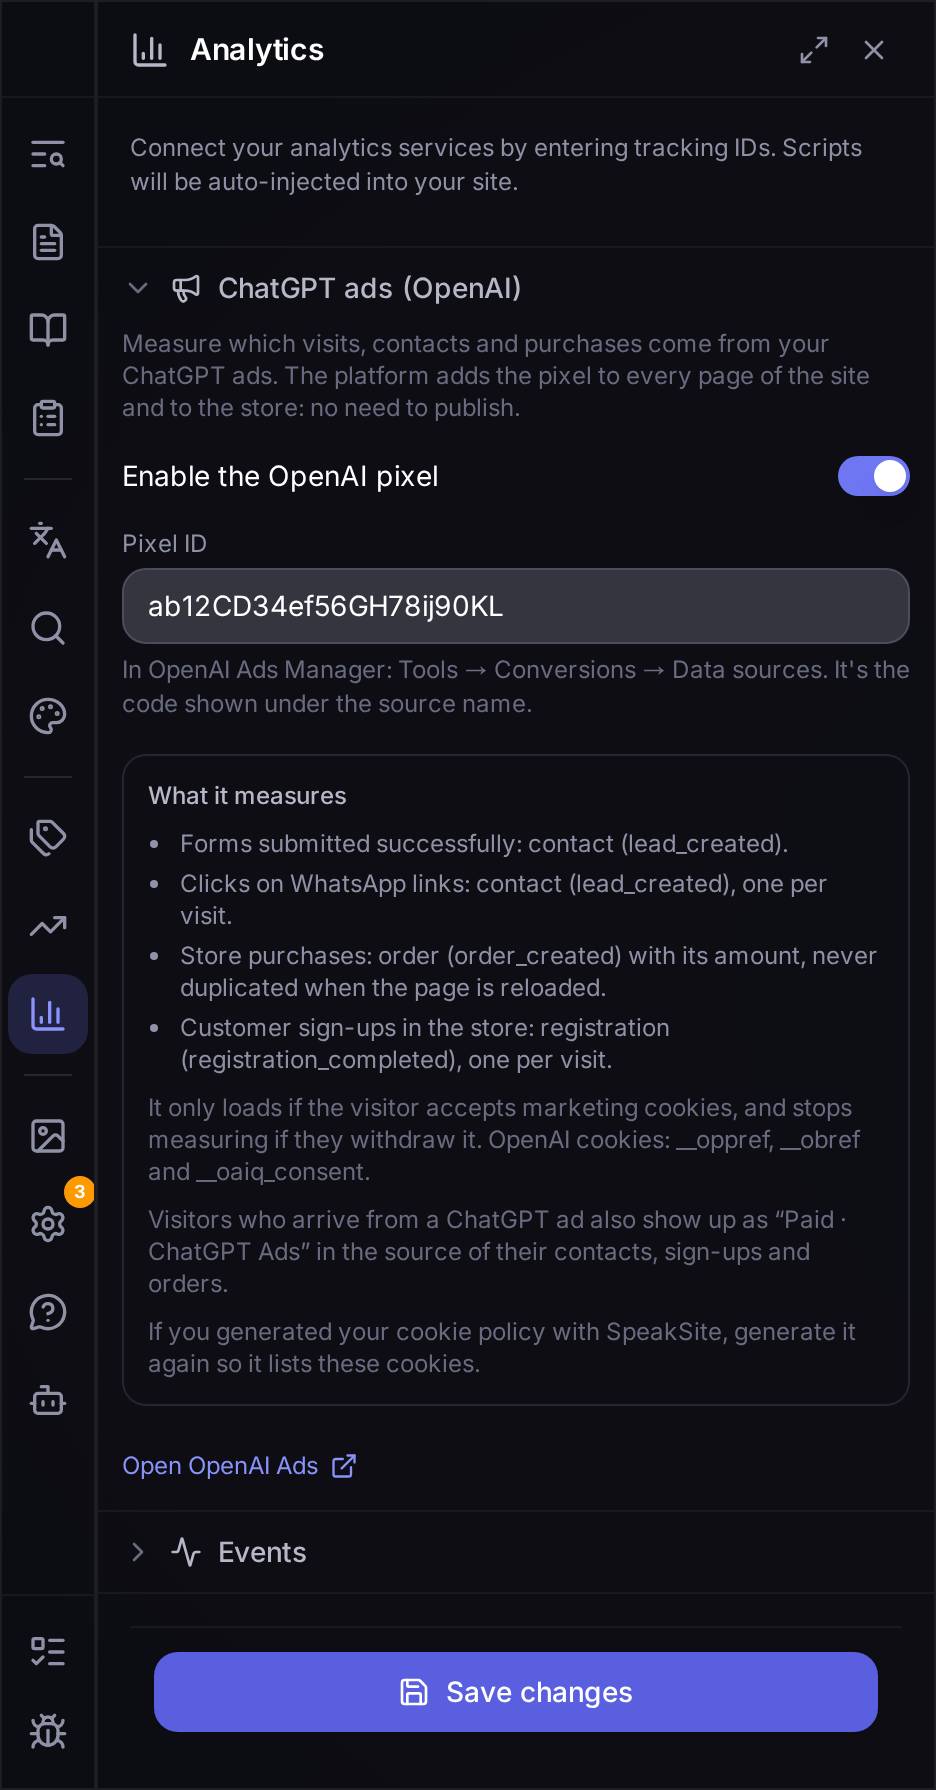
The ChatGPT ads (OpenAI) block measures what the ads you run on ChatGPT bring you. You turn on Enable the OpenAI pixel, paste the code OpenAI Ads Manager gives you into Pixel ID and click Save changes: the platform places the pixel on every page of your site and your shop, with no need to publish. The What it measures box lists what reaches OpenAI:
- Contacts (
lead_created): every form on your site sent successfully, and a click on a WhatsApp link, the latter only once per visit. - Orders (
order_created): every purchase in your shop, with its amount. Even if someone reloads the confirmation page, the purchase is not counted twice. - Sign-ups (
registration_completed): every customer who signs up in your shop, one per visit.
The pixel only loads if the visitor accepts your site's marketing cookies, and it stops measuring as soon as they withdraw that permission. The cookies OpenAI sets are __oppref, __obref and __oaiq_consent. Visitors who arrive from a ChatGPT ad also show up as "Paid · ChatGPT Ads" in the source of their contacts, sign-ups and orders. How to set it up from start to finish: screen 22.
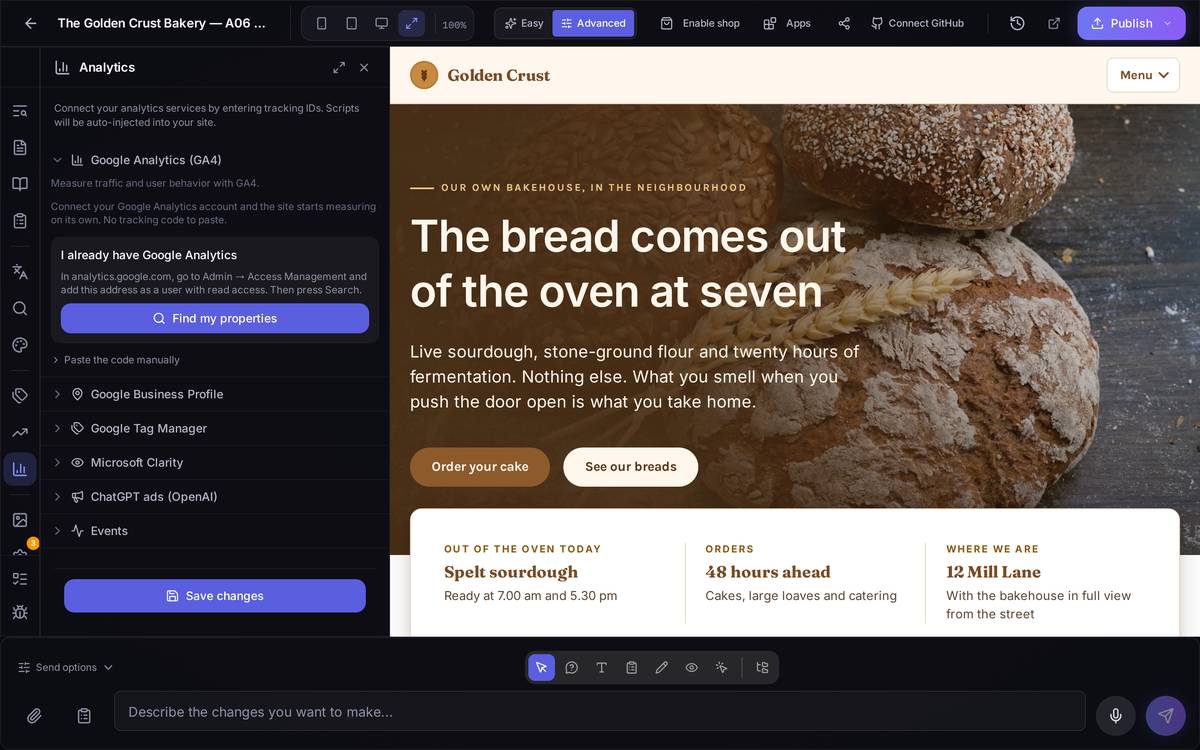
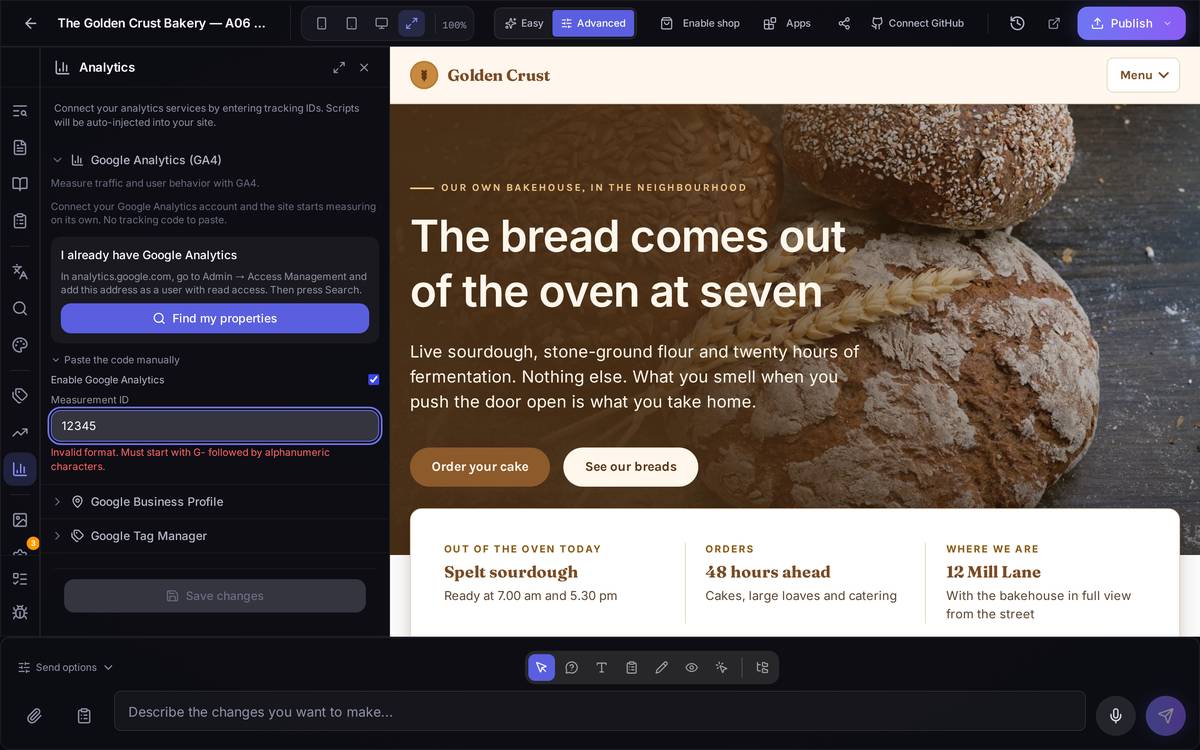
An example, step by step (manual route, for emergencies). You don't want to, or can't, connect your Google account (screen 21) and prefer to paste the ID yourself. You open Paste the code manually, turn on the "Enable Google Analytics" switch, and in "Measurement ID" you type the identifier Google Analytics gives you — it always starts with "G-" followed by letters and numbers, for example G-ABC1234XYZ. If you type it wrong (without the "G-" in front, as in the second screenshot), the panel warns you immediately and won't let you save until you fix it. With the right format, you click Save changes.
Watch out for… Don't confuse the GA4 "Measurement ID" (it starts with G-) with the Google Tag Manager ID (it starts with GTM-): they're different things and each field wants its own.
6.16Choosing which part of your shop you're designing
What it's forChange the look of the different screens of your shop (a category listing, a product page, the cart, the checkout) without touching code, for the whole shop in one go.
How to get thereThis screen, unlike almost every other one in this guide, does not require Advanced mode: you get there from your shop's menu by clicking Design, in Easy mode just as much as in Advanced.
What's on screen. A selector at the top, "Preview: [name]", for switching between the different shop screens you want to design (category, listing, product, cart, checkout…). On the right, the live preview of that screen with real data from your shop. Below the selector, two tabs: Blocks (which parts that screen has and in what order) and Appearance (colours, spacing and how the cards look). There's also a Test cart area for trying out how it behaves without affecting real orders — the panel's own text says so.
An example, step by stepYou want 2 products per row on mobile instead of 1 on the category pages. You go to Design → select the "Category" view → the Appearance tab → raise the number under "Grid columns" → "Mobile". The preview on the right updates immediately so you can check how it looks before publishing.
Watch out for… At the time of this review, the header of the preview (your business name and the top menu) was showing without its background box or styling, as loose text — it's a known visual bug on this particular screen, documented in the bug annex; it doesn't affect how your published shop actually looks, only this preview inside the editor.
6.17The shop screens you can design
What it's forIt's the complete list of all the "surfaces" (screens) of your shop that you can customise with the tool on the previous screen — a map so you don't get lost between category, listing, product, cart and checkout.
How to get thereThis doesn't require Advanced mode either. Open Pages in a project with the shop switched on: below the normal list of pages, a separate block appears titled STORE, with Category, Listing, Product, Cart and Checkout.
What's on screen. Each item in the Store block takes you straight to the design tool for that surface (screen 16) when you click it.
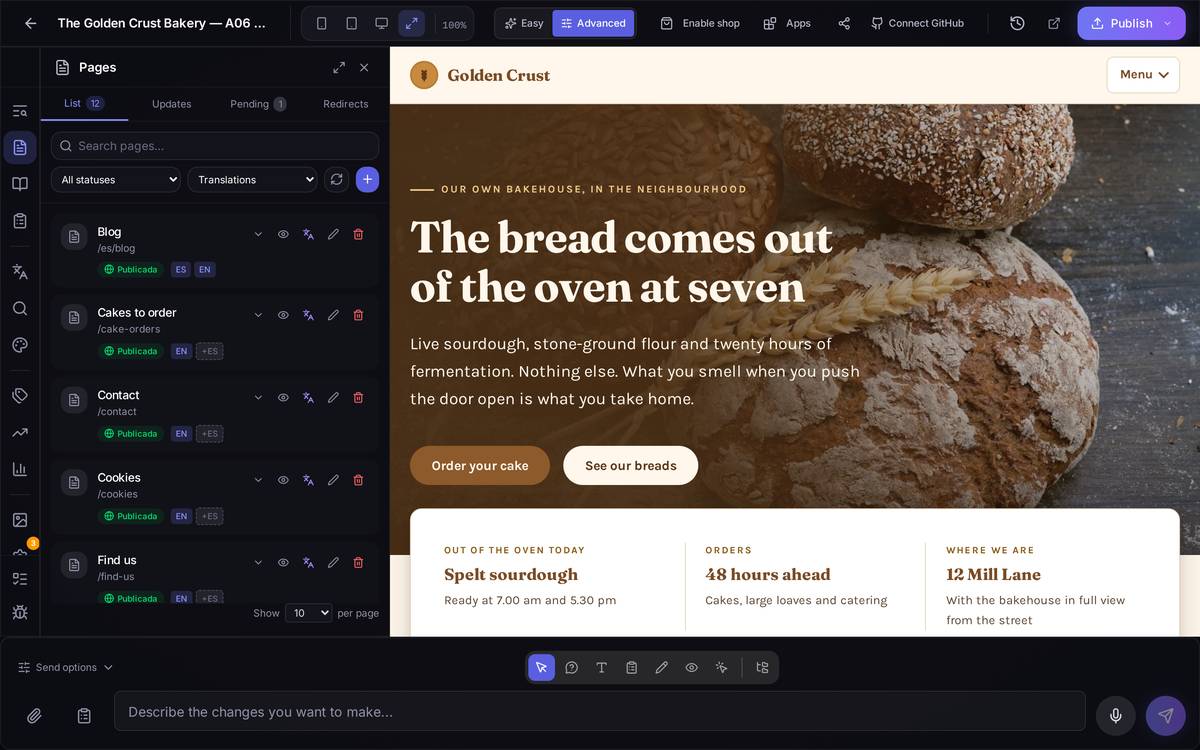
An example, step by stepYou can't remember where the tool for changing the look of the cart was. You open the Pages icon, scroll down to the STORE block, and click Cart: it takes you straight to the design screen for that surface, already on the right view.
Watch out for… This block only appears if your project has the shop switched on. If you can't see it, it means your project doesn't have the shop enabled yet, not that the feature has disappeared.
6.18Search Console: whether your site is on Google
What it's forSearch Console is Google's tool for telling you whether it has you indexed, which searches bring you visits and which pages have problems. Here you connect your site without copying any code by hand: the site itself carries the tag that verifies it.
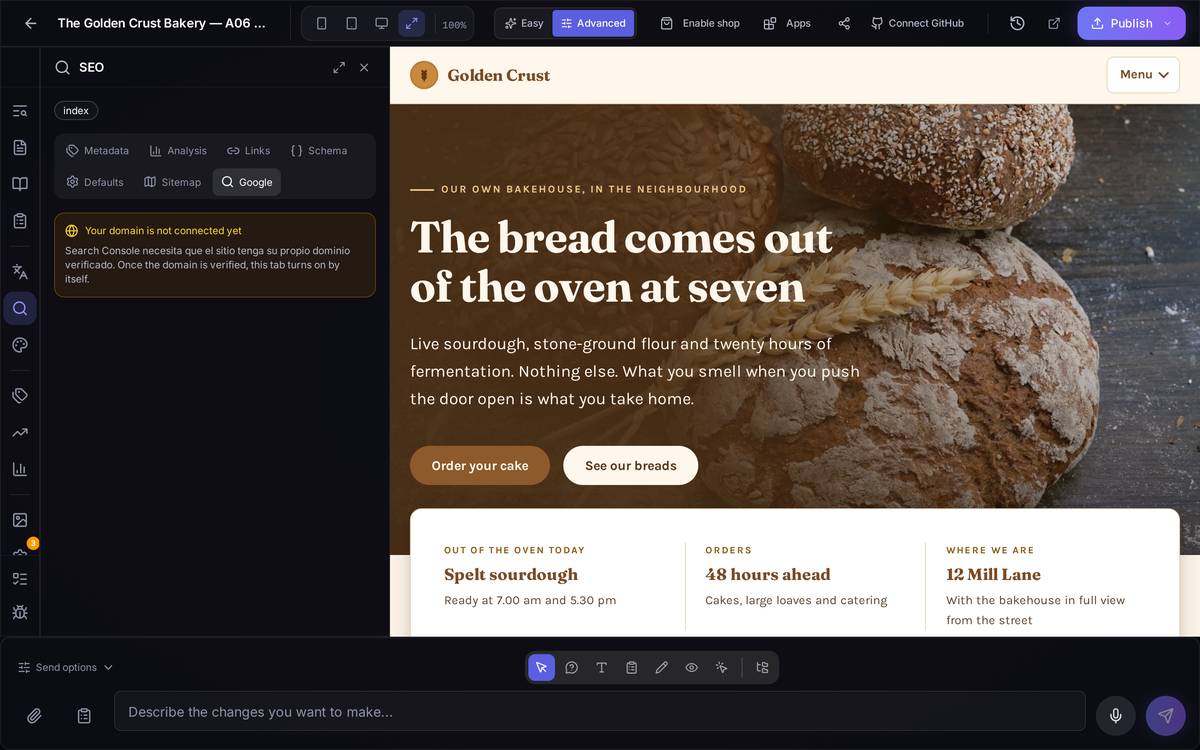
How to get thereSEO panel (Advanced) → Search Console tab.
What's on screen. If your own domain is not connected yet, the tab tells you so and will not let you go on: Search Console needs the site to be served on your own domain, and it switches itself on as soon as you have that verified. With the domain ready, before you connect anything you will see three routes, and they are not equivalent:
- Let Speaksite do it for you. For a new site that is not on Google yet: we register the property, verify it and submit the sitemap without you having to go anywhere. The property ends up in Speaksite's name, not your Google account's: you will see the data here, in this panel, not on search.google.com. If your site was already on Search Console, this route creates a brand-new property that starts from zero — not the one you want in that case.
- You already have it in Search Console. The route that keeps your history: instead of creating a new property, you give Speaksite's account read access to the one you already had. Clicking it opens the step by step: go into Search Console → Settings → Users and permissions → Add user, and paste in the address the screen shows you, with Owner permission.
- Connect your Google account. You sign in yourself with your account; the property is created and stays in your account, with normal access from search.google.com. Speaksite only reads the data to draw it here.
6.19Search Console: fixing a problem with the AI
What it's forWhen Search Console reports a problem with one of your pages — a missing description, a title Google does not like, a page it cannot index — the panel does not just list it: it offers to fix it for you and to tell Google when it is done.
How to get thereThe same Search Console tab, once connected, in the list of detected problems.
What's on screen. Each problem carries a line underneath saying exactly which step it is at, without you having to guess or reload:
- Not started yet — the fix has not been asked for.
- Fixing it… — the AI is working on it; it does not block your other edits.
- The fix failed — you can press Retry the fix.
- Fixed in the draft. Publish the site so Google can see it.
- Fixed and published. You can now tell Google.
- Told Google on [date] ([time ago]). It has not come round again yet; it usually takes from a few days to a couple of weeks.
- Google looked again on [date] and still sees it as wrong.
When the fix needs your judgement instead of applying itself, you will see Write with AI: it proposes the change (title, description) and shows it in full so you can review it before applying it with the Apply button on that row.
6.20Google Tag Manager: connecting your account without pasting anything
What it's forToday's recommended way of having Google Tag Manager: you connect your account as you do for Search Console, picking or creating the container, and the site itself serves the container on every page. There are no credentials to paste and nothing to publish by hand.
How to get thereIn the editor, Advanced mode, click the bars icon (Analytics) in the left-hand bar → Google Tag Manager (Simple) section.
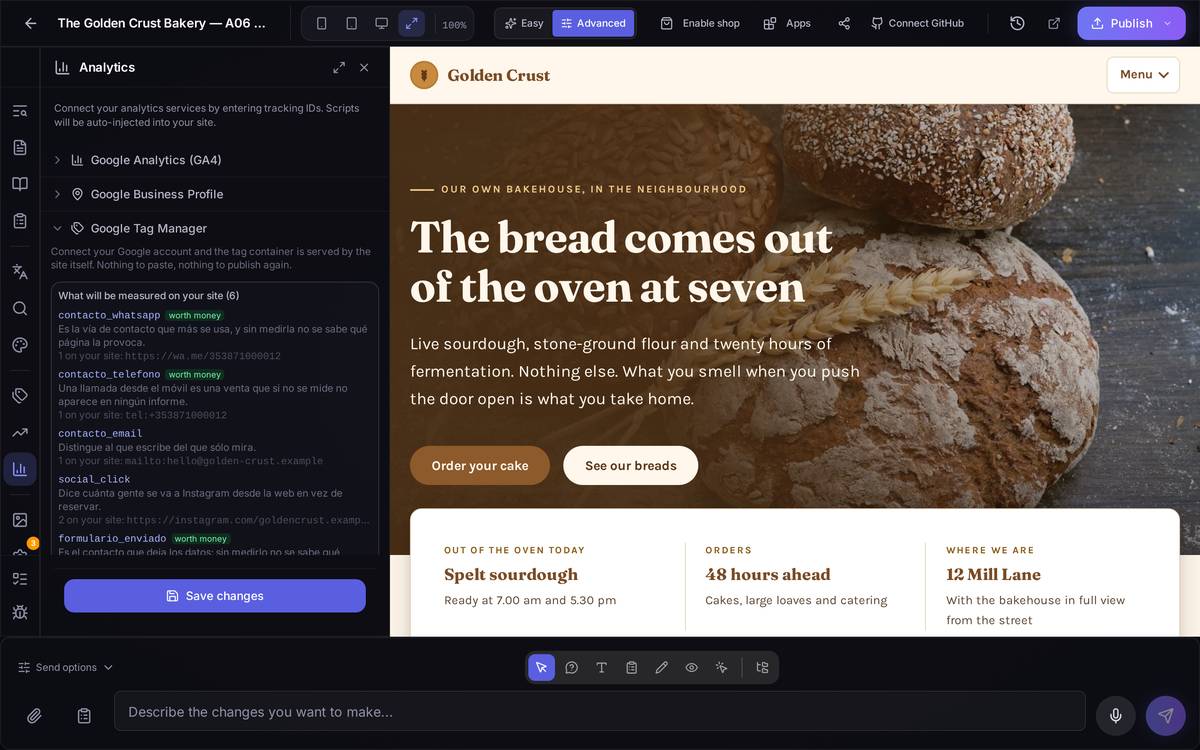
What's on screen. Before you connect, a Let me sign in to Google (recommended) block: you sign in with your Google account and the container stays in your name — if you ever leave Speaksite, you take it with you and everything in it. Once your account is authorised, you press Find my containers and pick one of the ones you already have, or Create a new one here so that it is created inside that same account.
With the container connected you will see Tag Manager connected, its name and its ID, and the note that the container is served by the site itself on every page: there is nothing to paste and nothing to publish. Below that, if you already have Google Analytics connected (the next screen), the panel says whether this container is going to measure through it or whether that connection is missing — so that each visit is not counted twice.
Even before you connect anything, the What is going to be measured on your site section shows you which events the AI proposes based on your own page — an "Add to basket" button, a contact form — with the real link each one came from, so that it is not "the usual tags" but something actually looked at on your site. The Tag and publish button creates those tags in the container and publishes them in one go.
6.21Measuring visits with your own Google Analytics account
What it's forConnecting Google Analytics so that the property is yours, not Speaksite's, and the visits show up in the panel without leaving it.
How to get thereEditor, Advanced mode, Analytics icon → Google Analytics (GA4) section.
What's on screen. Two routes for connecting on your own account: Find my properties, which looks for a property of yours that already measures this site and keeps its history, and signing in with your Google account so that a new one is created in your name. If it finds none of yours, you get the notice that no Analytics property measuring this site was found, with the option of creating it yourself at analytics.google.com — with your site's exact address already filled in, so that you create it in your account and not in Speaksite's.
Right at the bottom, a Paste the code by hand link unfolds the old route: switch Analytics on and type the Measurement ID (G-XXXXXXXXXX) yourself — the emergency exit if none of the routes above works for you.
Once the account is connected, the screen shows users, sessions and page views for the last few days, and the most-viewed pages, without leaving the panel.
6.22Measuring your ChatGPT ads, step by step
What it's forKnowing what the ads you run on ChatGPT bring you: how many contacts, sign-ups and purchases come from them. OpenAI's pixel counts them, and Speaksite places it for you on every page of your site and your shop.
What you need. An OpenAI Ads Manager account (ads.openai.com) and your site's cookie notice switched on: the pixel waits for the visitor to accept marketing cookies, so without a notice nobody can give that permission and it never loads. The notice is set up in the editor, cog icon (Settings) → Cookie Consent; the chapter "Shop: apps, shipping and settings" explains it under "The project settings".
How to get thereIn the editor, Advanced mode, bar-chart icon (Analytics) → ChatGPT ads (OpenAI) block.
Step by step
- Create the data source in OpenAI Ads Manager. Go to ads.openai.com (the block's own Open OpenAI Ads link takes you there). In the side menu, open Tools → Conversions and, in the Data sources tab, create a new source named after your site.
- Copy the ID. It's the code shown under the source name.
- Paste it into Analytics. In the ChatGPT ads (OpenAI) block, turn on Enable the OpenAI pixel, paste the code into Pixel ID and click Save changes. No need to publish: from that moment the pixel is on every page of your site and your shop.
- Try it on your site. Open your site in a normal browser window, outside the editor. In the cookie notice, accept marketing cookies (or "accept all") and do something that counts: send a contact form or tap a WhatsApp link.
- Watch it arrive. Back in Ads Manager: Tools → Conversions, Event stream tab, and click Start polling. Within a few seconds the event shows up —
lead_created, if it was a contact — with thepixel_sdkchannel. - Create the conversion events. In the Conversion events tab, create one for each thing you want to count: for example "Contact" on
lead_created, "Purchase" onorder_createdand "Customer sign-up" onregistration_completed. That way Ads Manager knows which actions count as results of your ads.
Watch out for… four things that cause doubts:
- Nothing arrives until marketing cookies are accepted, and that's on purpose. If you test without accepting them, or you reject them, the Event stream stays empty even though everything is set up correctly.
- You don't need to add anything to your ads' address. OpenAI adds the
opprefparameter to every click by itself (don't type it yourself: Ads Manager doesn't accept it among the tracking parameters), and that's what makes the visit show up as "Paid · ChatGPT Ads" in the source of your contacts, sign-ups and orders. - If your site already has the OpenAI pixel added by hand, the platform doesn't add another one: two pixels would count every contact and every purchase twice.
- If you generated your cookie policy with Speaksite, generate it again so it lists OpenAI's cookies.