Chapter 9 of 11
Shop: orders and customers
Handling an order, processing a return and keeping your customer records.
On this page
This part of the manual is about what happens after somebody buys from you: the order that comes in, the box you pack, the return they ask for, the customer who comes back, the review they leave behind. This is the screen you will look at every day.
Everything here lives inside your project's Shop. To get in: from the projects dashboard, click your project and then the Shop button. From there you have the shop menu down the left-hand side.
Two warnings before we start, which will save you half an hour of hunting
- Top right there is an Easy | Advanced switch. In Easy mode the left-hand menu only shows the basics (Overview, Design, Apps, Products, Orders and Settings). Almost everything in this chapter —returns, customers, reviews, subscriptions, carts, companies, bookings— only appears in Advanced mode. If you can't find something, check that switch first: click Advanced.
- In the menu, your customers are called Users and companies are called Groups. It isn't what you'd expect; it is logged as a bug in the annex, but in the meantime it is what you will read on screen.
9.1Your orders
What it's forIt's your shop's inbox: everything people have bought from you, with its status, who ordered it and how much has been paid.
How to get thereShop → Orders in the left-hand menu. It's there in Easy mode too.
What's on screen
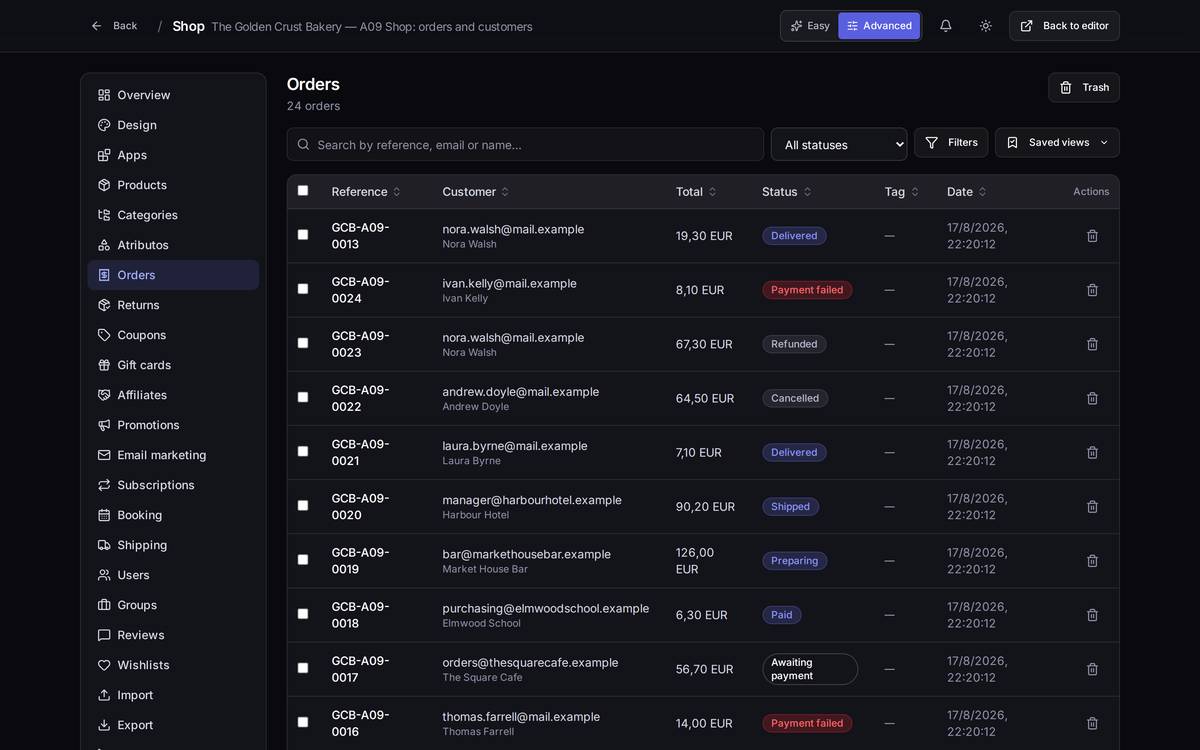
- At the top, the number of orders and the Trash button: orders you delete don't vanish, they are kept there and you can restore them.
- The All statuses dropdown filters by situation: Awaiting payment, Paid, Preparing, Shipped, Delivered, Cancelled, Refunded, Payment failed. This is the filter you'll use most: "show me what I have to pack" means filtering by Paid.
- Filters opens a panel with more criteria (dates, amounts, tags) and Saved views lets you keep a search you repeat often ready to go.
- The table: reference, customer, total, status, tag and date. Click any row to open that order.
- Tick the checkboxes on several rows and an action bar appears so you can do the same thing to all of them at once.
An exampleIt's Monday morning and you want to know what to bake: go into Orders, open the status dropdown and pick Paid. What's left in the list is exactly what has been paid for and not yet packed.
Watch out for… Awaiting payment is not a sale: it's a basket that made it as far as the payment page and never finished. Don't pack it until it says Paid.
9.2An individual order
What it's forIt's the whole order on one screen: what they bought, who's asking, where it's going, how much they paid and everything you can do with it.
How to get thereShop → Orders → click the order's row.
What's on screen
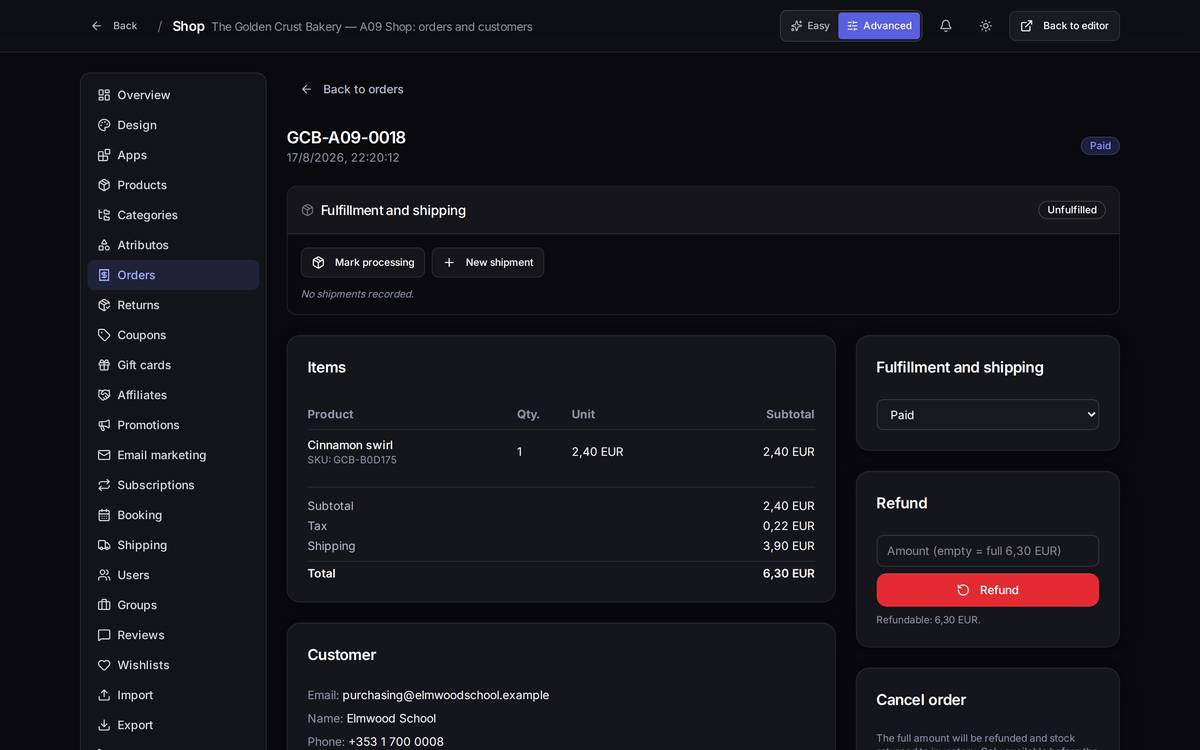
- At the top, the reference (
GCB-A09-0018, for instance), the date and the status badge. - Fulfillment and shipping: tells you whether the order is unfulfilled, in progress or shipped, and this is where shipments are created.
- Items: the order lines with quantity and price, and below them subtotal, tax, shipping and total.
- Customer: email, name, phone and the delivery address.
- Visitor source: how that sale arrived (search engine, social, campaign). Useful for knowing what's working.
- The right-hand column is the actions column: change the status, Refund, Cancel order, Delete order, issue the invoice in FacturaScripts, resend the summary by WhatsApp, and generate a Packing slip, Delivery note or Internal label to print.
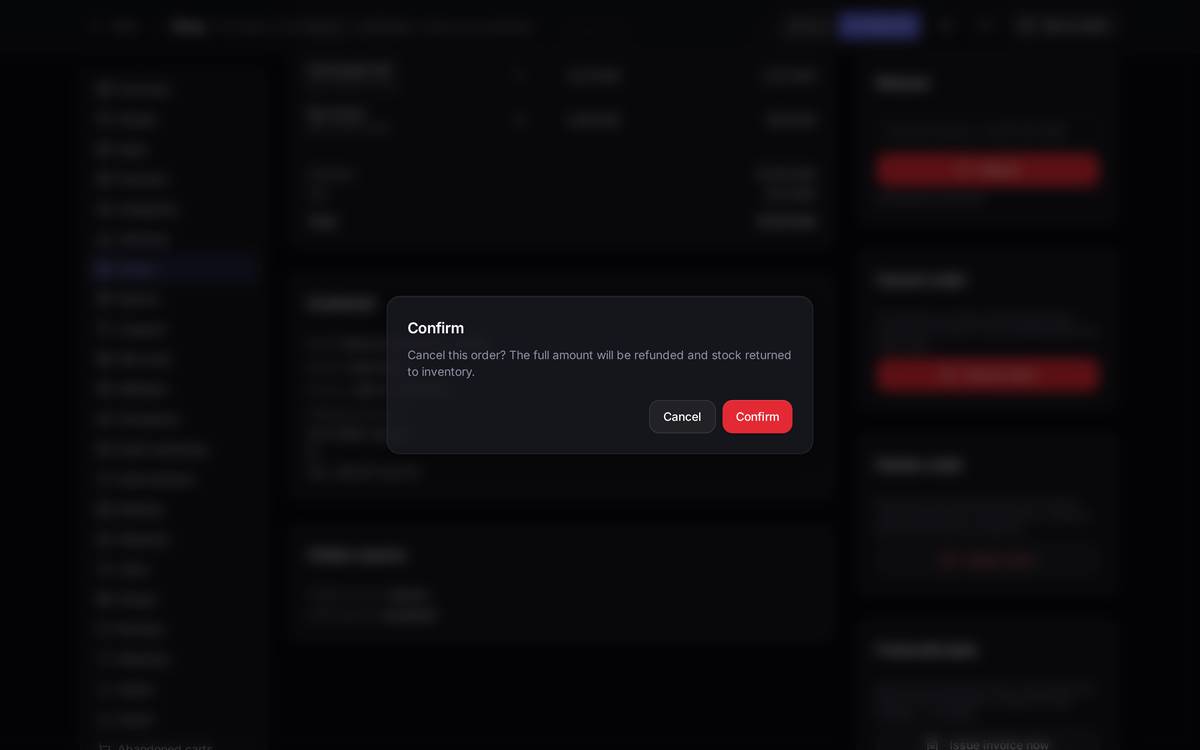
Watch out for… Cancel order and Delete order are not the same thing. Cancel refunds the money and puts the stock back, and is only possible before you've shipped. Delete removes it from the shop and from your reports without refunding anything or touching stock: it goes to the trash. If a customer asks you to undo their purchase, what you want is Cancel.
9.3Handling an order from start to finish
This is the round trip you'll repeat every day. We'll walk through it with a real order, GCB-A09-0002 from Andrew Doyle.
Step 1 — The order arrives paid. In Orders, filter by Paid and open it. Under "Fulfillment and shipping" it says Unfulfilled.
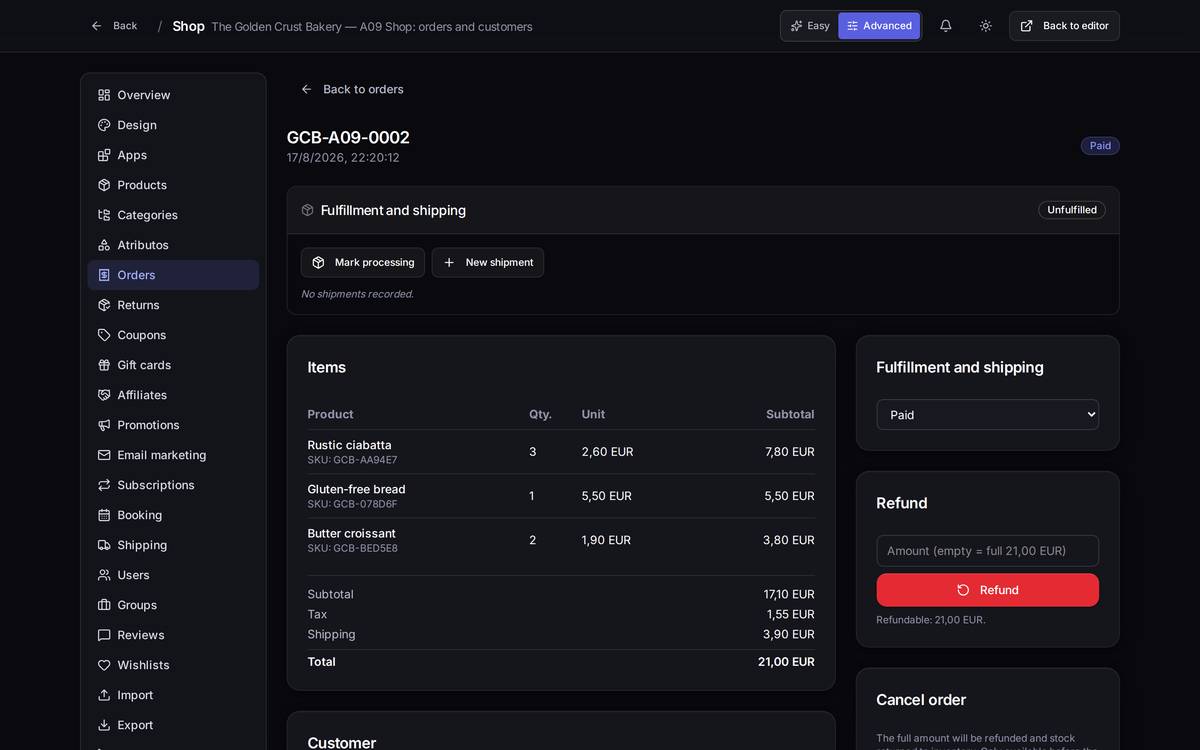
Step 2 — You start on it. Click Mark processing. This is how you (and anyone working with you) know that somebody has already started packing that box.
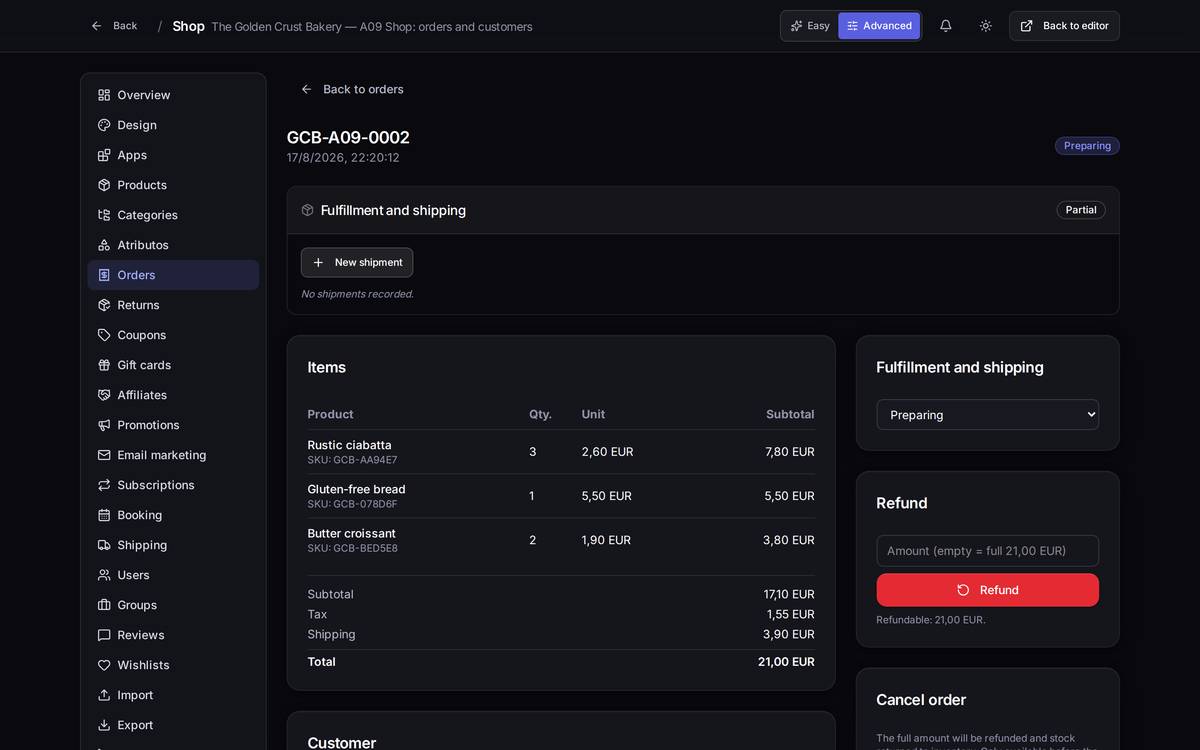
Step 3 — You add the shipment. Click New shipment. A window opens where you pick the carrier and type the Tracking number; if you have the tracking URL and the label as a PDF they go here too, along with the weight and the cost if you track those.
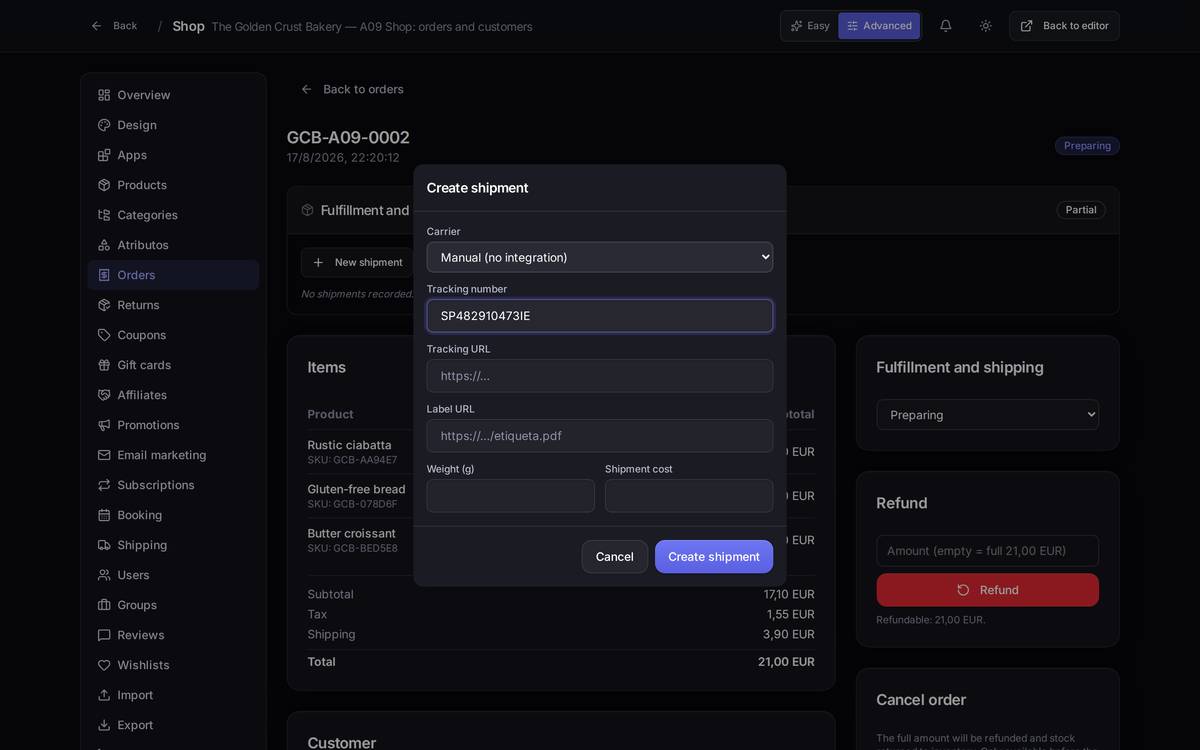
For now only the Manual (no integration) carrier works: Sendcloud and Packlink appear in the list but are disabled.
Step 4 — The shipment is recorded. When you click Create shipment, the shipment is saved on the order with its tracking number.
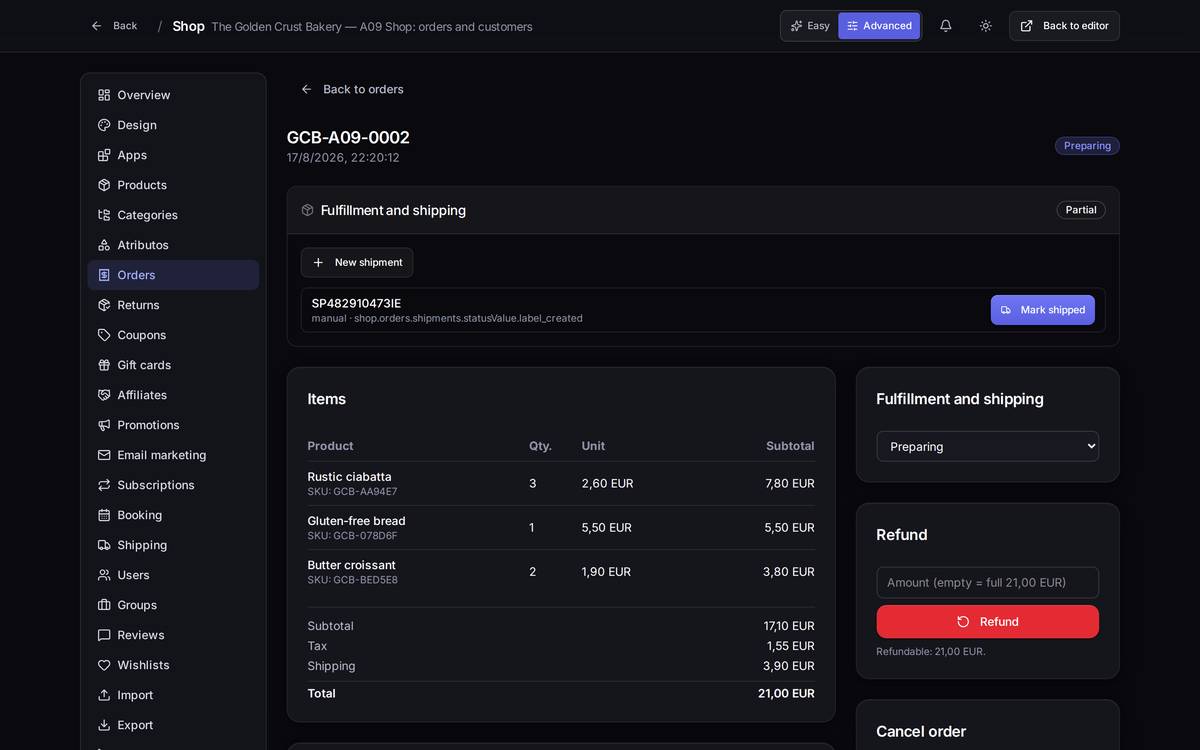
Step 5 — You mark it shipped. In the right-hand column, under "Fulfillment and shipping", open the status dropdown and choose Shipped. The change is immediate: the badge at the top switches to Shipped.
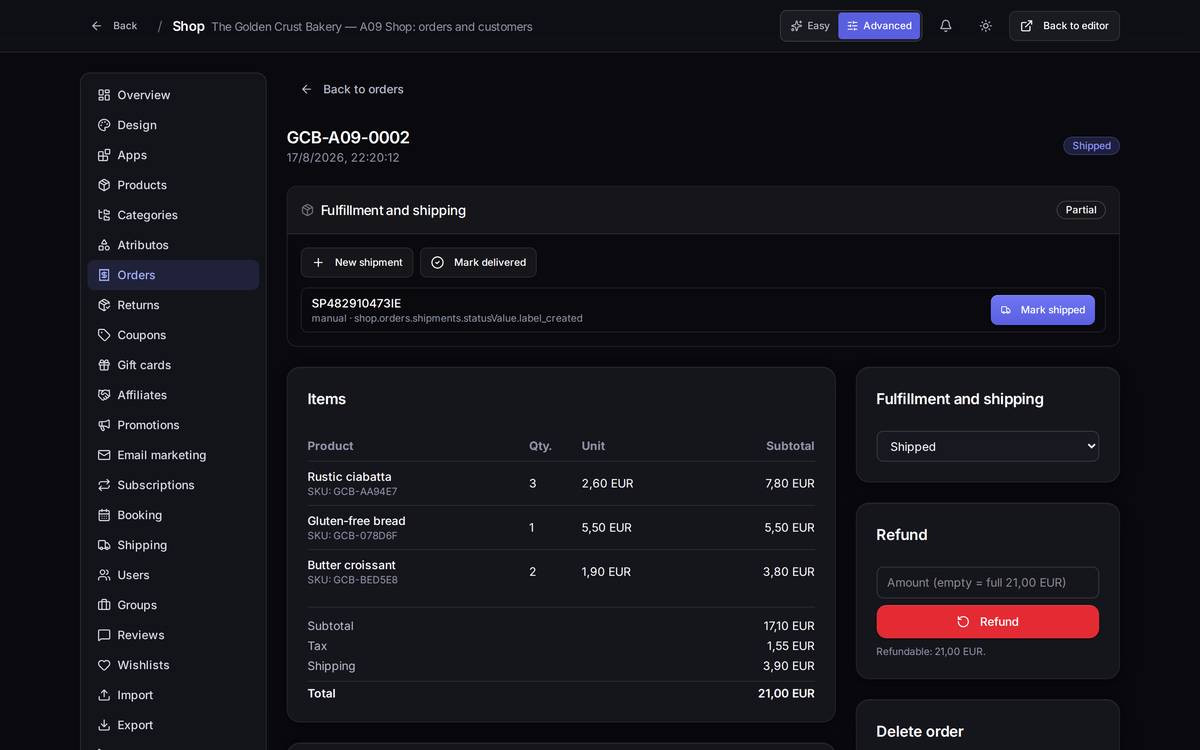
The statuses in the dropdown are, in order: Paid, Preparing, Shipped, Delivered, Cancelled. (The open dropdown doesn't appear in the screenshots in this manual: the operating system draws it outside the page, so it can't be photographed.)
Watch out for… changing the status by hand does not notify the carrier or print anything: it's your way of recording what has happened. And only mark something Shipped once the parcel has genuinely left, because the customer gets the notification and will chase you about it.
Before you cancel, the shop asks. If you click Cancel order, nothing happens until you confirm:
9.4Returns
What it's forThis is where the returns your customers request from their account arrive, each with its RMA code, and where you approve them, receive them and refund them.
How to get thereShop → Advanced switch → Returns. Advanced mode only.
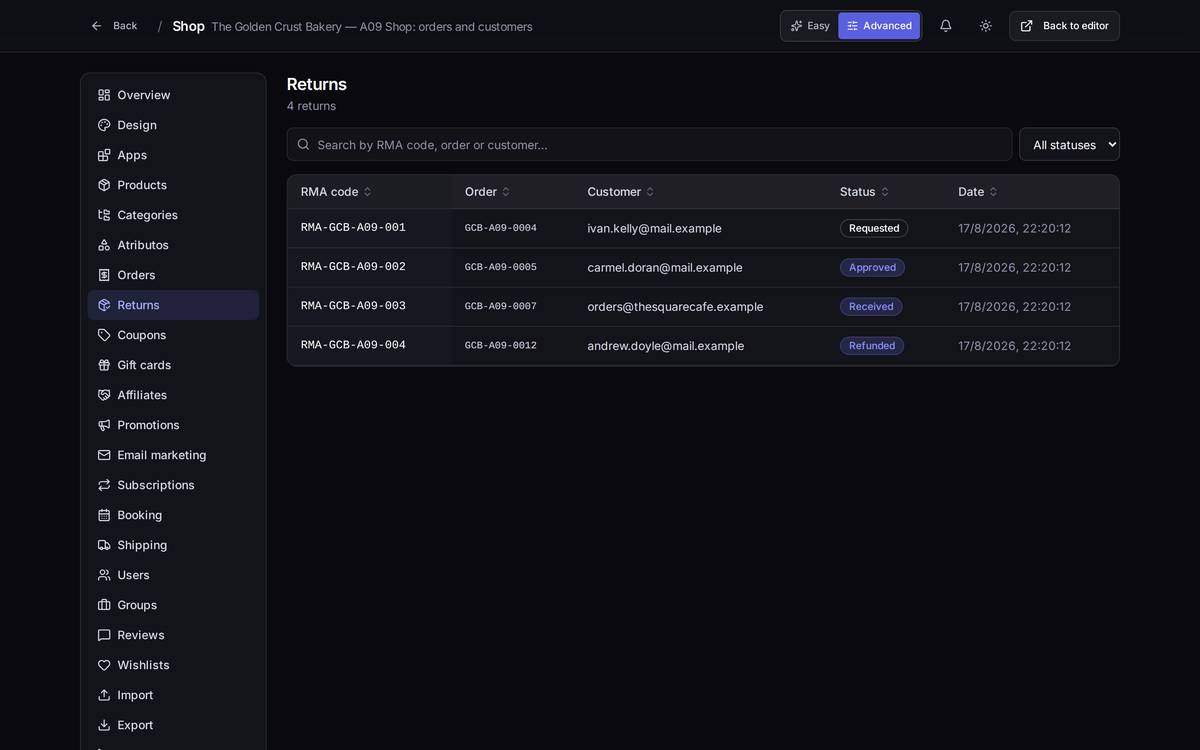
What's on screen. The status filter (Requested, Approved, Received, Refunded, Rejected, Closed) and one row per return. Click the row to open it.
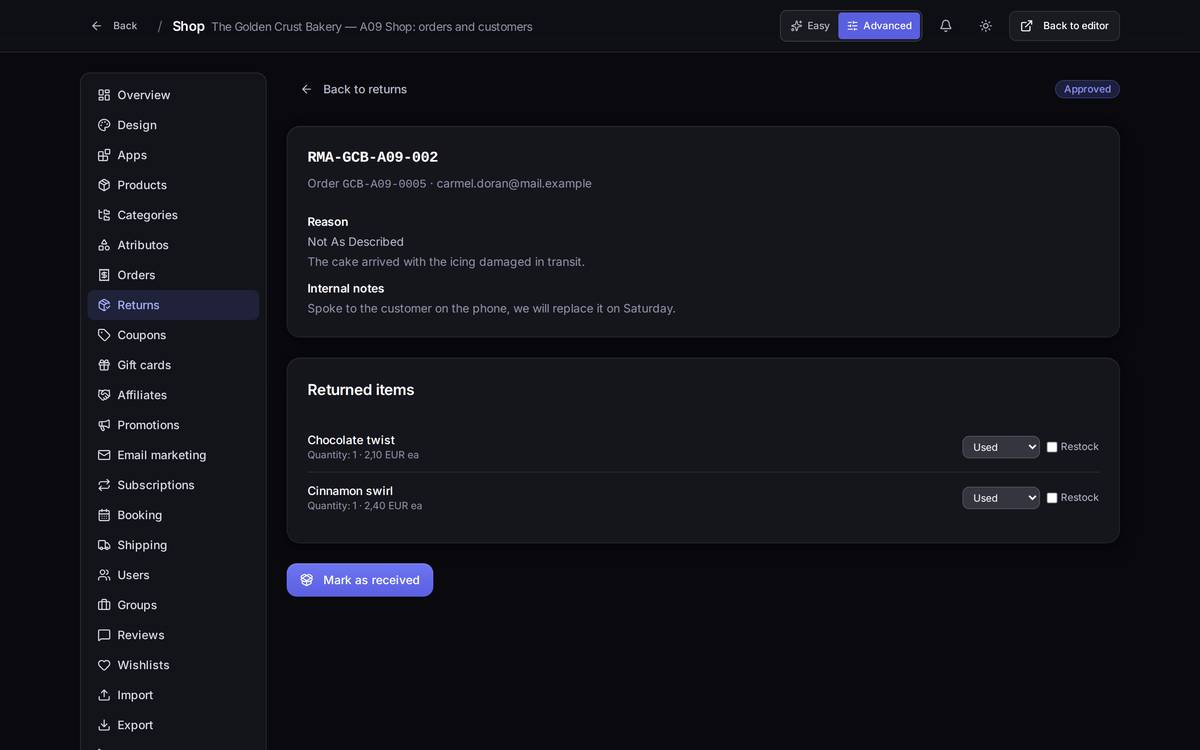
Inside you'll see the reason the customer chose, their explanation, your internal notes and the returned lines with the quantity and condition of each item.
Processing a return, step by step
Step 1 — The request arrives. The return comes in as Requested and you have two buttons: Approve and Reject.
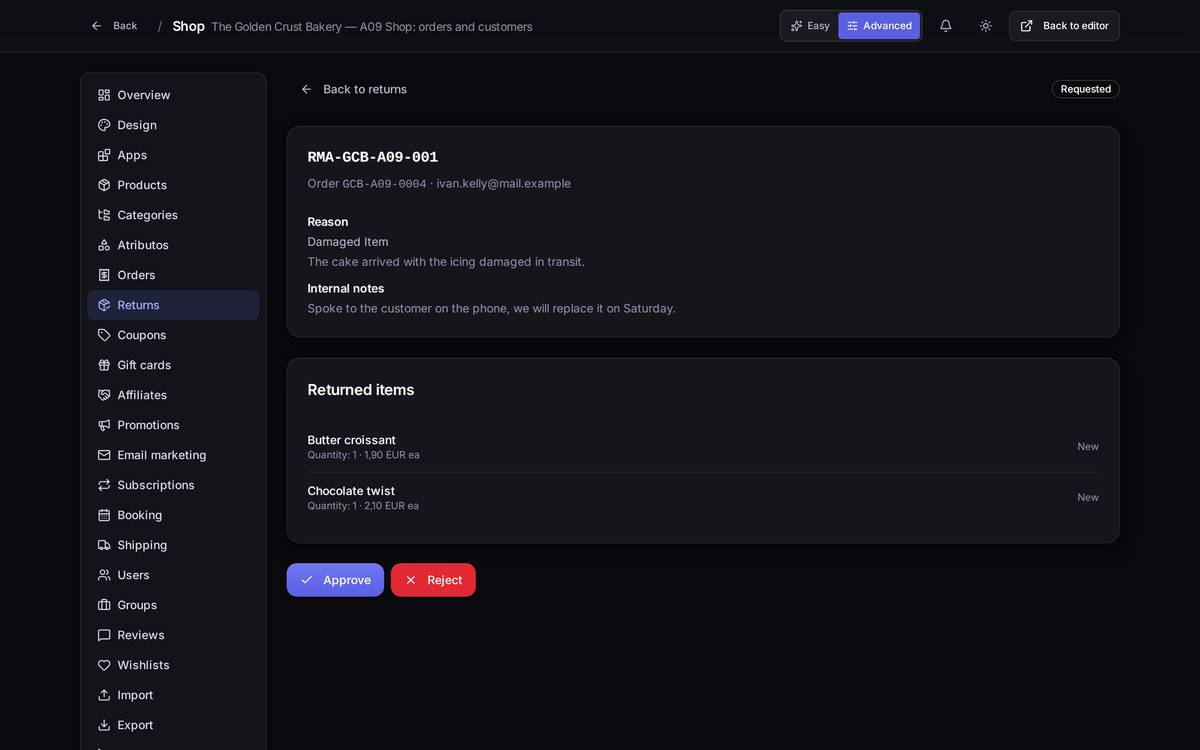
Step 2 — You approve it. Clicking Approve opens a window where you can write internal notes. When you confirm, the customer receives an email with instructions for sending the item back.
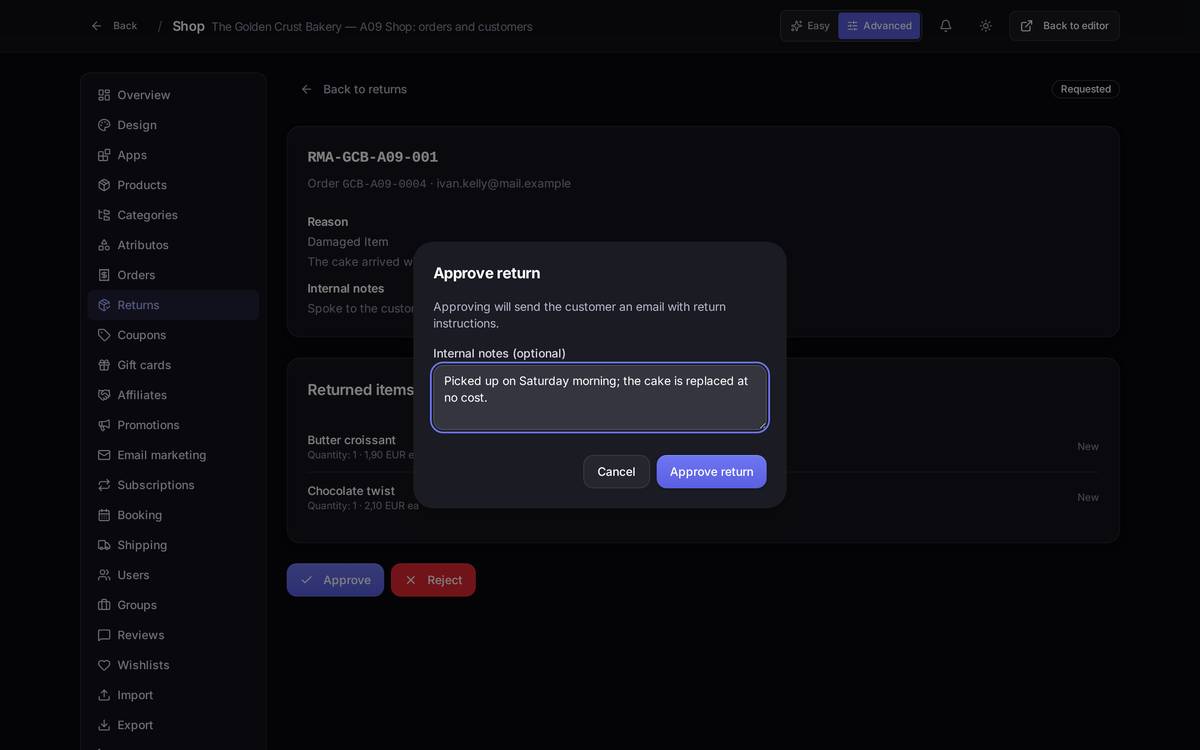
Step 3 — The parcel arrives. When the item reaches your shop, click Mark as received.
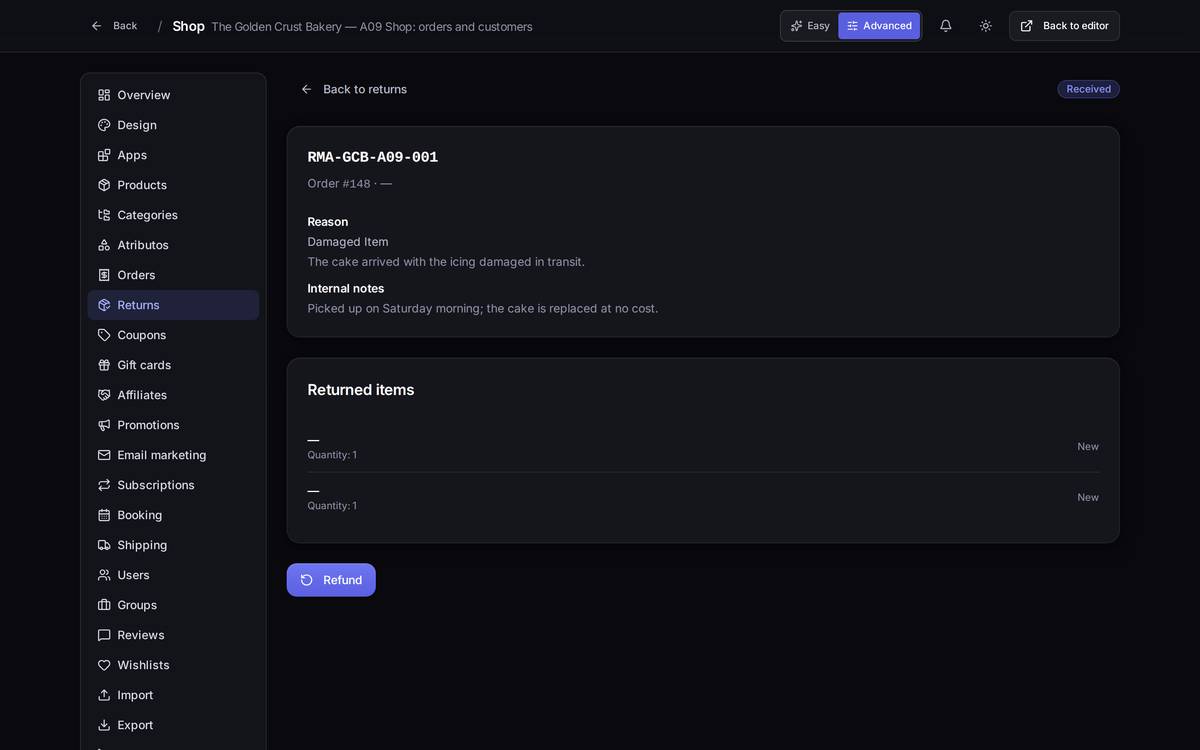
Step 4 — You give the money back. Click Refund. The window already suggests the amount (the sum of the returned lines) and lets you choose how to pay it back: through the Original gateway, as a Gift card, or Manual / bank transfer. If you ticked lines to be restocked, they go back into inventory when you confirm.
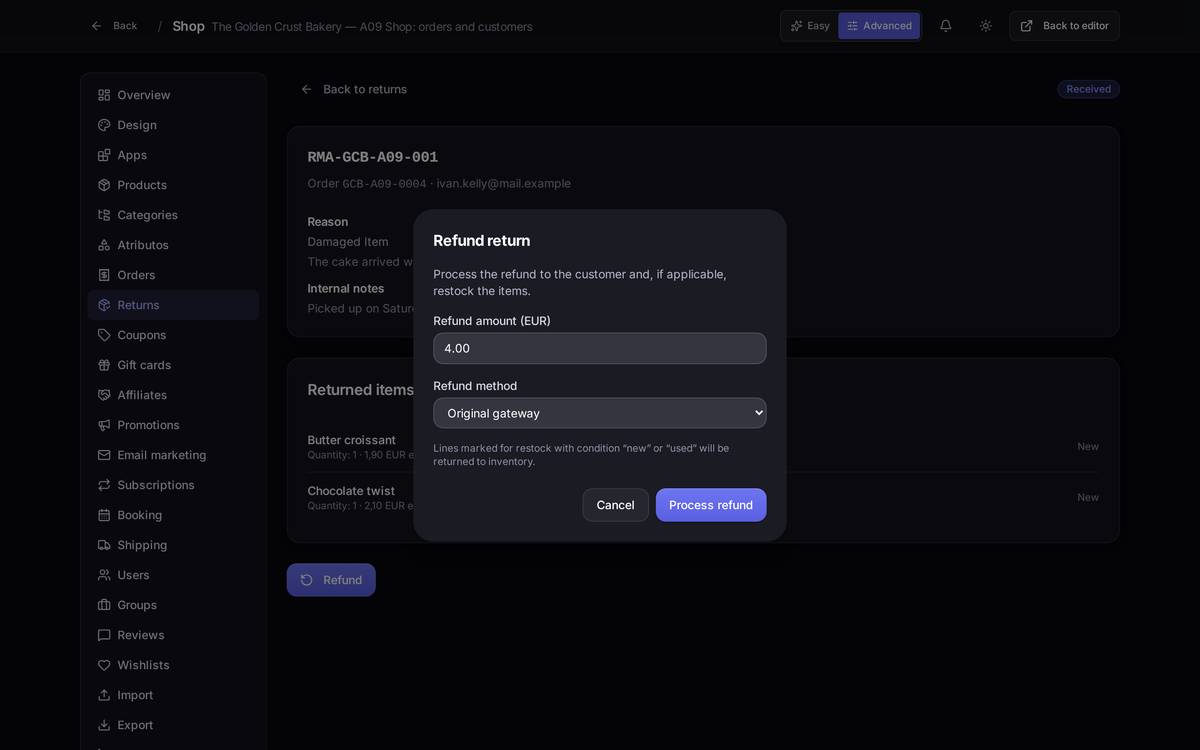
Watch out for… the return reason currently shows as a raw key (Shop.Returns.Reason.Damaged instead of "Damaged item"). It's a known bug and already fixed; if you see it like that, read it as the reason the customer chose. And a refund cannot be undone: check the amount before you confirm.
9.5Your customers
What it's forThe list of who buys from you, with what they've spent and how many orders they've placed.
How to get thereShop → Advanced → Users (yes, the menu calls them "Users"). Advanced mode only.
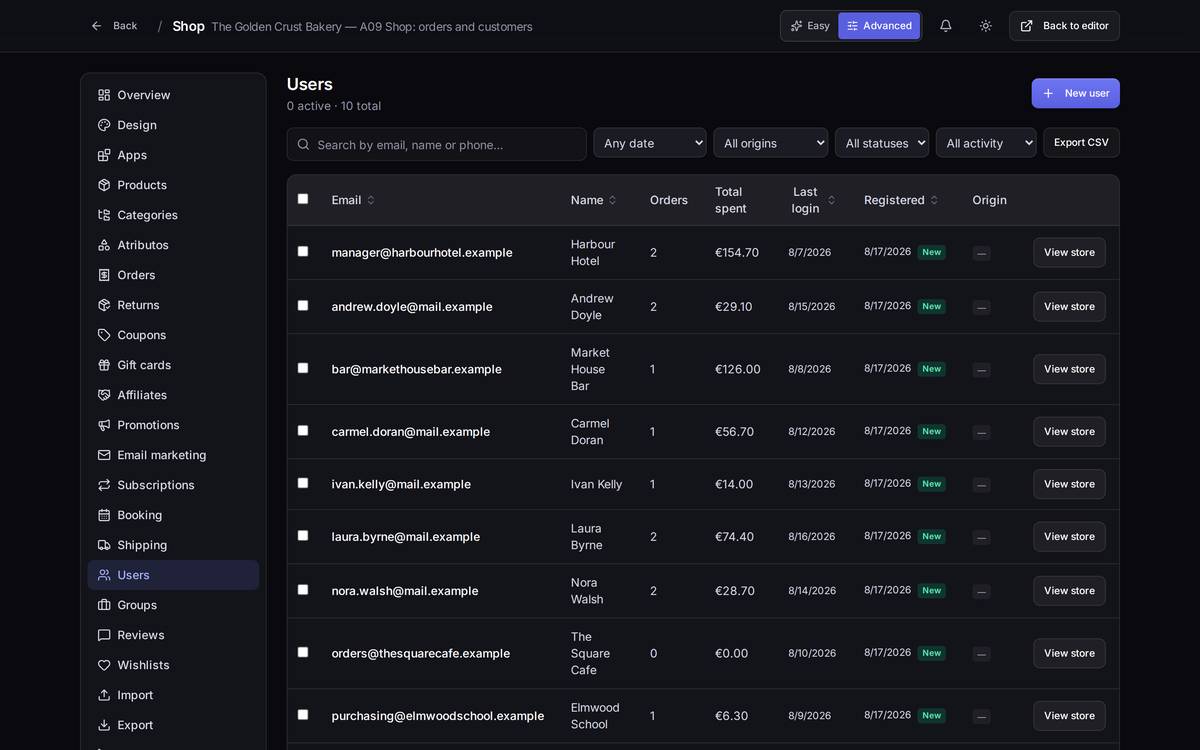
What's on screen. Filters by signup date, by origin (WhatsApp, form, imported), by approval status and by activity; the Export CSV button to download the list, and New user to add somebody by hand. The View store column opens your shop as that customer would see it (very handy with trade prices).
Watch out for… the counter at the top says "0 active · 10 total" even when you have customers with orders. "Active" there only counts customers flagged as such by an external ERP; if you have no ERP connected it will always say zero. It doesn't mean you have no customers.
An individual customer
How to get thereIn Users, click the customer's row.
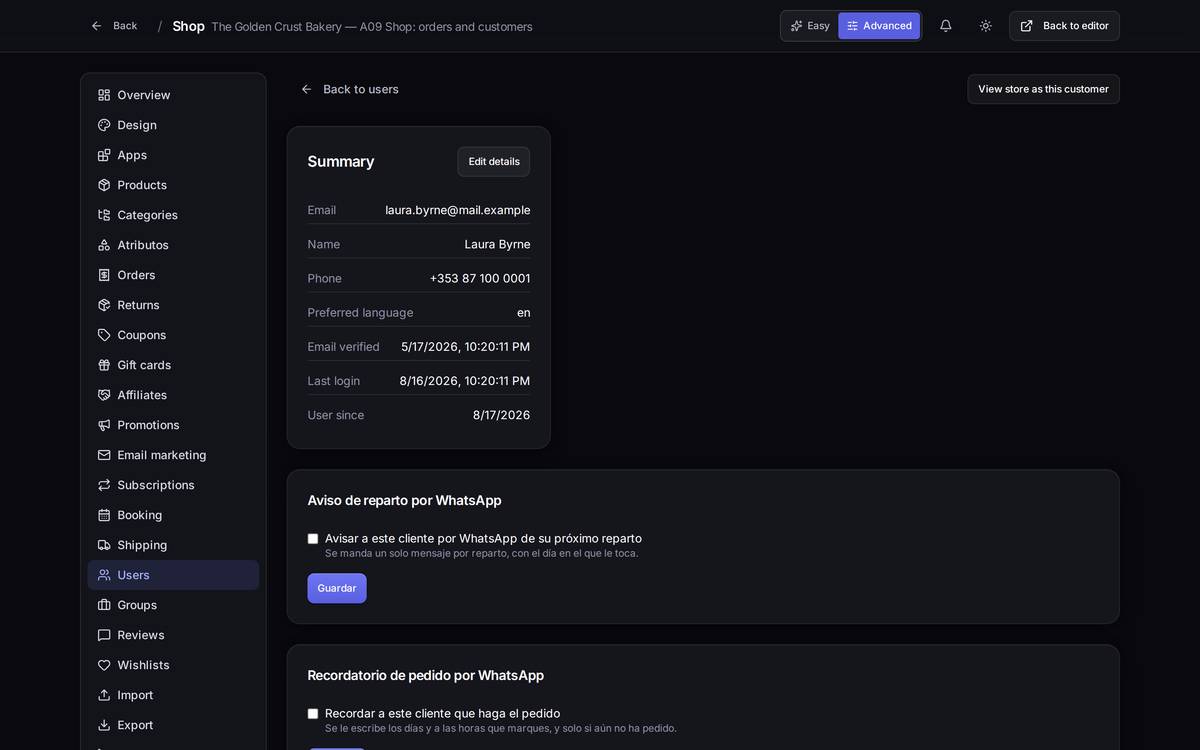
Here you have, top to bottom: their details and last login; WhatsApp notifications (delivery alert and order reminder); the B2B data (whether they're approved, which company group they belong to, tax ID, company); the phone numbers they can sign in with over WhatsApp; their book of Delivery addresses; their subscriptions; the GDPR block; and at the end their order history.
An exampleA customer rings you saying the bread never arrived: go into Users, search for them by email, open them up, scroll down to the order history and click the most recent one. From there you can see the status and the tracking number.
Watch out for… the Right to be forgotten block. It anonymises the customer and revokes access to their account: it is irreversible, which is why it makes you type BORRAR to confirm (that Spanish word is what the panel expects, in English too). In the order history on this screen the statuses come out as raw keys (pending_payment, fulfilling) instead of plain words; it's the same bug noted in the annex.
9.6Reviews of your products
What it's forThe reviews your customers leave. Nothing is published on its own: you decide what appears in the shop, and you can reply in public.
How to get thereShop → Advanced → Reviews. Advanced mode only.
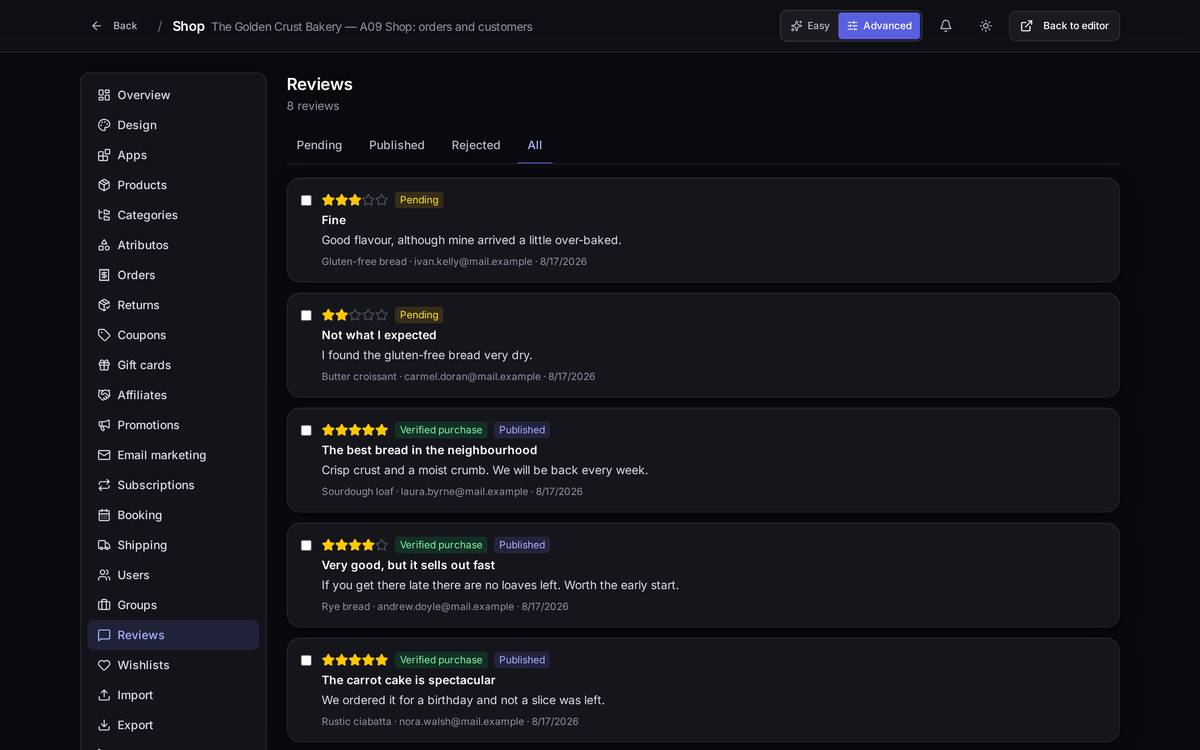
The tabs across the top are your work queue: Pending is what's waiting for you to look at it. Each card shows the rating, the title, the text, the product, the customer and the date.
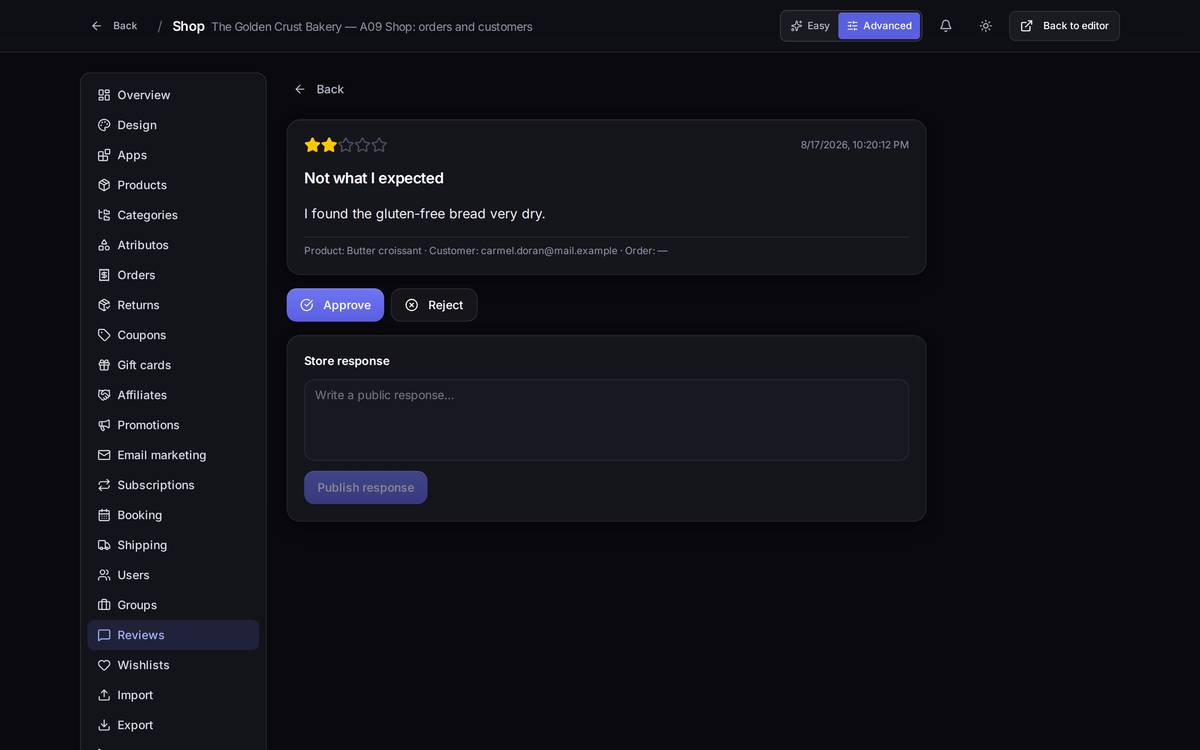
Replying to a review and publishing it
Step 1 — You write the reply. Open the review and write in Store response. Whatever you put there will be visible to anyone who opens that product page.
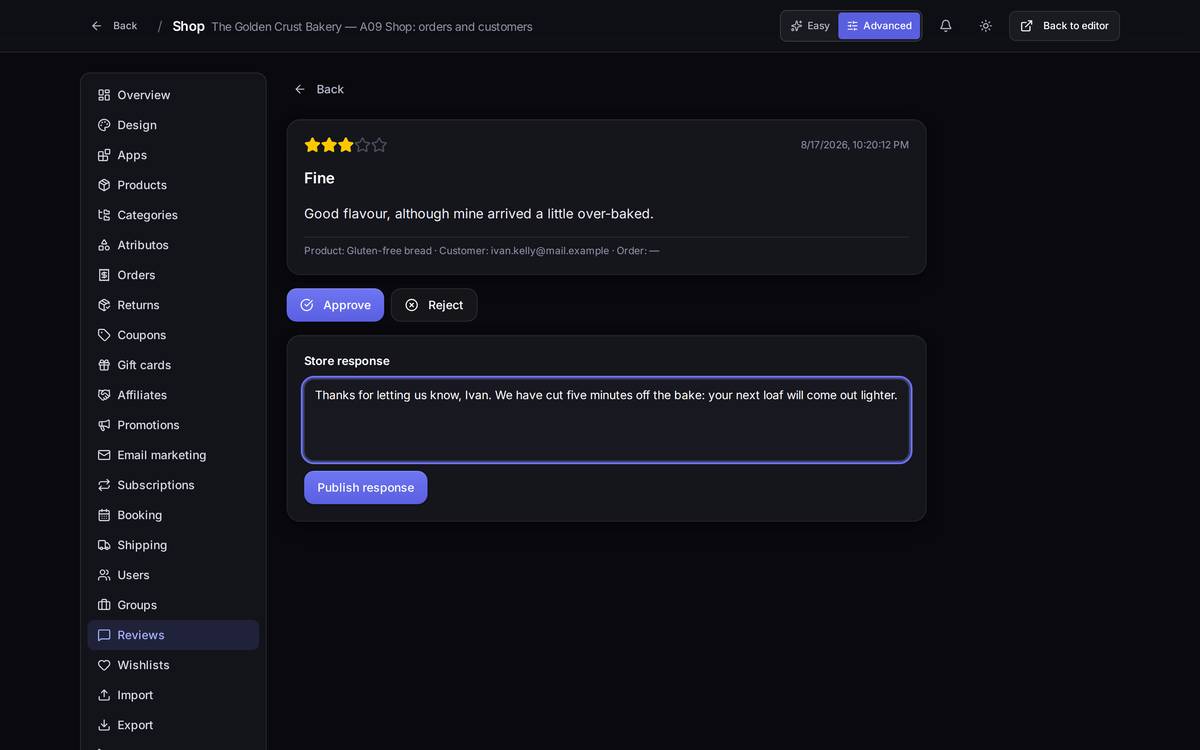
Step 2 — You publish it. Click Publish response and then Approve so the review shows in the shop. Approving takes you back to the Pending queue; the published review is now in the Published tab.
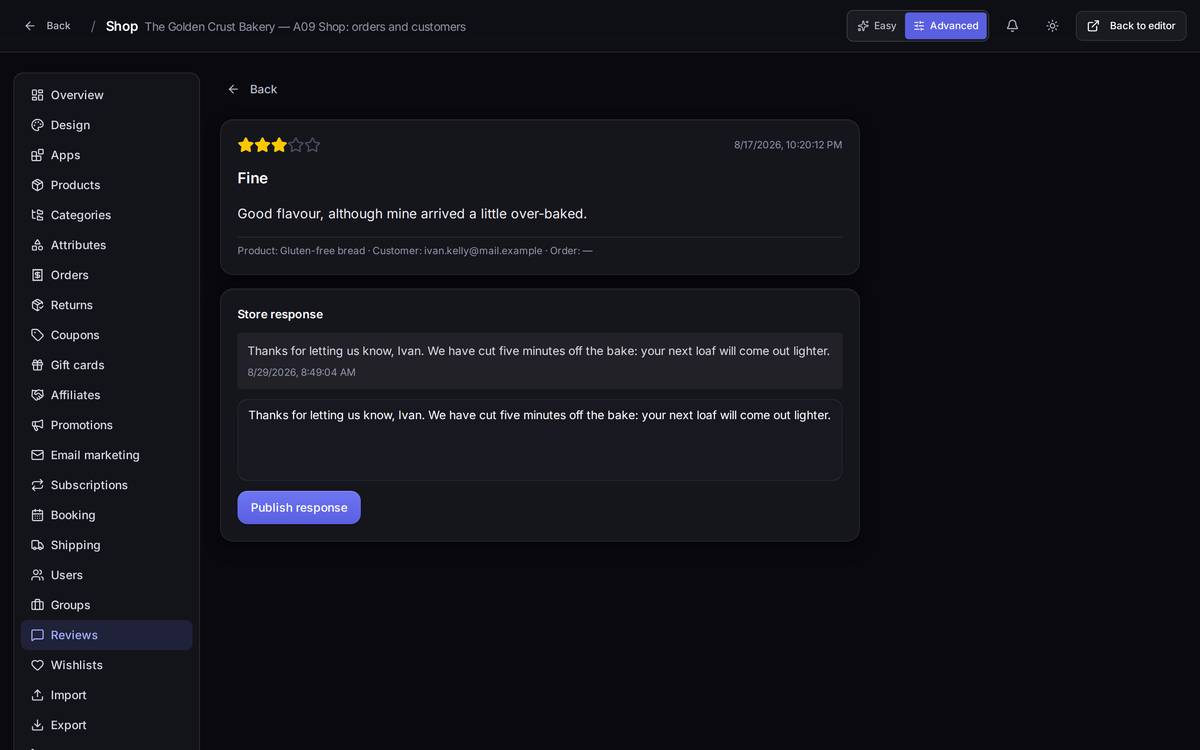
An exampleA customer gives you three stars and says the bread arrived very dark. Go into Reviews, open it, write "Thanks for letting us know — we've taken five minutes off the bake", click Publish response and then Approve. Everyone who looks at that product from now on sees the criticism and your answer.
Watch out for… rejecting a review doesn't delete it, it moves it to the Rejected tab. And always reply to the bad ones: one piece of criticism with an answer sells more than a shop with five stars and no comments at all.
9.7Subscriptions and recurring payments
What it's forThe customers who buy the same thing every week or every month and are charged automatically.
How to get thereShop → Advanced → Subscriptions. Advanced mode only.
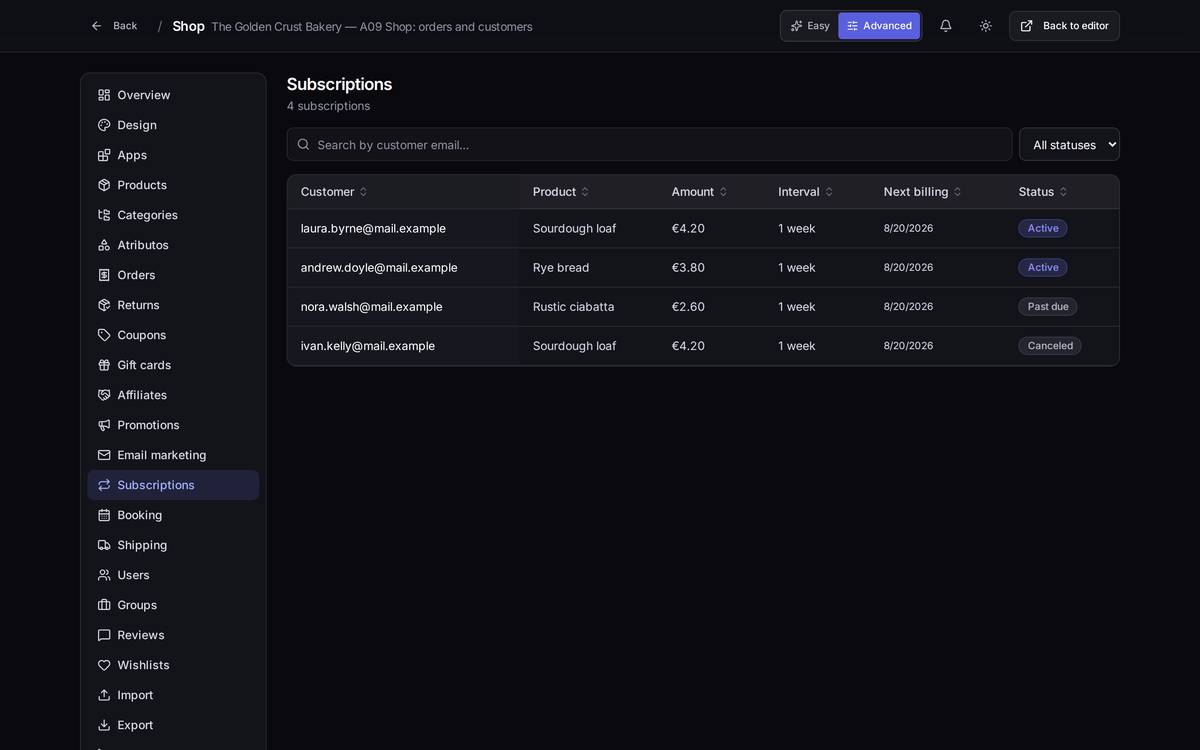
The statuses are Trialing, Active, Past due, Unpaid, Cancelled, Incomplete. Past due is the one to watch: it means a charge has failed.
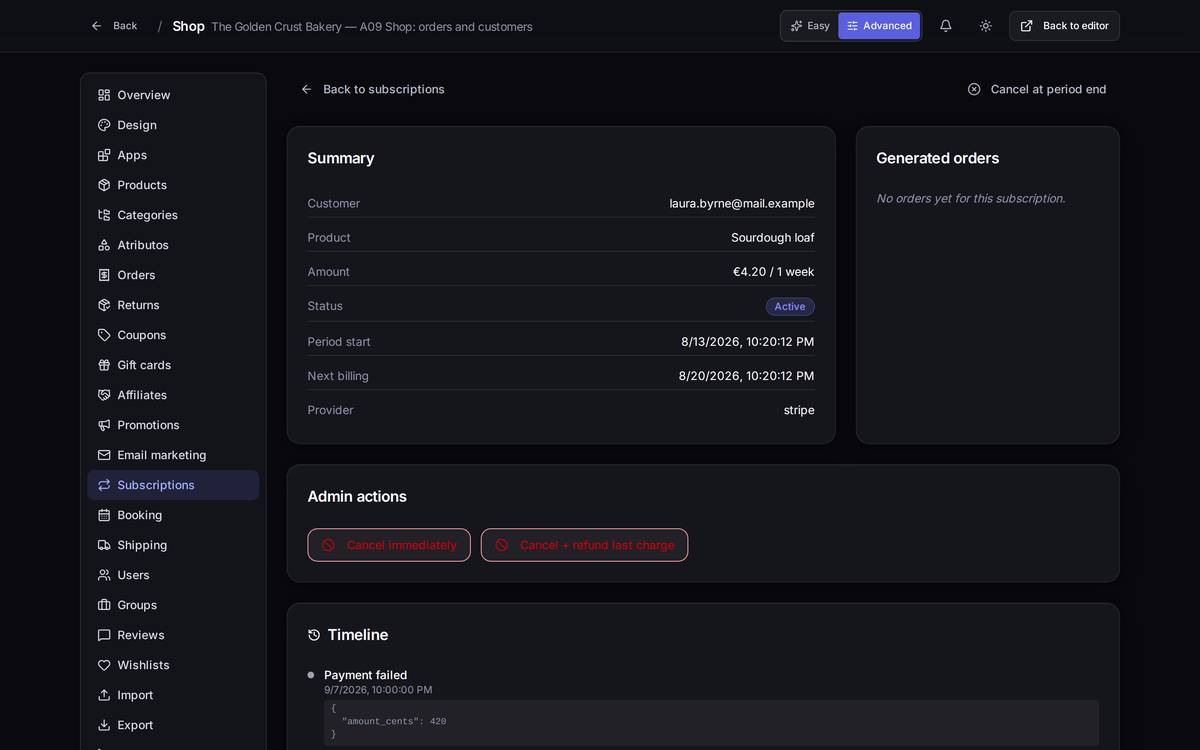
Inside you have the amount and how often it's charged, when the next charge is due, the orders it has generated and a history of charges. The actions are Cancel at period end (which respects what has already been paid for), Cancel immediately and Cancel + refund last charge.
Watch out for… Cancel immediately cuts off the service there and then even if the customer has paid for the whole week. If you'd rather not field a complaint, use Cancel at period end.
9.8Carts that were left half-finished
What it's forSeeing who filled a basket and never paid. The shop already emails them a reminder on its own (see "Abandoned cart reminders" in chapter 10); from here you can also send it yourself right away.
How to get thereShop → Advanced → Abandoned carts. Advanced mode only.
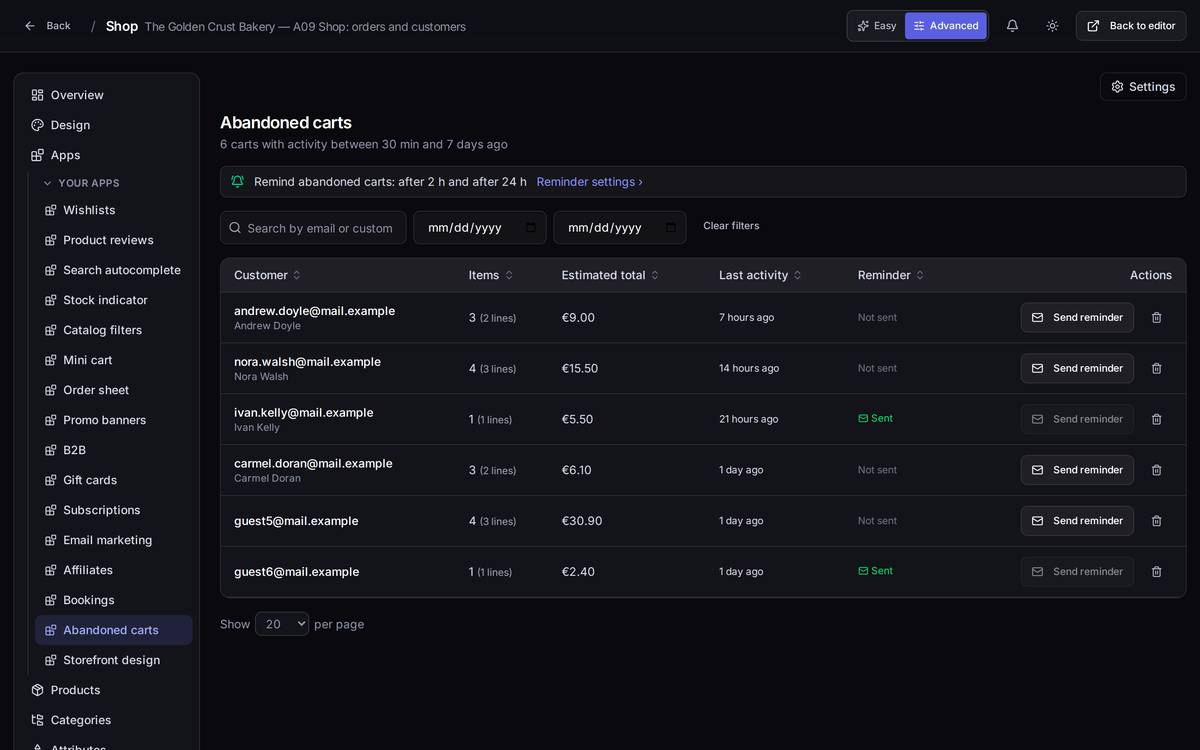
What's on screen. At the top, a strip that says whether the automatic reminder is on and when it goes out, with the Reminder settings link. Below, one row per cart with the customer (or their email if they had no account), the items, the Estimated total, how long ago the last activity was, and the Reminder column: whether it has been sent or not. The Send reminder button sends it there and then.
An exampleYou see a €30 cart from five days ago marked "Not sent". You click Send reminder, confirm, and that person gets an email with their products and a Finish my order button that takes them back to their cart.
Watch out for… the email really is sent as soon as you confirm, and only once per cart. Only carts with activity between 30 minutes and 7 days ago appear here: older ones drop off the list. If the customer asked not to get reminders, the button tells you and sends nothing.
9.9Trade customers (B2B)
What it's forSelling to cafés, schools or shops at prices that differ from the ones the general public sees.
How to get thereShop → Advanced → Groups (that's what the menu calls it). Advanced mode only. There are two tabs inside.
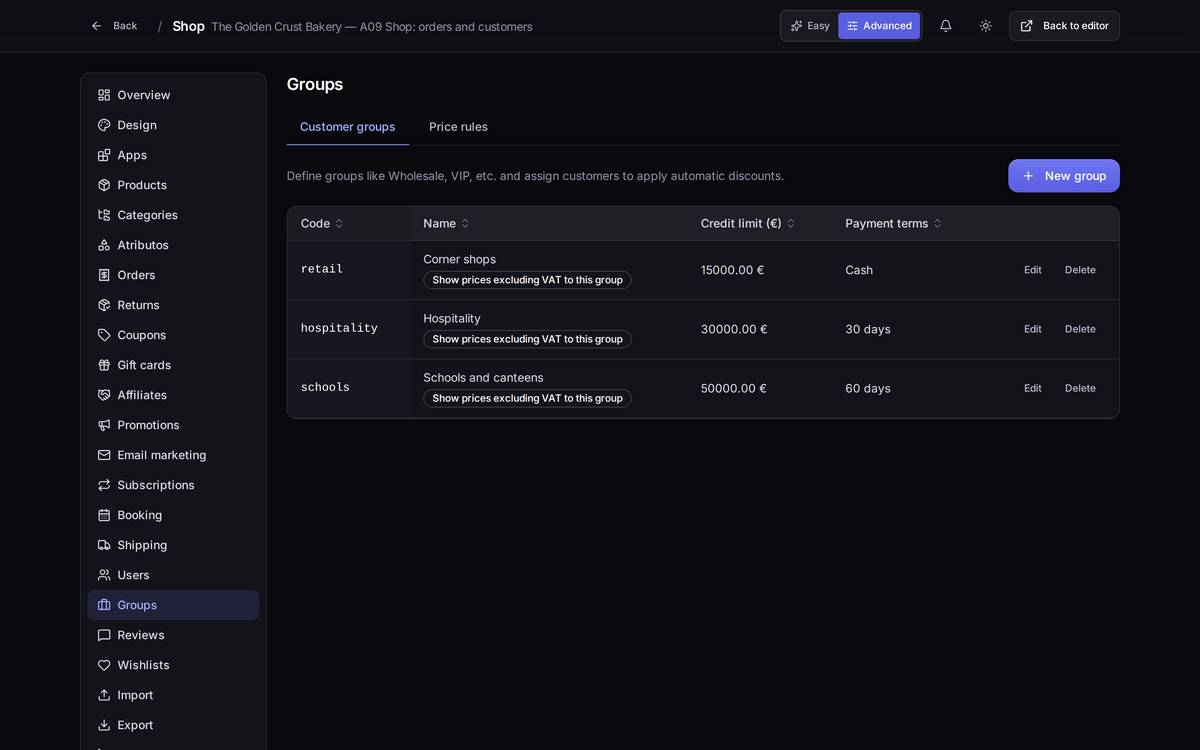
Customer groups. Each group (Hospitality, Schools and canteens, Corner shops…) has a code, a name, whether prices are shown to them excluding VAT, a credit limit and payment terms (cash, 30 days, 60 days). A customer is assigned to their group from their own record, under B2B data.
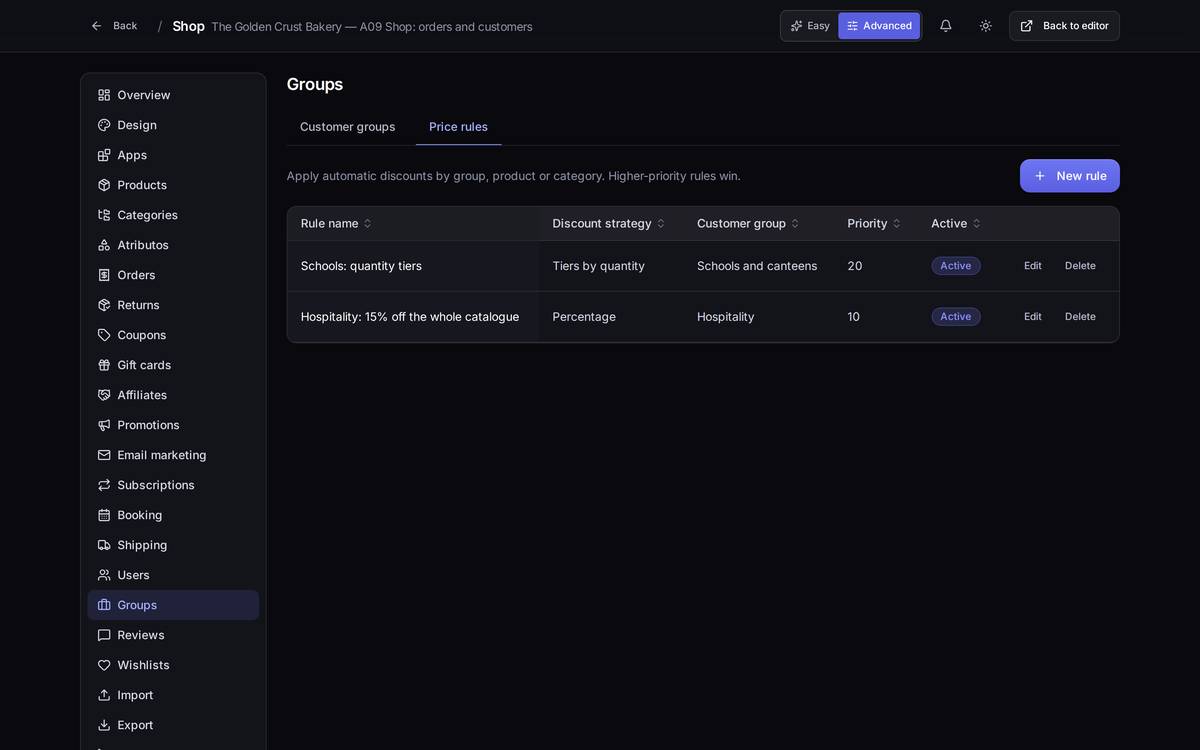
Price rules. This is where you set the discount: a percentage across the whole catalogue, a fixed price, or tiers by quantity ("from 50 units, 18%"). Each rule is tied to a group and has a Priority: if two rules land on the same product, the higher priority wins.
An exampleYou want hospitality customers to get 15% off everything: the Price rules tab → New rule → scope All products, group Hospitality, strategy Percentage, 15, priority 10, active. From then on, any customer in that group sees that price once they sign in.
Watch out for… the credit limit column used to say "(cents)" even though the amount is in euros; that's fixed, but if your panel hasn't updated yet, read it as euros. And deleting a group doesn't delete its customers: they're left without a group and go back to seeing the public price.
9.10Bookings
What it's forIf you sell services by appointment (a workshop, a room, an hour with someone on your team), this is the diary.
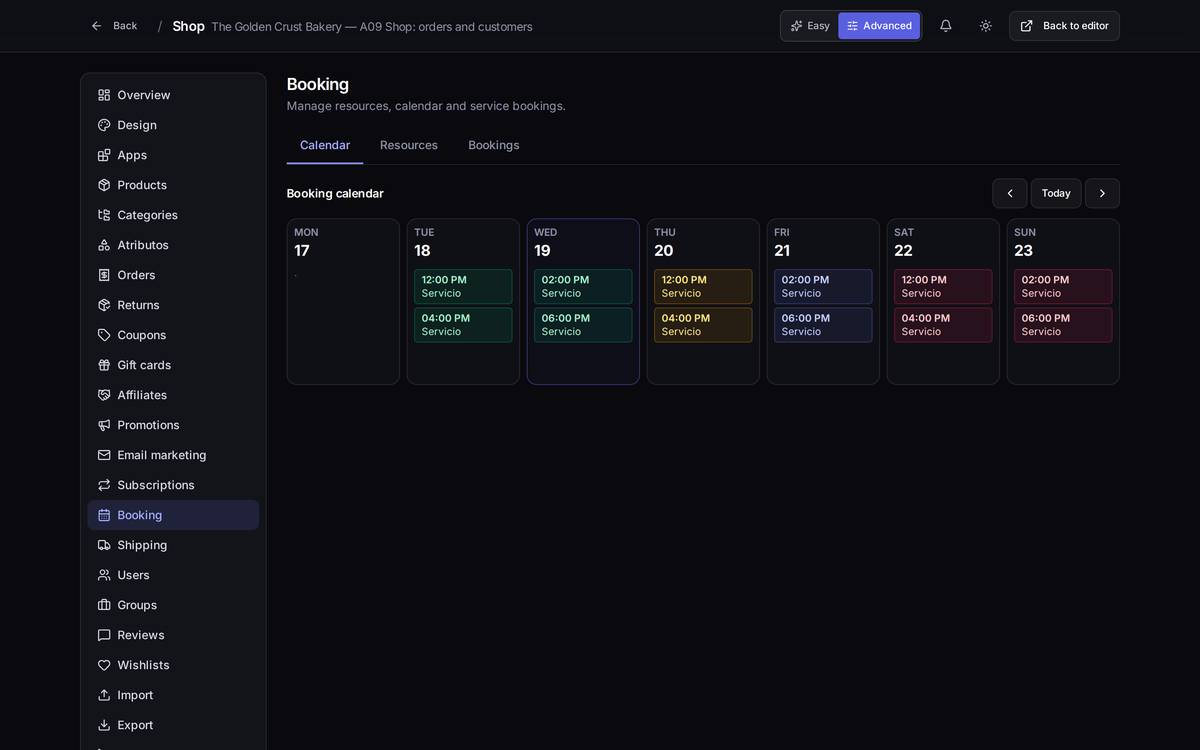
How to get thereShop → Advanced → Booking. Advanced mode only. It has three tabs: Calendar, Resources and Bookings.
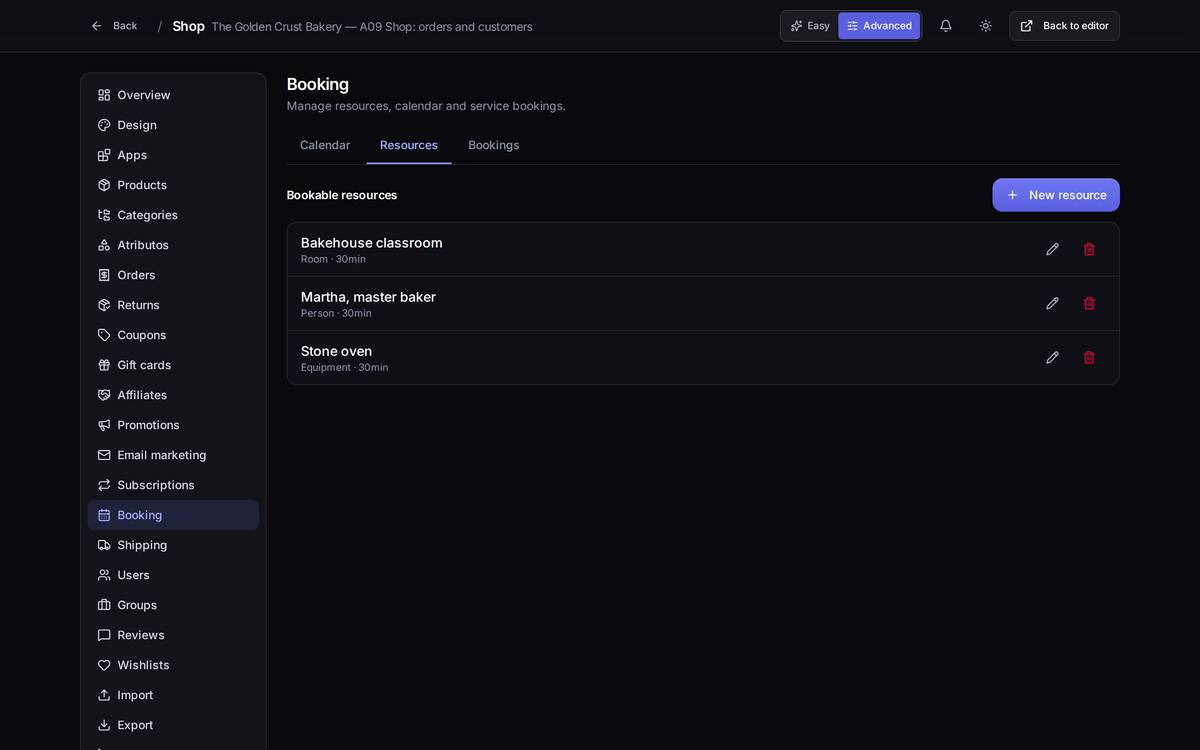
Resources are the things that can be booked: the bakehouse classroom, Martha the master baker, the stone oven. Each one has its weekly schedule and a buffer between bookings.
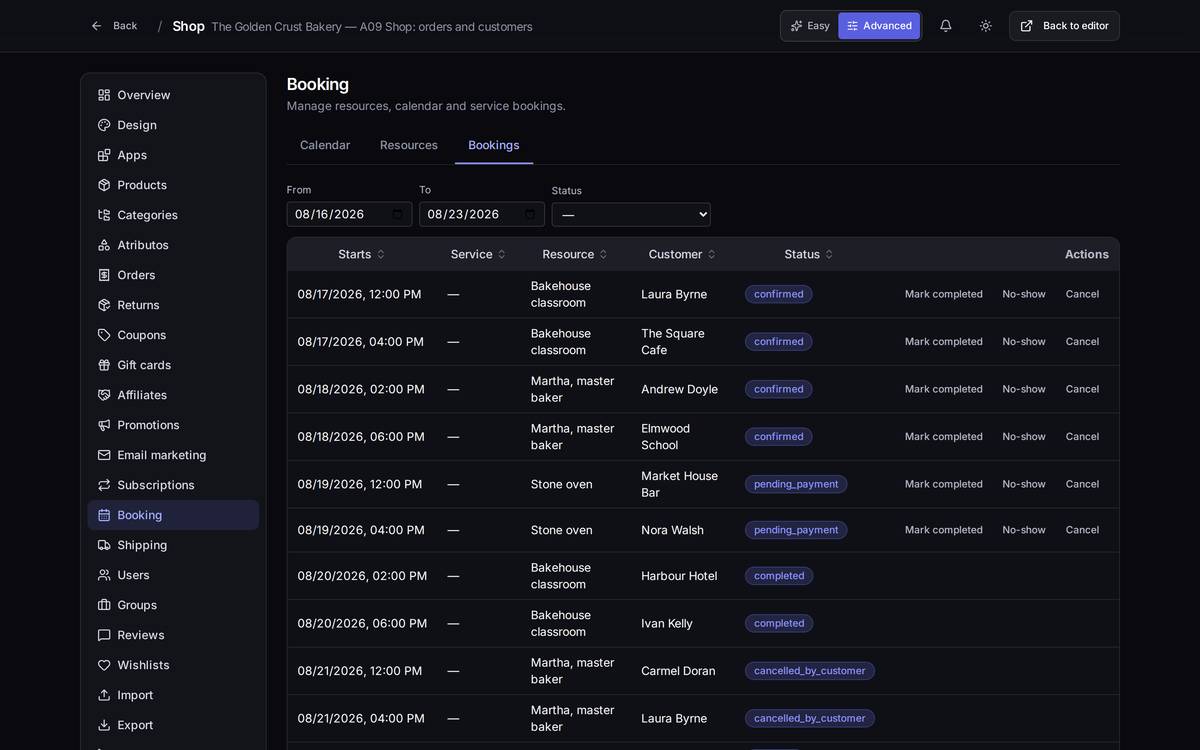
In the list you filter by date and by status, and on each appointment you can Mark completed, log a No-show or Cancel.
Watch out for… the calendar is placing every appointment one day later than the date it actually has (compare the Calendar tab with the Bookings tab in the two screenshots above: the same Monday appointment shows up on Tuesday in the calendar). Until that's fixed, trust the list, not the calendar. It's logged in the bug annex.
9.11Light and dark
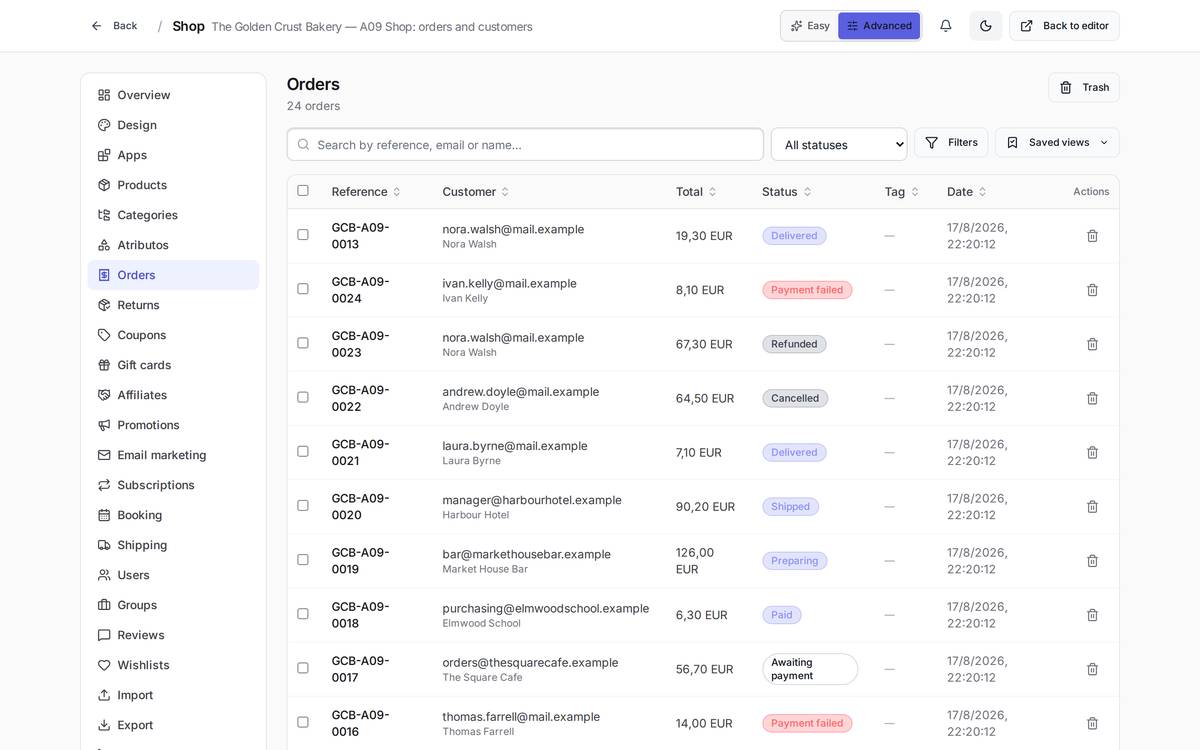
The shop comes in dark by default, but there's a sun/moon button top right that switches it to light. It's yours and yours alone: it doesn't affect what your customers see on your website, only how you see the panel. Every screenshot in this chapter is in dark; this is what light looks like: