Chapter 7 of 11
Publishing, domains and your team
Putting your site online, pointing your domain at it and working with other people.
On this page
- 7.1Publishing your site
- 7.2Choosing where the site gets published
- 7.3When the site uploads to your own server (and what to look at if it stops halfway)
- 7.4Earlier versions of your site
- 7.5Showing your site to someone before it is ready
- 7.6Inviting someone to your project
- 7.7Who has access and whose invitation is still pending
- 7.8When the invitation cannot be sent
- 7.9Backing up to GitHub (Advanced mode only)
- 7.10Your free address, before you have a domain of your own
- 7.11My domains
- 7.12Buying a domain
- 7.13A domain's page
- 7.14Whether the domain is set up correctly
- 7.15Pointing the domain at Speaksite (and what this DNS business is)
- 7.16Your domain's DNS records
- 7.17Forwarding the domain to another address
- 7.18Bringing a domain over from another provider
- 7.19Taking your domain to another provider
- 7.20Your outside domain, without moving it anywhere
- 7.21Satellite site
- 7.22Which address do I use: the table at a glance
- 7.23The things worth remembering
Up to now you have been working on the draft: your site exists, but you are the only one who can see it. In this part of the manual you put the site online, give it a domain name of your own, learn how to go back if something breaks, and give access to the people who help you.
7.1Publishing your site
What it's forTaking everything you have built in the draft and putting it on the internet so that anyone can see it. Until you publish, nobody sees your changes.
How to get thereOpen your project (My Projects → click the project card). The purple Publish button is at the top right. Click the small arrow beside it and the menu drops down.
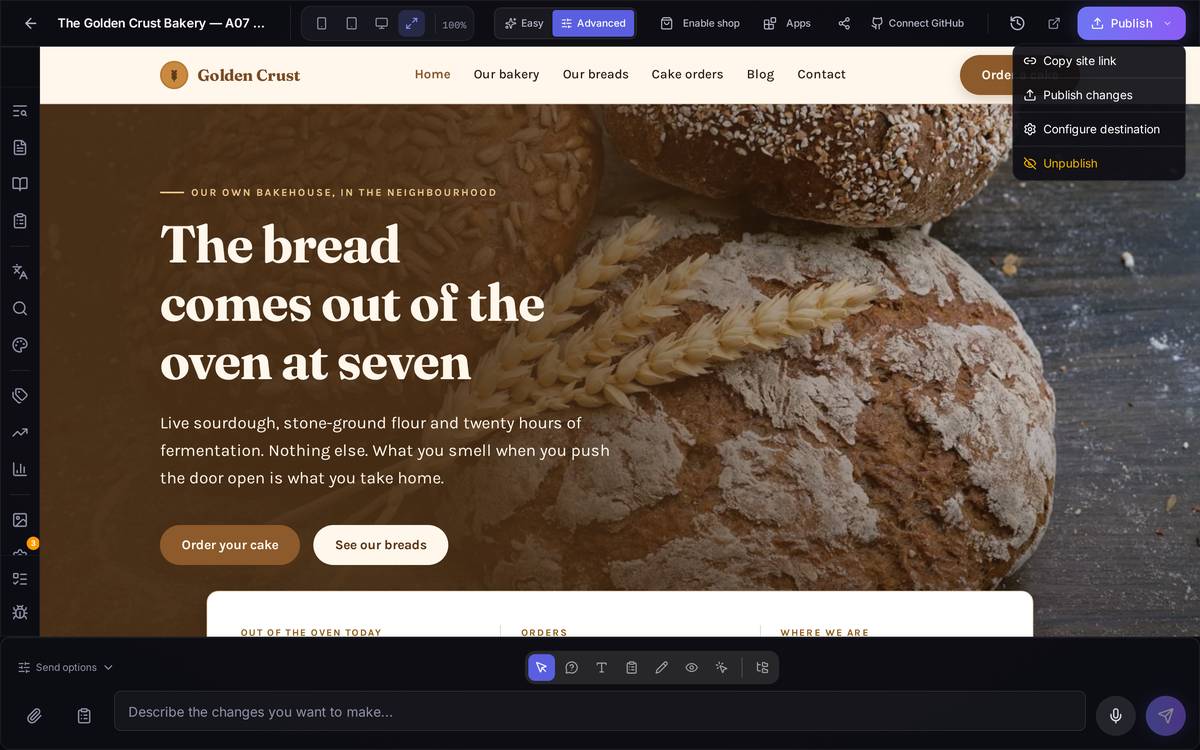
What's on screen
- Copy site link: copies your site's public address so you can paste it into an email or a WhatsApp message.
- Publish changes: what you want 99% of the time. Before uploading anything, Speaksite optimizes your images; that can take a few seconds and the button keeps spinning.
- Configure destination: choosing where the site gets published (see the next section).
- Unpublish: takes the site off the internet. Your work is not deleted, but anyone who visits your address stops seeing the page.
The "Unpublished changes" notice. It is the sign that you have touched something since the last time you published. If it is not there, what you see in the editor is exactly what is live.
A worked example, start to finishYou have changed the phone number on your contact page and you want it live today: open the project → check that "Unpublished changes" is showing at the top → click the arrow next to Publish → Publish changes → wait for the button to stop spinning and turn green with a "Published" → click Copy site link, paste it into your browser and check that the new number is there.
Watch out for…
- Publishing replaces whatever was there before. If you regret it, the fix is the version history (further down), not publishing again.
- Unpublish does not ask twice: your site disappears from the internet until you publish again.
- If you have a shop, publishing also uploads the catalogue exactly as it stands at that moment.
7.2Choosing where the site gets published
What it's forDeciding whether your site lives on the hosting Speaksite gives you (the usual choice) or on a server of your own, to which Speaksite uploads the files over FTP.
How to get thereArrow next to Publish → Configure destination.
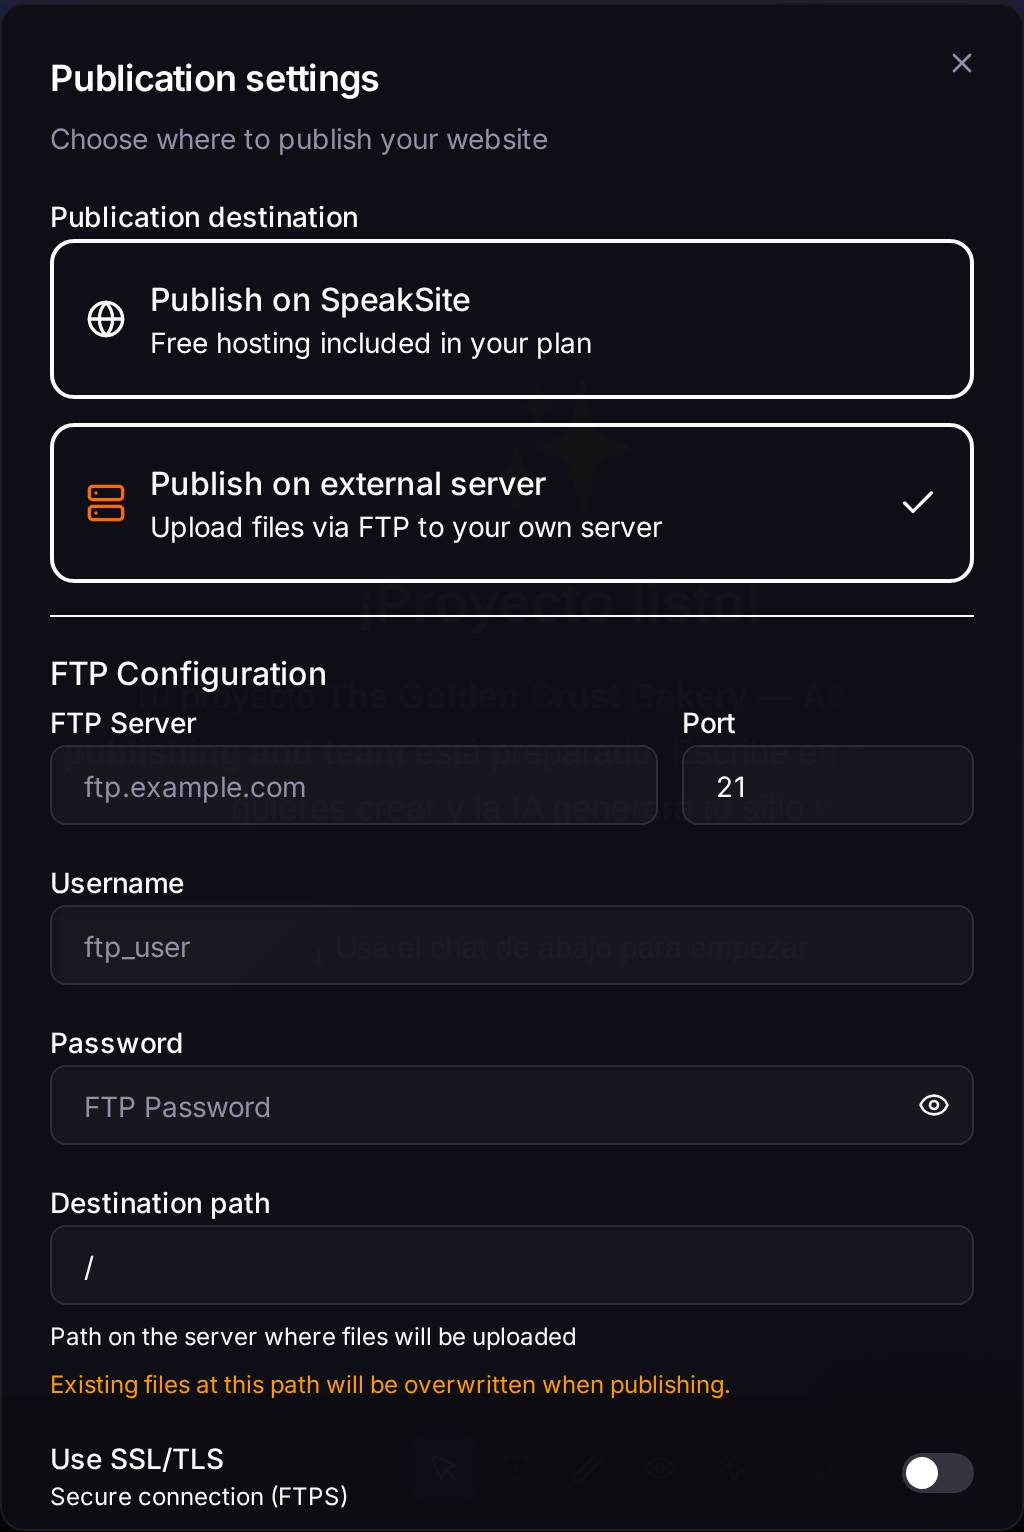
What's on screen
- Publish on Speaksite: nothing to configure. Your site sits at a Speaksite address and the security certificate is included.
- Publish on external server: for anyone already paying for hosting of their own. You need four details, all of which your hosting provider gives you: FTP Server (something like
ftp.mydomain.com), Username, Password and the Destination path (often/public_htmlor/www). The Test button checks that those details work before you publish anything, and Save and verify stores them.
A worked example, start to finishYou have hosting with another company and you want to keep using it: Configure destination → Publish on external server → type in the server, username and password → in the destination path put the one your provider gave you → Test → if it comes back green, Save and verify → close the dialog and click Publish changes.
Watch out for…
- The destination is saved the moment you click it, before you have even filled in the server details.
- Publishing over FTP overwrites the files already sitting in that folder. If you have another site there, you flatten it.
- Read the next section before you publish a large site over FTP.
7.3When the site uploads to your own server (and what to look at if it stops halfway)
What it's forPublishing to a server of your own is not instant: Speaksite uploads the files one by one and shows you a progress bar at the top right.
Watch out for… (this one matters if your site is large). The upload has a time limit of five minutes. If your site has a lot of pages and images, or your server is slow, the upload can run past that limit and be cut off halfway: some of the files will have arrived and some will not. The real problem is that nothing warns you: the progress bar simply stops at whatever percentage it had reached, never turning green and never showing an error.
How to recognise it and what to do:
- The bar has been stuck at the same percentage for several minutes (41%, say) and does not move.
- You open your site and see a mixture: some pages with the new design and some with the old one, or images that do not load.
- The fix: click Publish changes again. The upload starts over and completes what was missing. If it stalls at the same point again, write to support: your site needs more time than the system allows by default.
To stop it happening in the first place: publish over FTP with the site already optimized (light images), and avoid uploading hundreds of new photos all at once.
7.4Earlier versions of your site
What it's forEvery time you publish, Speaksite saves a copy of how your site looked just before. If a change has broken something, you go back to an earlier copy and that is that.
How to get thereIn the editor, the clock-with-an-arrow icon in the header (to the left of the Publish button).
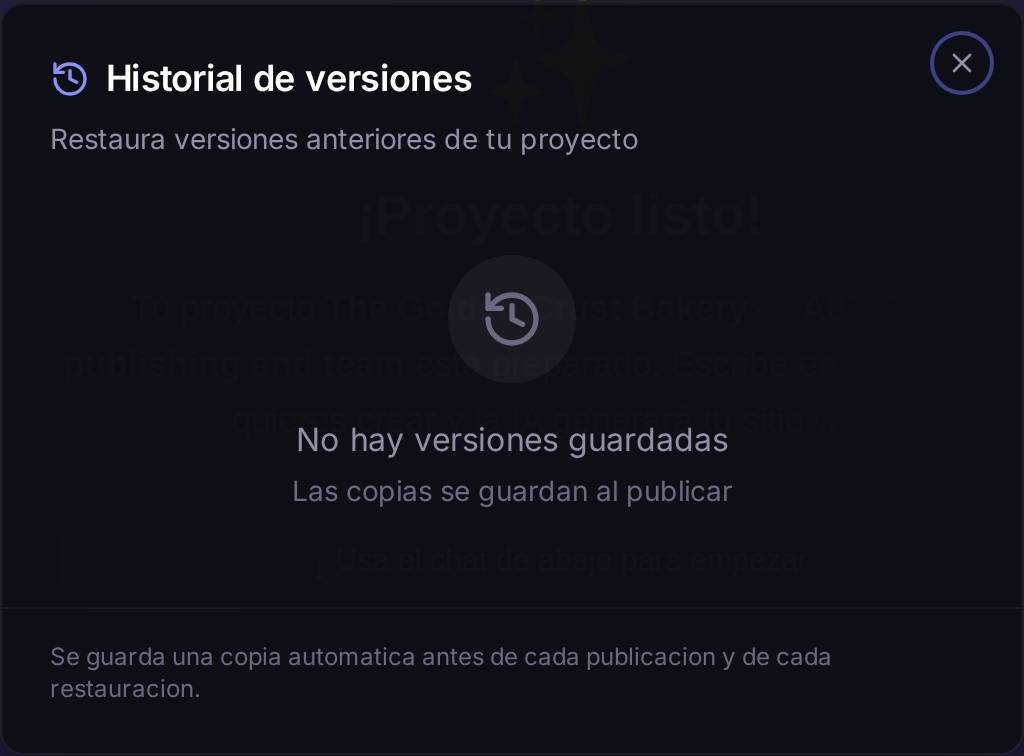
What's on screen. A list of copies, most recent at the top. For each one you see the date, the time and the number of files. The circular arrow restores; the bin deletes that copy (not your site).
A worked example, start to finishYesterday you changed the colours and today you are not convinced: open the clock → find the copy dated the day before yesterday → click the circular arrow → confirm → go back to the editor and check that the old colours are back → click Publish changes so that the change reaches the internet too.
Watch out for…
- Restoring changes your draft, not what is live: until you publish, the internet still shows the old version.
- The history is not infinite: it depends on your plan (on the Pro plan the copies of the last 30 days are kept).
- Copies are saved when you publish. If you have never published, the history will be empty.
7.5Showing your site to someone before it is ready
What it's forShowing a partner or a client how the site is coming along without giving them permission to edit it.
How to get thereThe share icon (the three joined dots) in the editor header. It only appears if the project is yours.
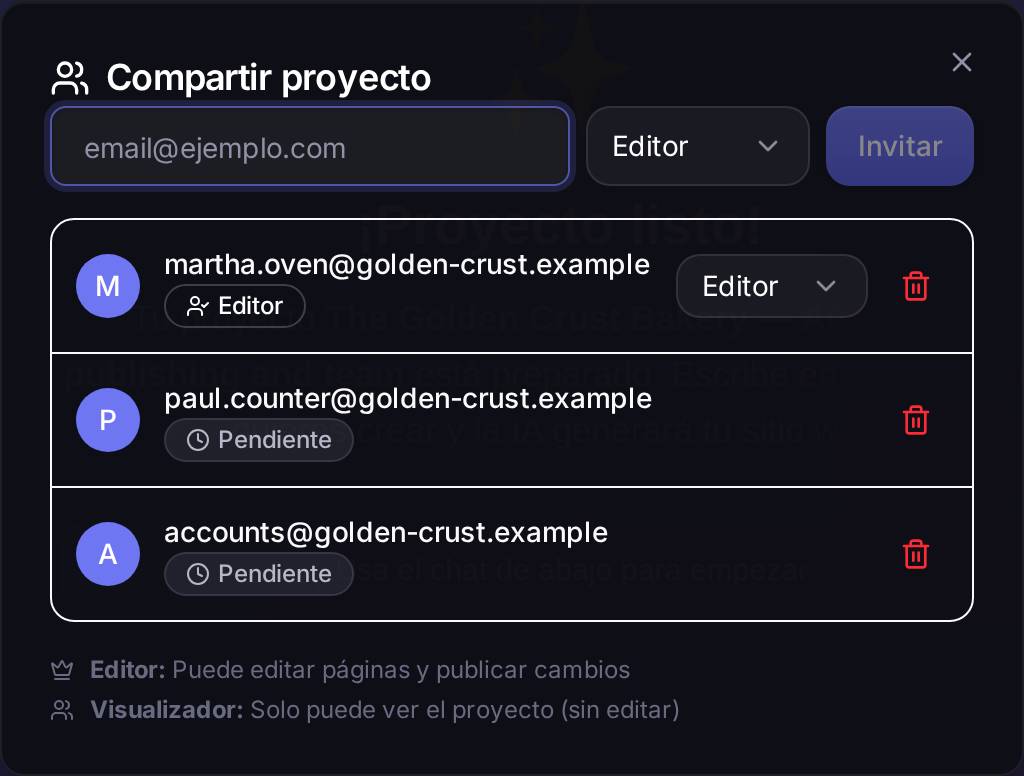
What's on screen. An email field, a permission dropdown and the Invite button; below that, the list of people. At the foot, the two permissions are explained: Editor (can edit pages and publish changes) and Viewer (can only look).
Watch out for… An Editor can publish. If all you want is to show someone the result, use Viewer.
7.6Inviting someone to your project
What it's forWorking on the same site with several people.
How to get thereShare icon → type the email address → pick the permission → Invite.
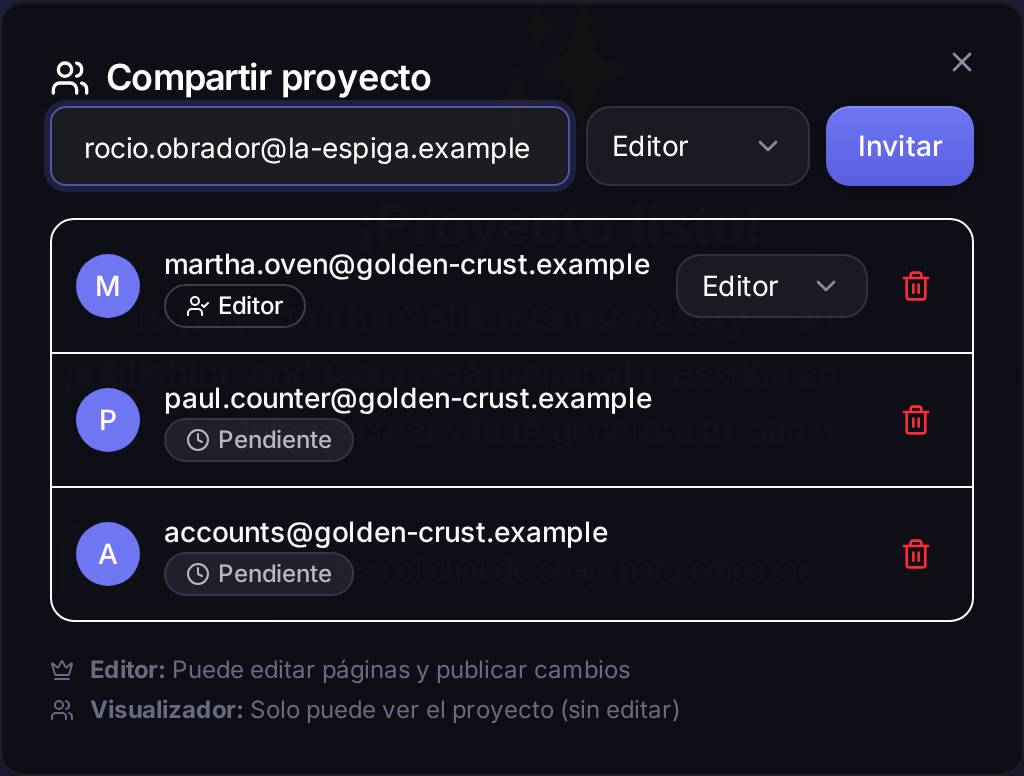
A worked example, start to finishYou want your designer to retouch the photos, but you do not want her publishing without telling you: share icon → type rosie.baker@golden-crust.example → open the permission dropdown and choose Viewer → Invite. She receives an email with a link; once she accepts, she moves from "Pending" to showing up with her permission. If later on you do want her to be able to edit, change her permission in the dropdown on her row.
Watch out for…
- The invitation goes to whatever address you type: get one letter wrong and it never arrives, with no warning.
- If that person does not have a Speaksite account, they will have to register with that same email address in order to get in.
7.7Who has access and whose invitation is still pending
What it's forSeeing at a glance who you are sharing your site with.
How to get thereShare icon → the list underneath the form.
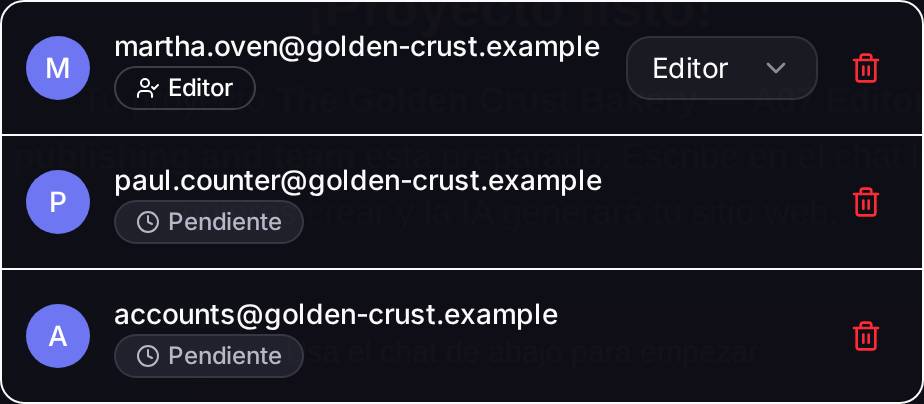
What's on screen. One row per person, with their email address and their status. For those who have accepted, you can change the permission in the dropdown. The red bin withdraws access (or cancels the invitation) immediately.
Watch out for… The bin does not ask for confirmation. Get the wrong row and you will have to invite that person all over again.
7.8When the invitation cannot be sent
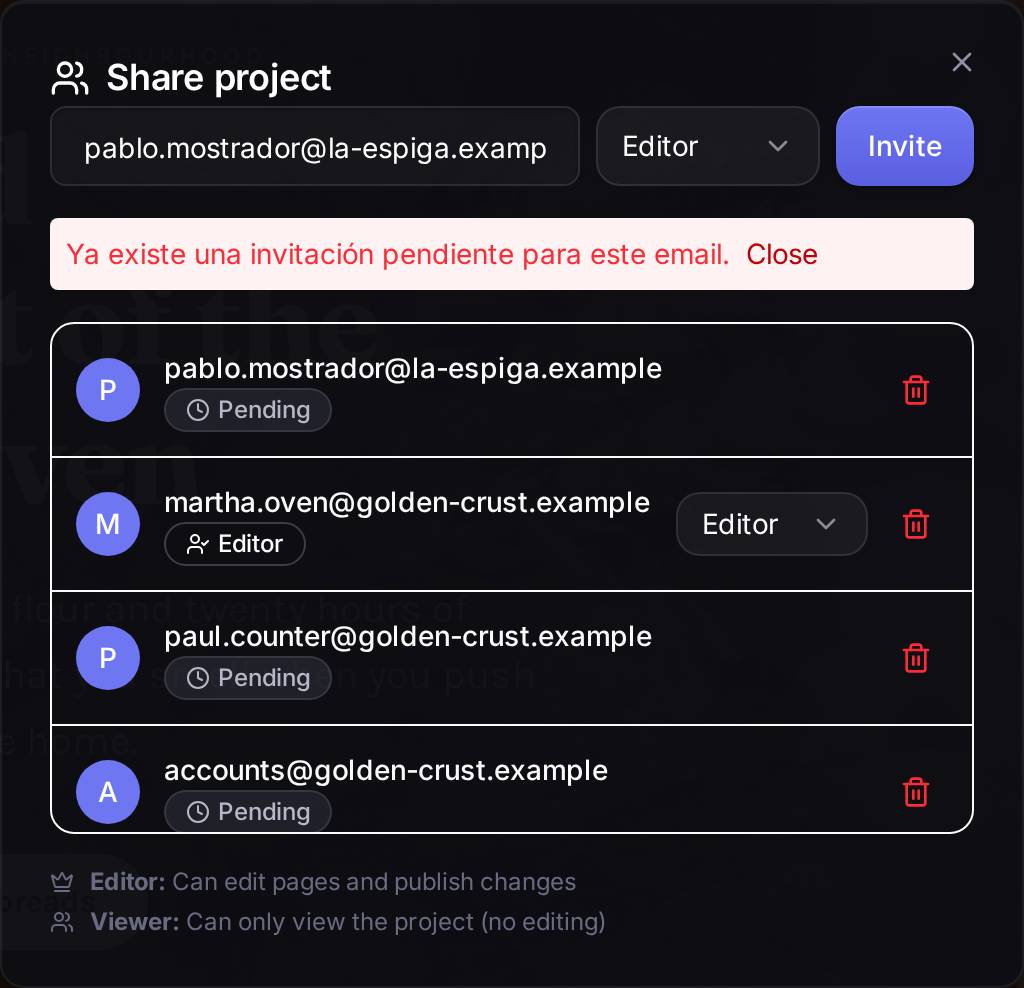
Other common reasons: you have typed your own email address (you cannot invite yourself), or that person is already a collaborator. In every case the message appears above the form and is dismissed with Close.
7.9Backing up to GitHub (Advanced mode only)
What it's forKeeping your site's code in your own GitHub account. It is for people who know what GitHub is: if you do not use it, you have no need for this screen at all.
How to get thereIn the editor, turn on the Advanced switch in the header. The GitHub button then appears, to the left of the history clock. In Easy mode it does not exist: that is the number one cause of "I can't find it".

What's on screen and what happens next. Clicking Connect GitHub opens GitHub's own page so that you can authorise Speaksite. When you come back, the button turns into a menu with two options: Create a new repository (Speaksite creates the repository and uploads your site) or Link an existing repository (if you already have one). Once linked, that same spot shows the repository status, the branch, and buttons for saving changes and opening a pull request.
This part of the process cannot be photographed for the manual: it requires a real authorisation against github.com with a live account, and the screenshots are taken in a closed environment with no access to GitHub. What you see above is the starting point.
Watch out for… Connecting GitHub is not a substitute for publishing. They are different things: GitHub stores the code; publishing is what puts the site on the internet.
7.10Your free address, before you have a domain of your own
What it's forYou do not have to buy or connect anything for your site to have a real address. From the moment you create the project one already exists: https://api.speaksite.app/site/ followed by your project's slug (something like my-bakery-Xk3mQ2). It is the address you use while you decide whether you want a name of your own, or whether for now you do not need one.
How to see it. Publish your site (see "Publishing your site", above) and use the arrow next to Publish: Copy site link gives you that full address ready to paste into an email or a WhatsApp message; the external-link icon opens it in a new tab. It is the same button as in the "Publishing your site" section above, so this needs no separate picture.
Before publishing, or if you only want the bare name. On the Dashboard, your project's card shows the slug on its own (without the https://api.speaksite.app/site/ in front). It is not a link you can click: put the address together yourself, pasting that text after https://api.speaksite.app/site/.
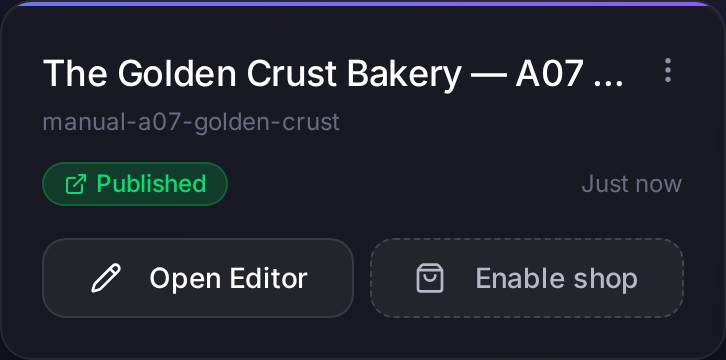
Watch out for… The address has api.speaksite.app in front, not plain speaksite.app. If you ever type it by hand instead of copying it, speaksite.app/site/whatever is not an error that warns you: it takes you to Speaksite's commercial site, not yours. Always use Copy site link and you will never have to remember this.
Can the slug (the odd bit at the end) be changed? No, on no screen. It is generated on its own when the project is created and stays fixed forever: neither you nor we can touch it afterwards. That is an advantage, not a limitation — it means you can hand that address around without fearing that one day it will break: it never changes.
What happens to this address when you connect your own domain. It goes on working exactly the same; it is not switched off and it does not redirect to your new domain. Both addresses show the same site at once. For Google to settle on yours (and not split the same content between the two, which weakens both), there is a step that is not automatic: go into Project settings → General information → Base URL and write your full domain (https://yourdomain.example). Without that step your site is still indexable at api.speaksite.app/site/... too, and Google may settle on that address instead of yours. Do it right after connecting the domain; do not leave it for later.
7.11My domains
What it's forA domain is your site's name: the thing people type into their browser (goldencrustbakery.com). Here you buy a new one, connect the one you already have, and see the ones registered in your name.
How to get thereMy Projects → Domains.
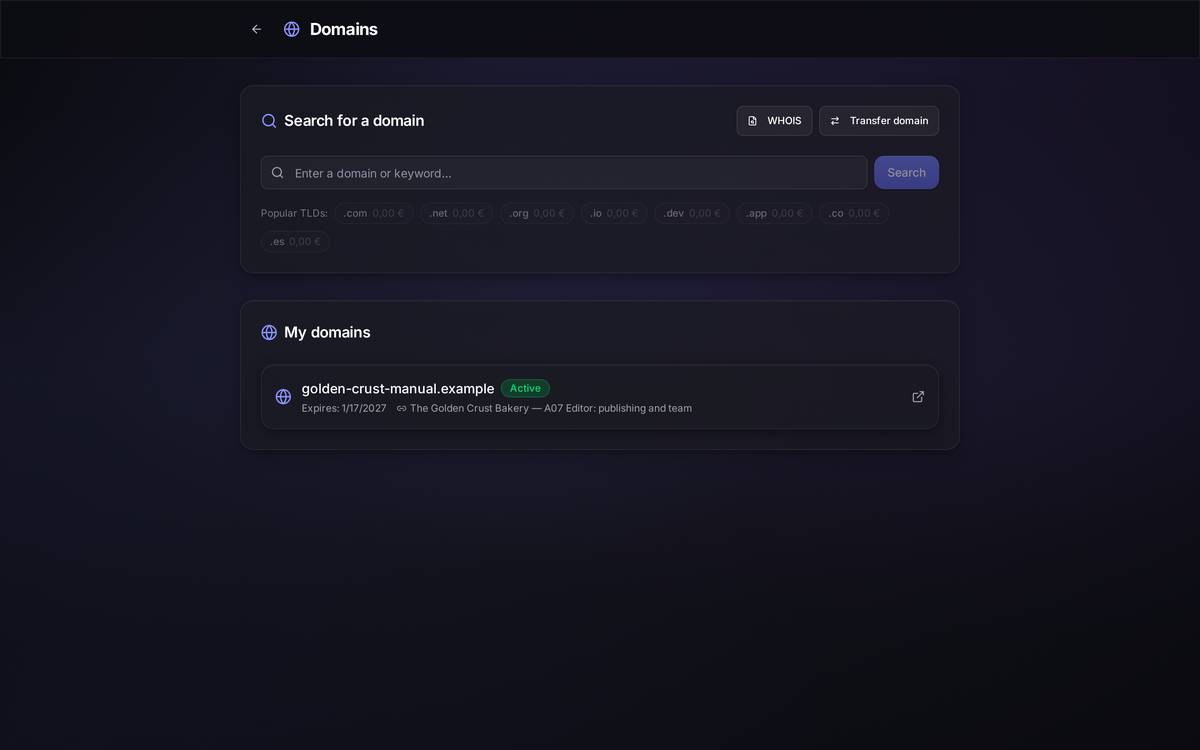
What's on screen
- Search for a domain: type the name you want (without
wwwand without.com) and Speaksite tells you whether it is free and what it costs in each extension. - WHOIS: the public lookup of who owns a domain that is already taken.
- Transfer domain: bringing a domain you bought elsewhere over to Speaksite.
- My domains: yours. Each one with its status (Active), its expiry date and the project it is connected to.
Watch out for… A domain is rented by the year, not bought forever. If it expires and you do not renew it, your site stops answering to that name and anybody can take it. Check the expiry date now and then, and leave auto-renewal switched on.
7.12Buying a domain
How to get thereDomains → type the name → Search → on a result that is free, Select.
Speaksite asks you for the registrant's details (name, address, phone and email: they are compulsory under the rules that govern domains, and the email address has to be a real one because a verification message is sent to it) and for payment. When you are done, the domain shows up under My domains within a few minutes.
This screen is not photographed in the manual, and that is not an oversight: the purchase window only opens when the registrar confirms that the name is free and at what price, and that requires a live payment connection to the registrar which the environment where these screenshots are taken does not have. Photographing it would have meant drawing a fake purchase screen.
Watch out for…
- Buying a domain is charged and cannot be undone; domains are not refundable.
- Type the name carefully: you buy it exactly as you typed it, spelling mistake included.
- Answer the verification email you will receive. If you do not do it in time, the domain is suspended.
7.13A domain's page
What it's forEverything you can change about one specific domain: which project it points to, when it expires, how healthy it is and where it sends its traffic.
How to get thereDomains → click the domain in the list.
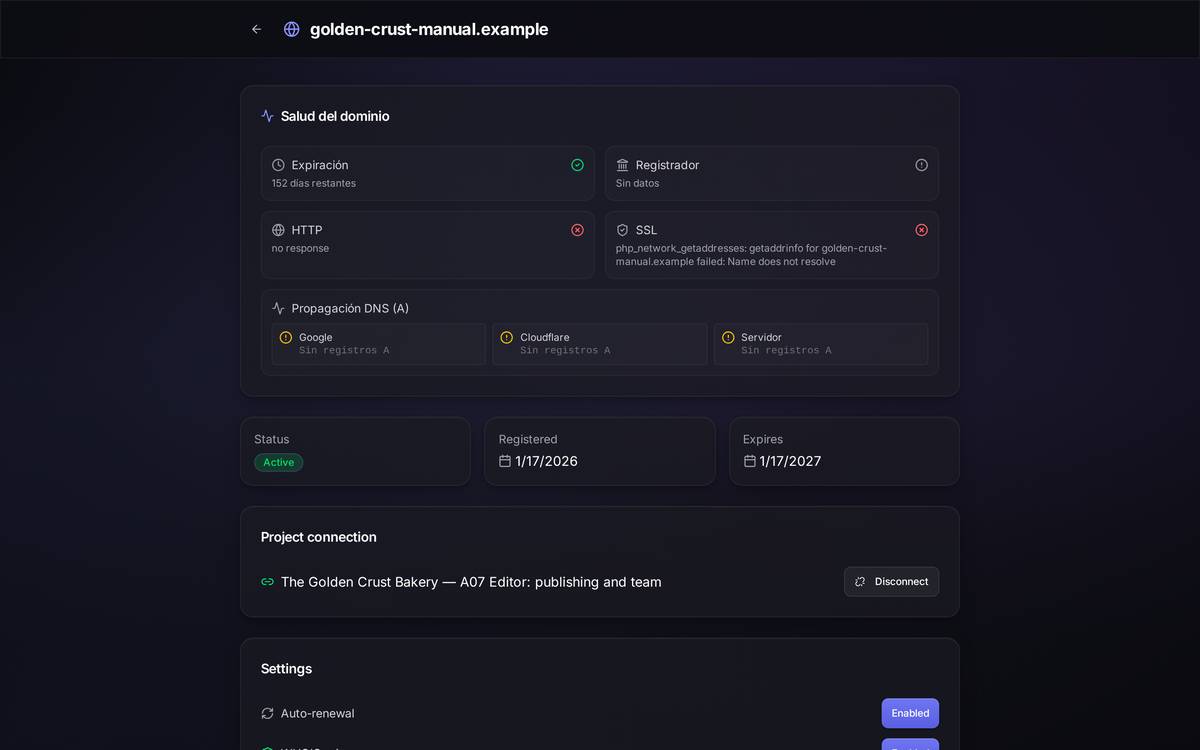
What's on screen (the blocks you will actually use):
- Project connection: which of your sites this domain answers for. Disconnect frees it up so you can point it at another one.
- Auto-renewal: leave it switched on unless you do not want to keep the domain.
- WHOIS privacy: hides your personal details from the public domain lookup. Switch it on.
- Registrar lock (EPP): a padlock that stops anyone moving your domain to another company without your permission. It should always be Locked, except on the days when you yourself are transferring it.
- EPP / Auth Code: the password you will be asked for if you ever take the domain to another provider.
- Registrant contact (WHOIS): the details of whoever is on record as the owner.
- Managed subdomains: addresses like
shop.yourdomain.compointing at projects of yours.
Watch out for… Disconnecting the domain from a project leaves your site without that name as soon as the change propagates. It is not instant, either when you disconnect or when you reconnect (see below).
7.14Whether the domain is set up correctly
What it's forA quick diagnosis: it tells you whether your domain answers, whether it has the security padlock, and whether the change you made has reached the internet yet.
How to get thereDomain page → first block, Domain health.
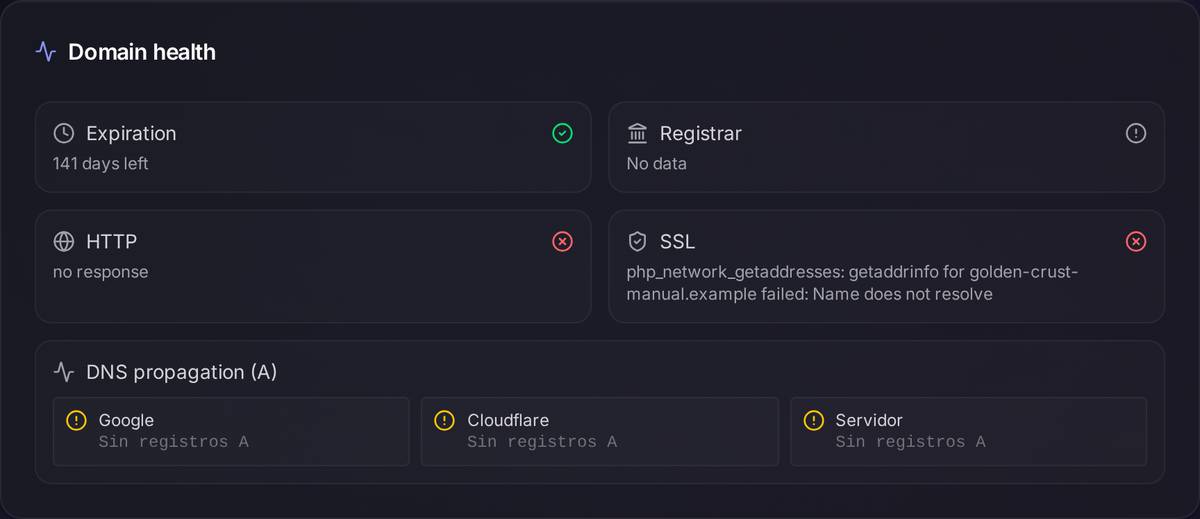
What's on screen
- Expiration: how many days the domain has left.
- HTTP: whether visiting your domain gets your site to answer.
- SSL: the security certificate, the one that produces the padlock and the
https. Speaksite issues it on its own, but it takes a while after you point the domain: if you see red on the first day, look again a few hours later. - DNS propagation: whether the change you made is visible to Google, to Cloudflare and to the server itself. Three greens = everybody can see your site.
Watch out for… Domain changes take time. Minutes to hours is normal, and in the worst case up to 48. If you have just changed something and it comes up red, wait before you change anything else: most domain disasters are caused by people making three changes in a row without giving anything time to take effect.
7.15Pointing the domain at Speaksite (and what this DNS business is)
What DNS is, in plain language. The internet does not understand names, it understands numbers. DNS is the internet's phone book: the thing that says goldencrustbakery.com corresponds to server number such-and-such. When you "point a domain", what you are doing is changing that entry in the phone book so that the name leads to your Speaksite site.
Nameservers are whoever runs that phone book. If you hand the nameservers to Speaksite, your domain's phone book is kept by Speaksite and you do not have to touch anything else.
How to get thereDomain page → Speaksite authoritative DNS block.

A worked example, start to finishYou bought goldencrustbakery.com from another company and you want it to show your Speaksite site: open the domain page → Use Speaksite nameservers → Speaksite shows you two addresses along the lines of ns1.speaksite.app and ns2.speaksite.app → go to the website of the company you bought the domain from, look for "DNS servers" or "nameservers" and replace whatever is there with those two → save → come back to the domain page and check Domain health every few hours until propagation goes green.
Watch out for… While the phone book is changing hands, any email you use on that domain can stop working if you do not copy your mail records (the MX ones) across first. If you have business email on that domain, write down the records you had before you touch anything.
7.16Your domain's DNS records
What it's forEditing the entries in that phone book one by one. You only come in here when something specific asks you to (your business email, a third-party tool, a Google verification).
How to get thereDomain page → DNS records block.
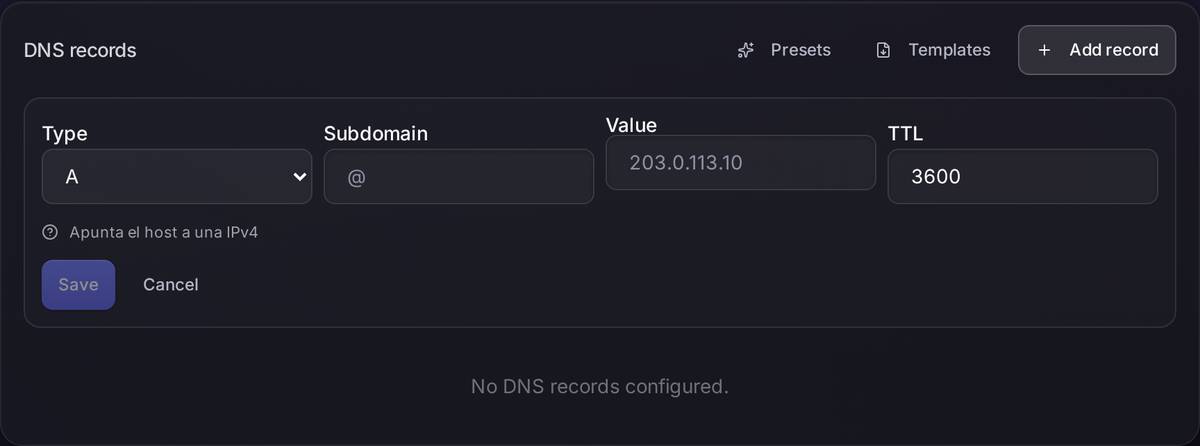
What's on screen. A table with Type, Subdomain, Value and TTL. The ones you are going to run into:
- A: sends a name to a specific server (an IP address). It is the record that makes your site visible.
- CNAME: says "this is the same as that" (for example
www= your domain). - MX: where your email goes. Do not touch it unless you know what you are doing.
- TXT: loose notes that Google or your email provider use to check that the domain is yours.
- TTL: how long that entry is kept in the internet's memory, in seconds (3600 = one hour). The lower it is, the faster changes show up.
The Templates and Presets buttons fill in the typical configuration for well-known services in one go (Google's email, for instance), so that you do not have to type six records by hand.
Watch out for…
- Deleting an MX record leaves your email dead, and you will not notice until somebody tells you their messages are bouncing. Write down what was there before you change it.
- If this list comes up empty but you know you had records, do not recreate them yet: it may be that Speaksite could not read them at that moment. Reload the page after a while and check.
7.17Forwarding the domain to another address
What it's forMaking anyone who types your domain end up at a different address. It is what "spare" domains are for: you buy golden-crust-bakery.com as well as the main one, and make it lead to the main one.
How to get thereDomain page → URL forwarding block.
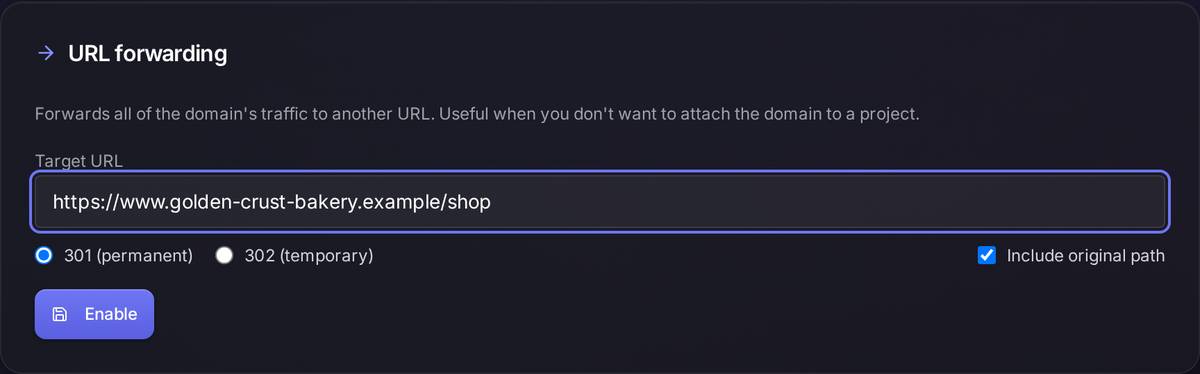
What's on screen
- Target URL: the full address you want to send people to, with
https://. - 301 (permanent) or 302 (temporary): the 301 tells Google the change is final and passes the search reputation on to the destination. The 302 is for something passing (a campaign, some building work).
- Include original path: if someone goes to
yourdomain.com/offers, with this ticked they end up atdestination.com/offers; unticked, they land on the destination's home page.
Watch out for… A forwarded domain cannot show a site at the same time. If you have it connected to a project and you switch forwarding on, you are sending your visitors away.
7.18Bringing a domain over from another provider
What it's forMoving a domain you bought at another company over to Speaksite, so that everything is in one place and renews itself.
How to get thereDomains → Transfer domain.
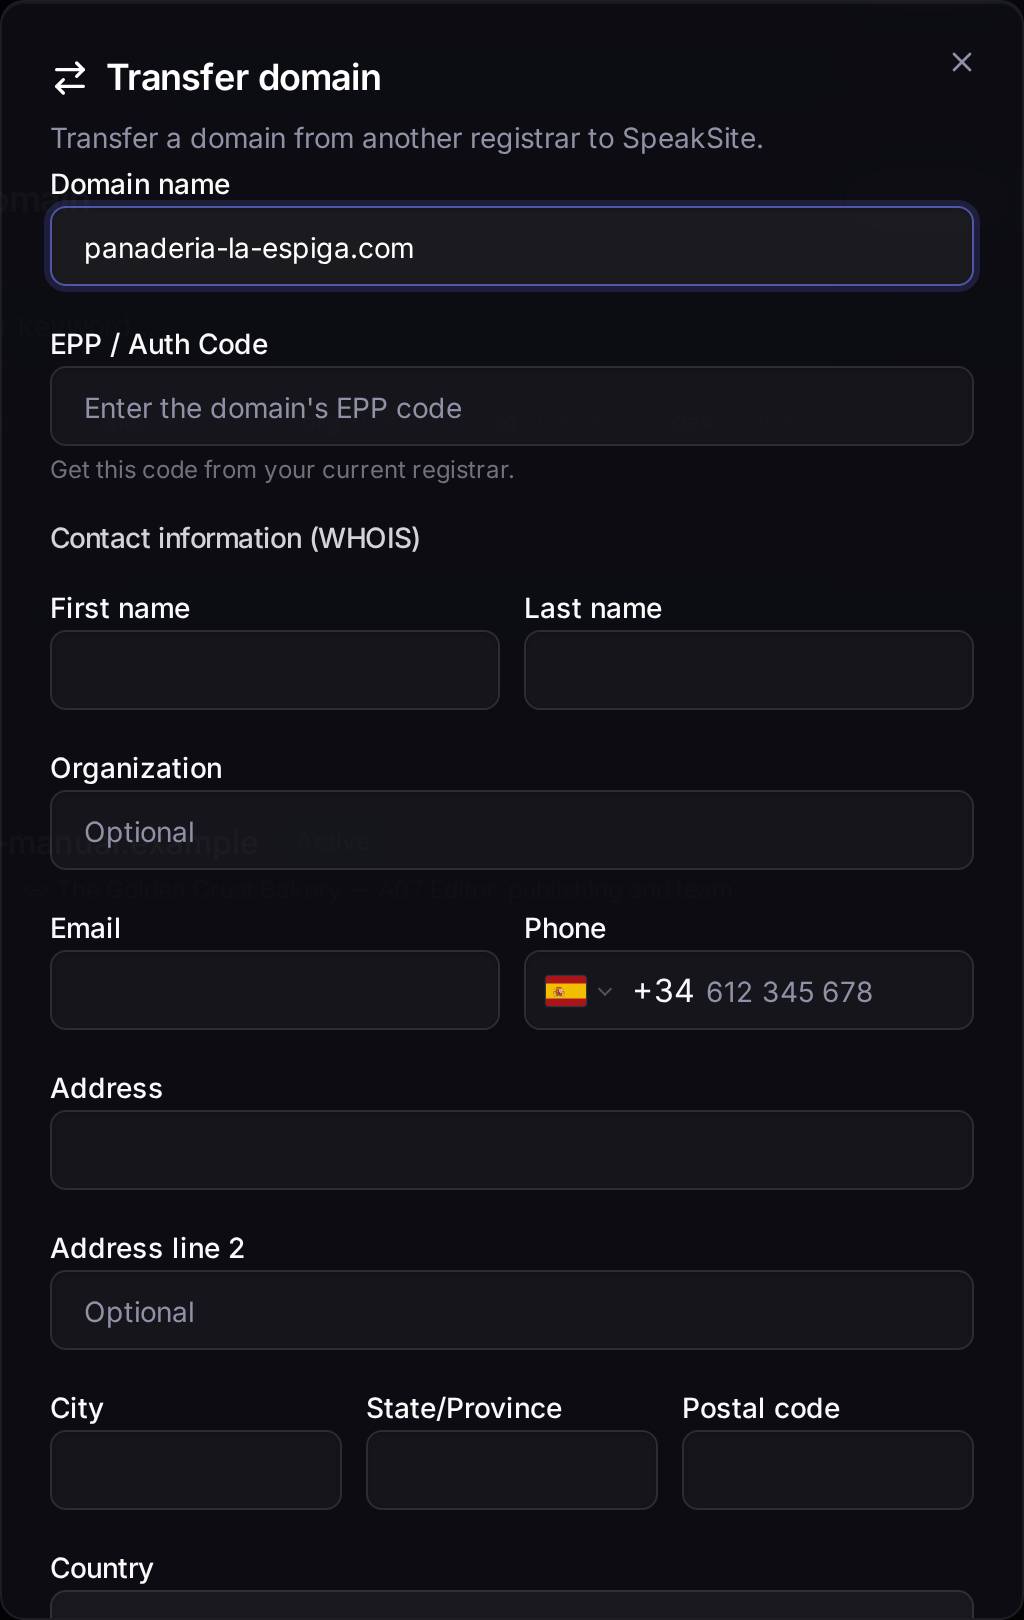
A worked example, start to finishYou have golden-crust-bakery.com at another company: go into that company's control panel → remove the domain lock and ask for the authorization code (you will see it called "EPP", "Auth Code" or "transfer code"); it arrives by email → in Speaksite: Domains → Transfer domain → type the domain and paste the code → confirm → you will get an approval email; accept it → in 5-7 days the domain appears under My domains.
Watch out for…
- Without the authorization code there is no transfer, and that code has to come from the provider who holds the domain today.
- A domain that has just been bought or just been transferred cannot be transferred: you have to wait 60 days. That is a rule of the domain system, not a Speaksite one.
- During the transfer your site keeps working: nothing goes down.
7.19Taking your domain to another provider
What it's forThe opposite: taking a domain you bought here out of Speaksite. It is here on purpose: the domain is yours and you are free to take it with you.
How to get thereDomain page → at the bottom, Transfer to another registrar → Transfer out.
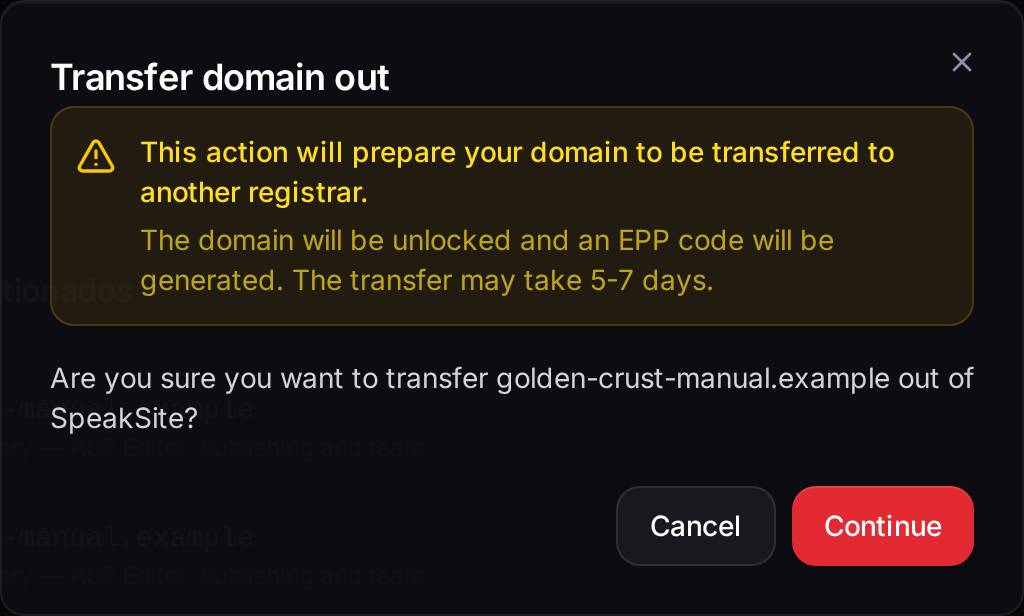
Watch out for…
- The moment you continue, your domain is left unlocked. If you end up not moving it, go back to the domain page and switch Lock domain back on.
- The transfer takes 5-7 days and, in the meantime, the domain carries on pointing where it was.
- If your site is on Speaksite and you take the domain away, remember to configure the DNS at the new provider or your site will stop being visible under that name.
7.20Your outside domain, without moving it anywhere
What it's forThis is the most common case and the one nobody explains: you bought your domain at IONOS, GoDaddy, Hostinger or somewhere similar, you want to keep it there (for the invoice, for the email, or because that way you take it with you if you ever change website) and all you want is that typing it into a browser brings up your Speaksite site. You do not have to buy it here or hand over the nameservers: one DNS record is enough.
Where you declare it. Not in My domains — that section is for domains you buy or bring over to Speaksite whole. For "I leave it where it is and just point it", go into your project, put the switch on Advanced, click the cog icon (Config) in the narrow left-hand bar and open the Domain & Hosting section. Type your domain with no http:// and no www (for example la-espiga.example) and press Configure.
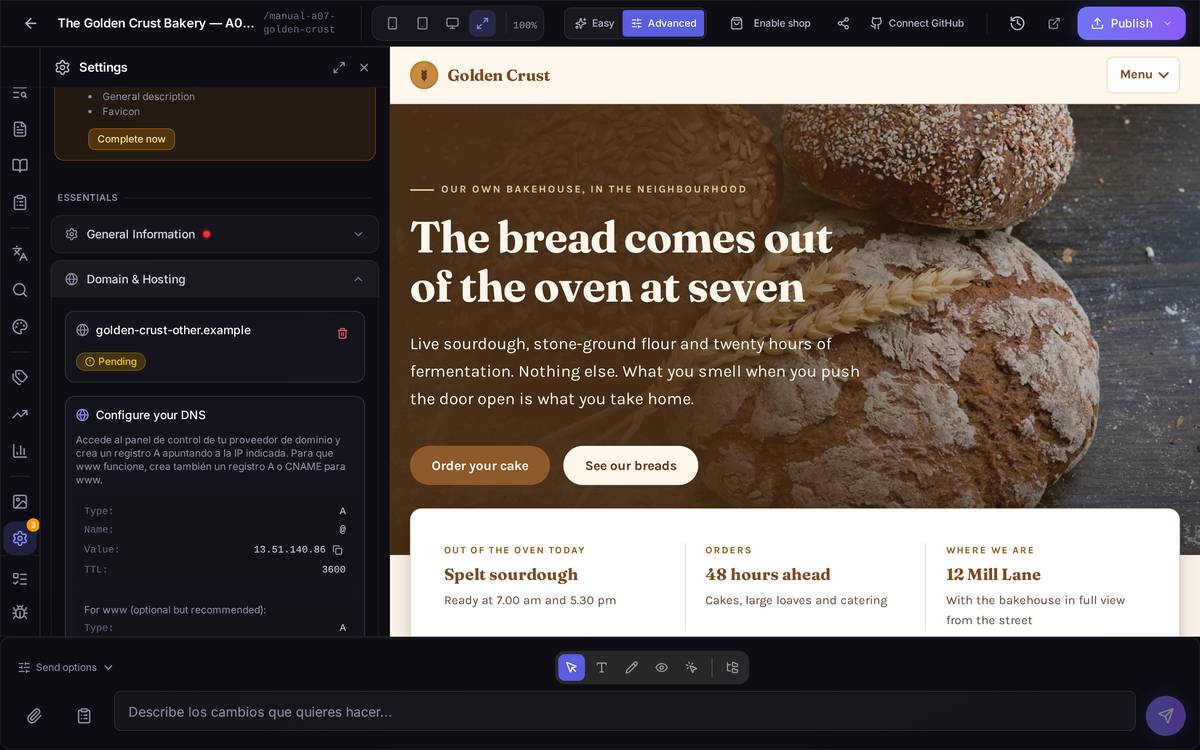
The exact record to create at your registrar (root domain). In the IONOS, GoDaddy or Hostinger panel — whichever you use — go into the DNS management for la-espiga.example and create:
| Type | Name | Value | TTL |
|---|---|---|---|
| A | @ | 13.51.140.86 | 3600 |
| A | www | 13.51.140.86 | 3600 |
Both records carry the same IP: one is for the bare domain, the other so that www.la-espiga.example works too. Speaksite shows you them identically on screen, with a button for copying the value without typing it by hand.
A subdomain (shop.la-espiga.example) is not pointed the same way. If what you want to publish there is a different project (your shop, say, separate from your main site), use that same screen in the shop's project and type the full subdomain, shop.la-espiga.example, instead of the root domain. The record you create at the registrar changes name:
| Type | Name | Value | TTL |
|---|---|---|---|
| A | shop | 13.51.140.86 | 3600 |
With a subdomain the www record is not needed — nobody is going to type www.shop.la-espiga.example. That really is the only difference: at the root the record's name is @ (plus the separate www one); on a subdomain the name is the single word in front (shop, blog, whatever), with no domain after it and no @.
Watch what the screen shows you if yours is a subdomain. The "Configure your DNS" block is always the same one, whatever you typed: it shows Name: @ and, below it, the www record. That is right for the root domain. If you declared tienda.la-espiga.example, do not copy that @: you would be pointing your main domain at Speaksite and would lose the site you already have there. From that screen copy only the Value (13.51.140.86) and the TTL (3600); you type the Name yourself, and it is tienda.
If your registrar will not let you type an IP address on a subdomain (some only offer CNAME), a CNAME that eventually leads to that same address works just as well: when checking, Speaksite looks at the A record first and, if there is none, follows the CNAME through to the end and accepts the result. For the root domain this almost never works: there it has to be the A record with the IP.
How you check it has arrived. Press Verify DNS configuration. Speaksite looks at whether your domain already resolves to that IP at that moment, against the server itself — it does not retry on its own, so if you have only just touched the DNS and it has not had time yet, come back later and press it again. The panel warns that a DNS change can take up to 48 hours, although it is normally much less.
If it comes out red — "The domain does not point correctly to the server. Check the DNS configuration." — check at your registrar that the record is exactly the one in the table above (one extra space, a www. that crept into the name, or an @ where it does not belong are the typical mistakes) and press the same button again. There is no other action to try: it is literally "try again once you have corrected it".
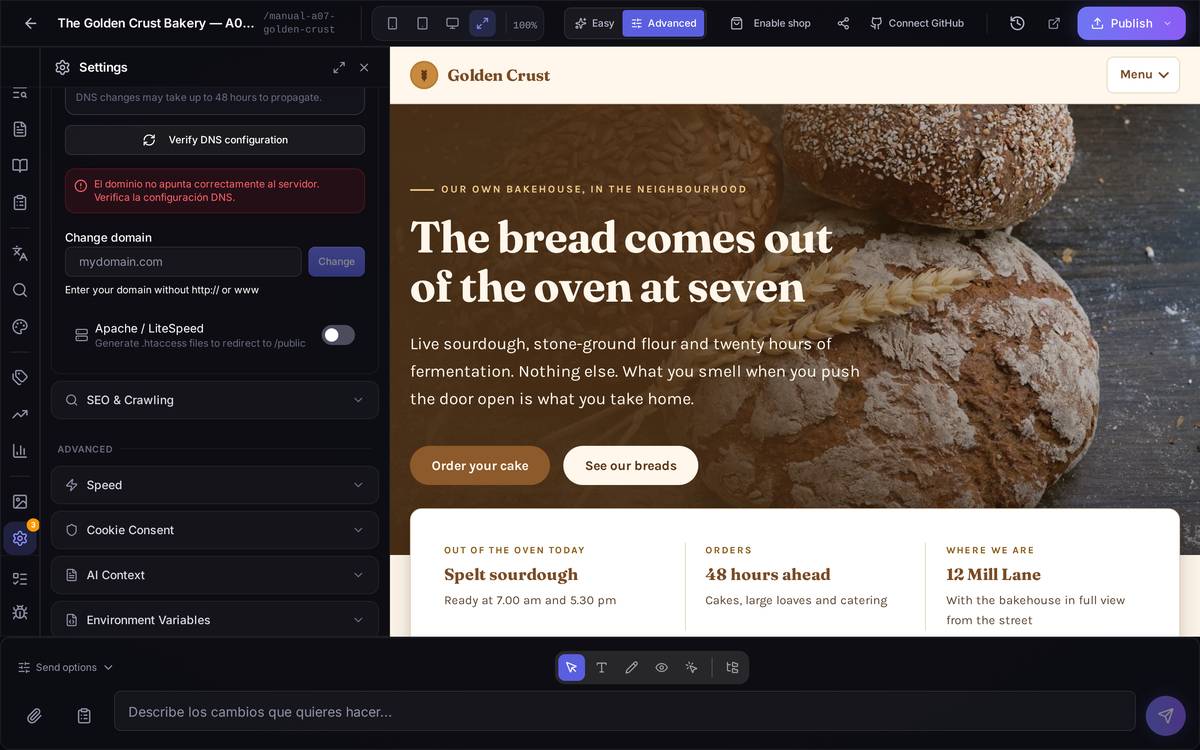
The certificate (the padlock and the https://). As soon as the domain is Verified, a new block appears, SSL certificate, with the Generate SSL certificate button. Press it: Speaksite requests a free certificate (Let's Encrypt) for your domain. The process has a limit of three minutes; if it does not finish in that time the button gives you the red notice that the SSL certificate could not be generated and to try again in a few minutes, and you can simply press it again.
What you see meanwhile. Between the DNS being verified and the certificate being ready, your site already answers on http://la-espiga.example (without the s). On https://la-espiga.example the browser shows an insecure-connection warning — that is normal, nothing has broken: there is no padlock for that name yet. Do not hand the link around with https:// until the SSL block says Active.
Watch out for…
- This screen requires Advanced mode. In Easy mode the cog icon does not appear.
- Each project carries a single domain. If you want the root and a subdomain to show different sites, that is two projects (or see Satellite site, a little further down).
- Only the project's owner can touch this screen, not a collaborator with Editor access.
- Changing an already declared domain for another resets everything: verification is asked for again and the SSL certificate is withdrawn. Do not touch it "just to see".
- This feature needs a plan with custom domains. If you do not have one, the screen offers the upgrade button directly.
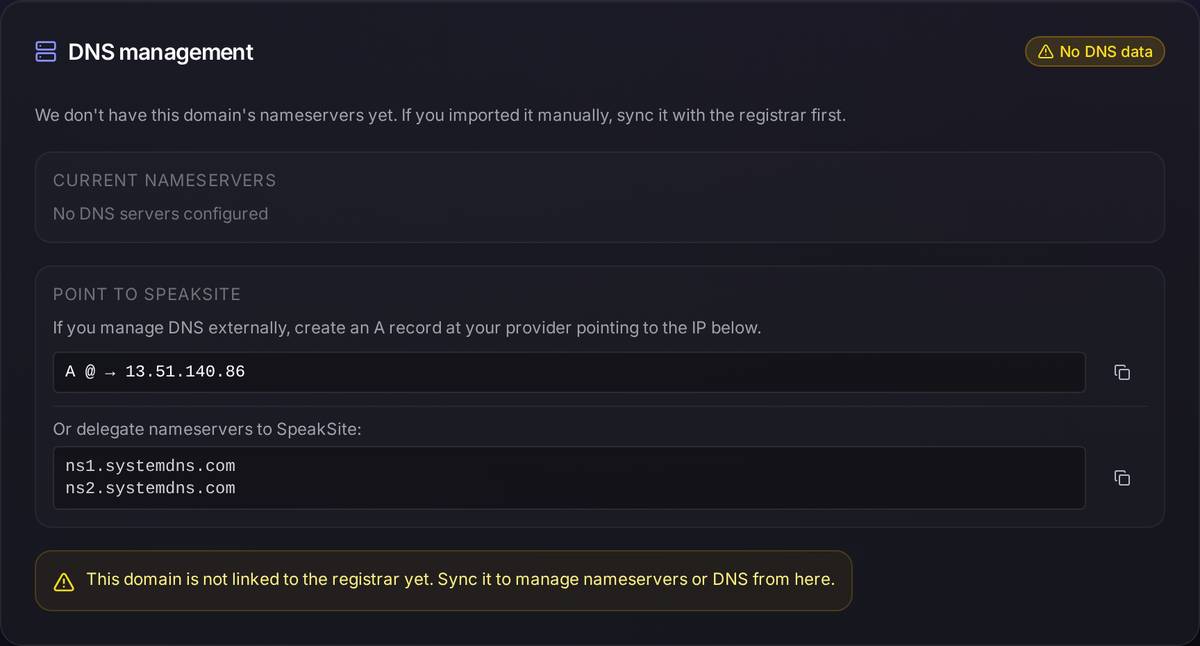
If you would rather keep it centralised in My domains. You can register the domain there with I already have a domain so as to have them all in one list. But mind what that place does NOT do: while the DNS stays at your registrar, the "DNS management" block on the domain's page does not show your A record — it shows "No DNS data", because Speaksite does not have the domain's nameservers and cannot read them. The record you need to copy is where you saw it above, in Project settings. That place pushes you by default towards handing the nameservers over to Speaksite (covered above, in "Pointing the domain at Speaksite"); if what you want is exactly what this section describes — leaving the DNS where it is — the Project settings → Domain and Hosting route above is the one to follow, and it is the only one of the two that issues the SSL certificate.
7.21Satellite site
A satellite site is a copy of your shop published at a different address (your main site on Speaksite, say, and the shop on a separate domain). It is set up from Shop → Satellite site settings, and it only appears if your project has the shop switched on and your plan includes this feature.
There is no screenshot of this screen: the demonstration project used for this chapter's screenshots does not have the shop switched on, and switching it on would have changed all the other pictures. Going in without a shop lands you on the "Activate the shop" screen, which is something else entirely and would be misleading.
7.22Which address do I use: the table at a glance
With all of the above already covered, this is the only thing you need to read if all you want is to know which case is yours:
| What I want | Which route I take | Where it is done | What I touch at my registrar |
|---|---|---|---|
| Show my site now, without buying anything | Internal address (free): api.speaksite.app/site/<slug> | Nothing to set up: it exists from the moment you create the project | Nothing |
| Speaksite to manage the lot for me | Buy the domain at Speaksite | My domains → Search for a domain | Nothing |
| I have the domain outside and want to keep managing it there | Point it, without handing over the DNS | Editor → Settings → Domain & Hosting | One A record → 13.51.140.86 |
| I have the domain outside and want to bring it over whole | Transfer it (or hand over the nameservers) | My domains → "I already have a domain" → switch on Speaksite DNS | Change the nameservers |
7.23The things worth remembering
| If you want to… | Go to… |
|---|---|
| Get your changes onto the internet | Publish → Publish changes |
| Undo a published change | Clock icon → restore → publish |
| Give your site a name of your own | Domains → buy or transfer → point it at Speaksite |
| Let someone else help you | Share icon → invite |
| Take the site off the internet for a while | Publish → Unpublish |