Chapter 5 of 11
Forms
Collecting the details of the people who write to you, and knowing where they end up.
On this page
- 5.1Where the forms panel is
- 5.2Your forms
- 5.3Creating a form by hand
- 5.4The questions: the label the visitor sees and the technical name
- 5.5The settings: what happens after someone submits your form
- 5.6Creating a form with artificial intelligence
- 5.7Putting the form on a page of your site
- 5.8Working with forms on the page itself (Forms mode)
- 5.9Editing a form and watching it change on the page
- 5.10Templates: starting from a ready-made form
- 5.11Appearance: how the form looks
- 5.12Multi-step forms, questions that depend on others, and columns
- 5.13Code for pasting the form outside your site
- 5.14Forms that were already on your site
- 5.15Two things that bite in silence
- 5.16The messages people have sent you
- 5.17The detail of a message
- 5.18Notifications: which address your forms land in
- 5.19The email address the alerts are sent from (SMTP)
- 5.20Sending your contacts to your CRM
- 5.21Connecting the CRM and matching the fields
- 5.22Watch out for: what can't be undone
- 5.23If something goes wrong
A form is the place where your visitors leave you their details: the "Write to us" on the contact page, the "Request a quote", the "Sign me up to the newsletter". Speaksite lets you create them, put them on your site and read everything that comes in comfortably, without leaving the panel and without touching a line of code.
Everything in this chapter lives inside your project's editor, in both modes, Easy and Advanced.
5.1Where the forms panel is
What it's forIt's the doorway to everything else: the list of your forms, the messages you've received, the notification email and the connection to your CRM.
How to get there
- In My Projects, click Open Editor on your site's card.
- In the column of icons on the left, look for the clipboard icon, just below Blog. Hover over it: it says "Forms". Click it.
On a phone that column isn't shown: tap the round Tools button, bottom right, and choose Forms.
It's in both modes. The Forms panel shows up the same in Easy as in Advanced: you don't need to touch the switch in the header to create a form or to read what comes in through it.
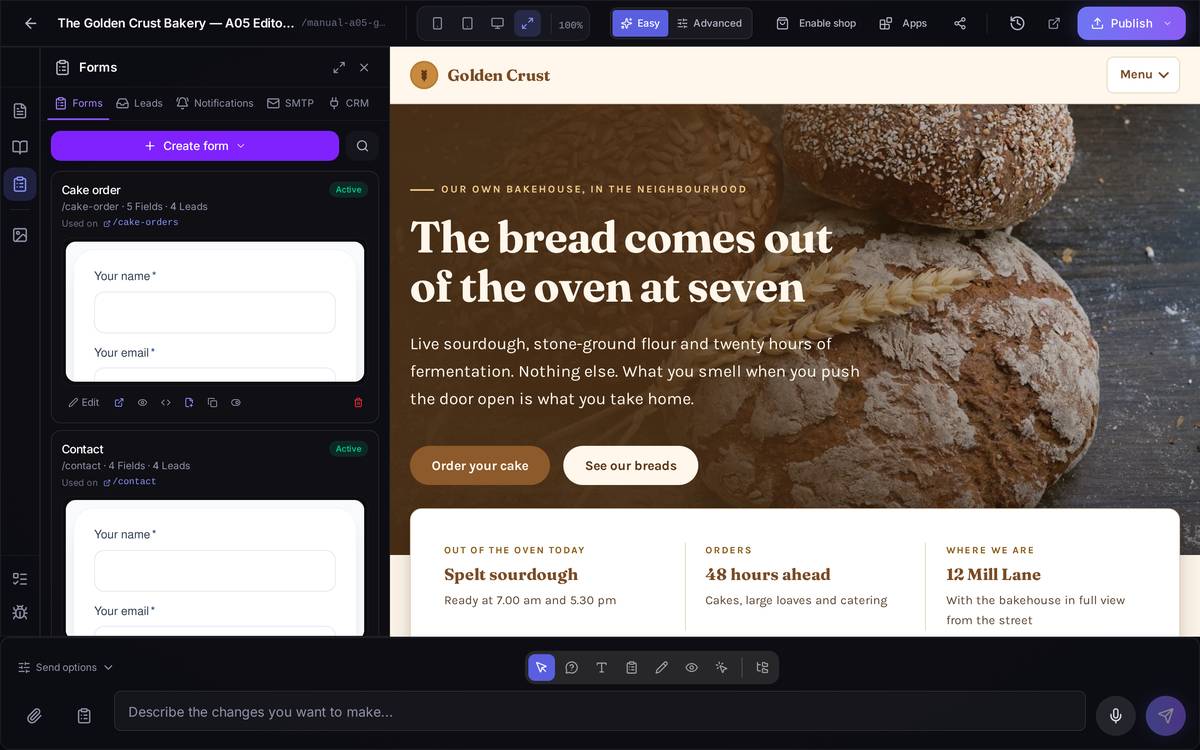
5.2Your forms
What it's forSeeing at a glance every form on your site, what state they're in and how many people have written to you through each one.
What's on screen. Each form is a card with:
- The name you gave it ("Contact", "Cake order").
- Its address (
/contact), the number of questions it has and the number of Leads — which is what the panel calls the messages you receive. - Active / Inactive. An inactive form stays on your site but stops accepting submissions. Handy for closing a promotion temporarily without deleting anything.
- A line in orange telling you which pages it's on. If it says "Not embedded on any page yet", the form exists but no visitor can see it yet: you're missing the step of putting it on a page.
Underneath each card there's a row of icons. From left to right: Edit, Preview (see how it looks to a visitor), HTML code, Insert with AI, Duplicate, Deactivate and Delete (the red bin).
Right at the top: the big Create form button, and to its right two small buttons, Generate with AI (the wand) and Detect forms (the magnifying glass).
Watch out for… the bin. Deleting a form takes every message that had come in through that form with it. If all you want is to stop receiving, use Deactivate, which can be undone. If the form is placed on any page, the delete dialog tells you so and offers to remove it from those pages too (ticked by default): otherwise the site would keep a form that can't send anything any more.
5.3Creating a form by hand
What it's forBuilding the form question by question, when you know exactly what you want to ask.
How to get thereIn the list, click Create form.
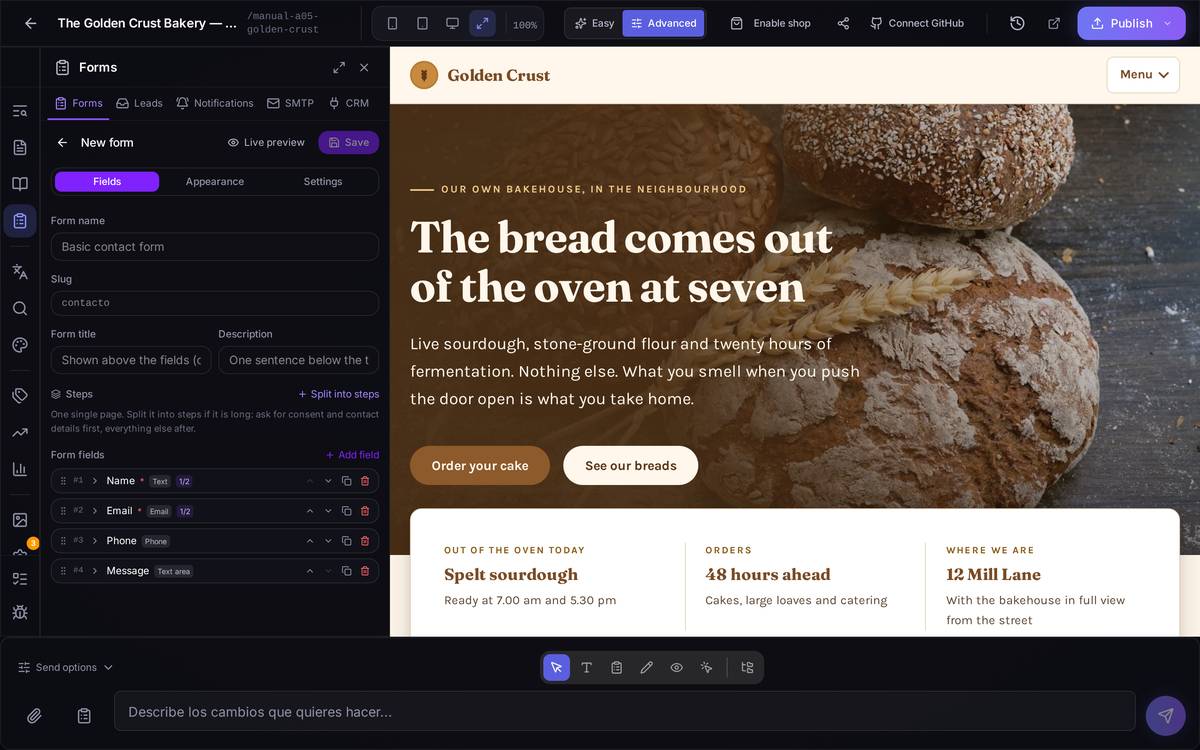
What's on screen. At the top, two details about the form as a whole:
- Form name: for you, so you can recognise it in the list.
- Slug: the short address the system identifies it by (
contact). Written in lowercase, with no spaces or accents.
An example from start to finish: "I want to collect quote requests"
- Click Create form.
- In Form name type
Request a quote. - In Slug type
quote. - Click + Add field. A new question appears.
- In Label type
How many people is it for?. - Repeat step 4 for the name, the email and the phone.
- Scroll down to Settings and write the thank-you message.
- Click Save, at the top right.
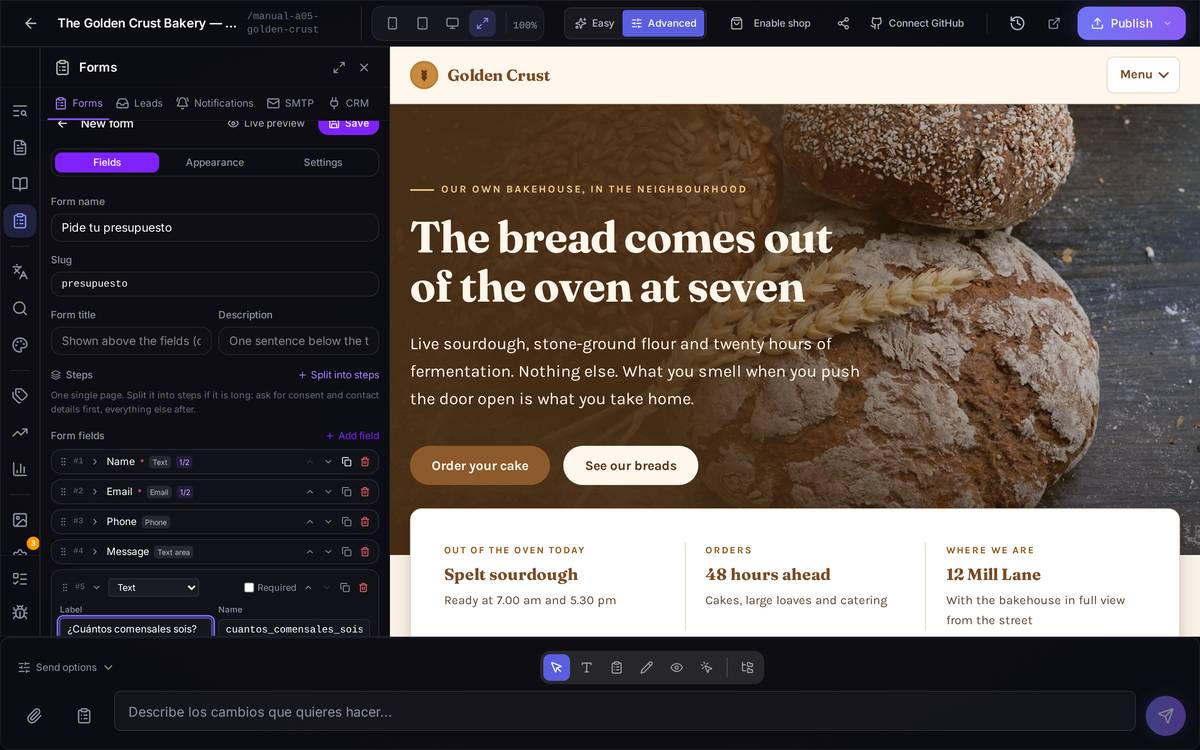
Watch out for… leaving without saving. While you're building the form nothing is saved: if you close the panel or move to another tab, you lose it.
To edit one that already exists it's the same screen: click Edit on its card. The name and the address are at the top, the questions in the middle and Settings at the bottom. It's saved with the Save button at the top right.
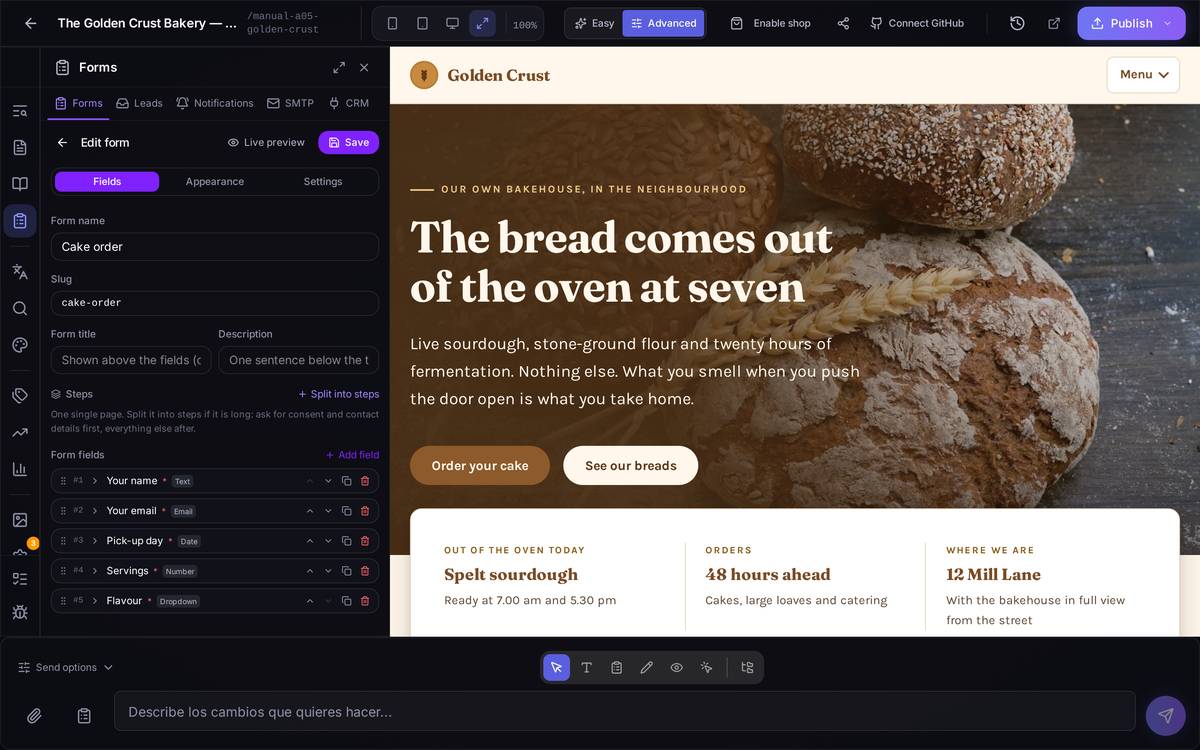
5.4The questions: the label the visitor sees and the technical name
What it's forEvery question in your form has two names, and mixing them up is the most common mistake on this screen.
How to get thereOpen a form with Edit and scroll down to Form fields.
What's on screen. Each question takes up a block with:
- Label: what the visitor reads above the box ("Your email", "Phone"). Write it in plain English, the way you'd say it to a customer.
- Name: the technical name the data arrives under when you receive it (
email,phone). Lowercase, no accents or spaces. It's generated automatically from the label: you only need to change it if your CRM expects a particular name. On a question that is already saved, changing the label does not change the name: that way old and new messages stay together. - Field type: a dropdown with Text, Email, Phone, Text area, Dropdown, Checkbox, Radio buttons, Number, URL, Date, File and Hidden. Choosing the right type isn't cosmetic: if you pick Email, the browser won't let a badly written address through, and if you pick Phone, mobiles bring up the numeric keypad.
- Placeholder: the grey example text shown inside the empty box.
- Required: tick it and the visitor can't submit without filling it in.
To the right of each question you have the Move up and Move down arrows for reordering them, plus Duplicate field and Remove field.
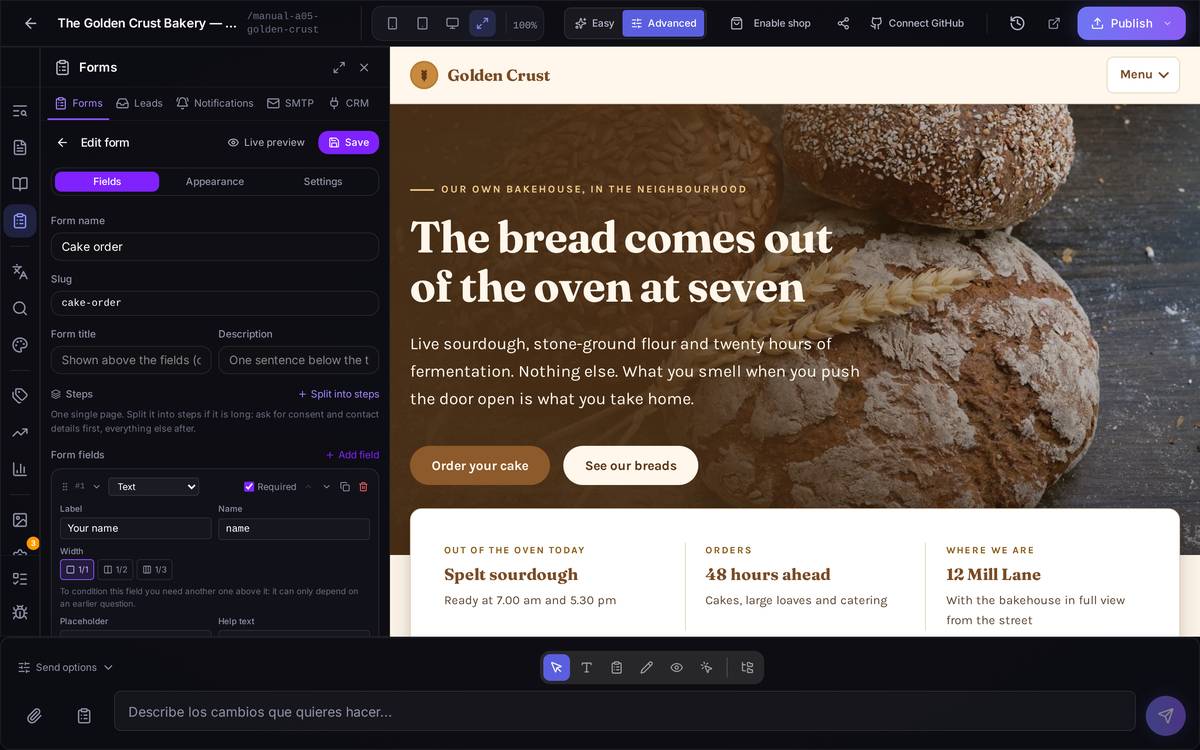
email.Watch out for… changing the Name of a question on a form that is already receiving messages. The old messages were saved under the old name and new ones will arrive under the new one: in the list of received messages you'll see the same question split in two. Unless you have a clear reason, leave the Name alone and change only the Label — the Label is the only part that affects the visitor.
If you choose the type "Dropdown", "Radio buttons" or "Checkbox" one more box appears, Options (one per line). If you leave it empty, the dropdown will come out empty on your site and the visitor won't be able to choose anything; the panel warns you in yellow. If you want to receive a value that's different from the text the visitor reads, write the option as Label | value. With few options, they show up on the site as chips (rounded buttons) rather than a list.
A note about the photos in this section: the "Field type" dropdown is one of the ones drawn by the operating system itself, not by the page. That's why there's no photo with the list of types unfolded: it can't be photographed from inside the browser. The twelve types are the ones listed above.
5.5The settings: what happens after someone submits your form
How to get thereWith a form open, scroll down to Settings.
What's on screen
- Success message. What the visitor reads right after hitting submit. By default it's a "Thanks! We've received your message.", but it gains a lot if you personalise it and say when you'll reply: "Thanks, we will reply as soon as we are out of the oven."
- Redirect URL. If instead of a message you'd rather send them to a thank-you page of your own, put its address here (
/thank-you). If you fill it in, this is what happens, not the success message. - Notification emails. The addresses that get an alert every time someone writes to you, separated by commas. You can put several (
orders@…, bakehouse@…). - Anti-spam protection (honeypot). Leave it on. It adds an invisible box that people never see and robots do fill in; when it arrives filled, the submission is discarded. It doesn't bother your visitors.
- Submit button text. "Send", "Request a quote", "Sign me up".
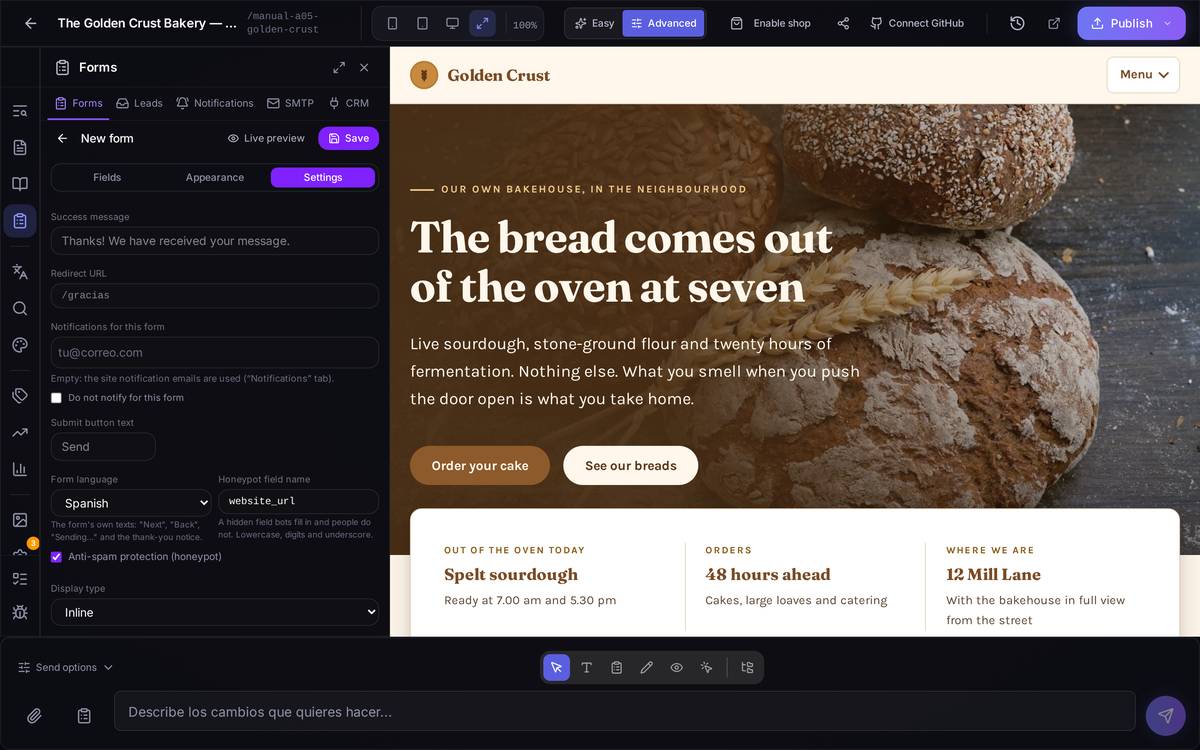
- Display type. Two ways of showing the form:
- Inline: the form appears within the page, as one more section. This is the normal choice.
- Pop-up / Modal: it floats above the page. Choosing it opens one more block of options: Trigger (after a few seconds, after scrolling a percentage of the page, on a button click, or when the visitor is about to leave), the delay, the max width, the overlay colour and how many hours to stay hidden from anyone who has already closed it.
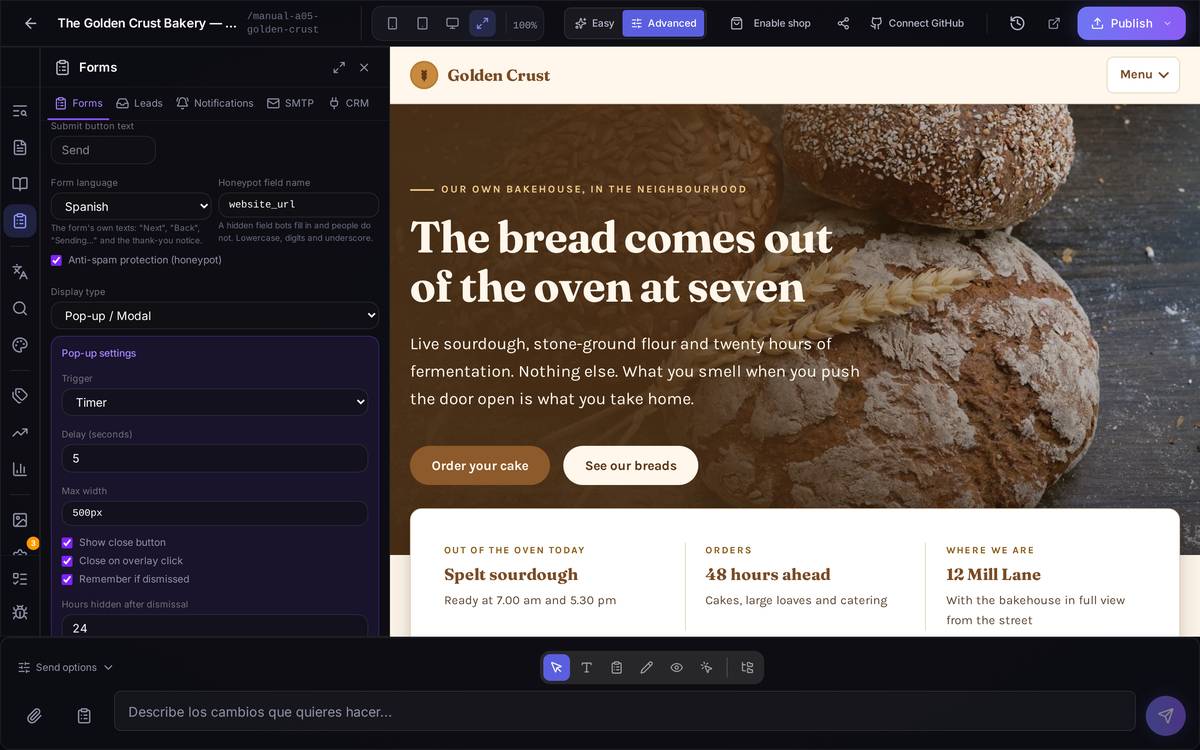
Watch out for… pop-ups that fire on arrival with no delay. They're annoying, and Google penalises sites that cover their content the moment you land. If you use a pop-up, leave a few seconds of delay or fire it once the visitor has already scrolled down the page.
5.6Creating a form with artificial intelligence
What it's forDescribing in your own words the form you want and having the AI build it with the questions and types already in place. It's the fastest way to start.
How to get thereIn the list of forms, the wand button next to "Create form".
What's on screen. A text box for describing what you need and four Quick examples you can click to get going: Basic contact form, Appointment booking, Budget request and Event registration.
A concrete exampleInstead of writing "booking form", which will get you something generic, be specific and say what you want to ask and what's required:
"A form for booking a table at the bakery: name, phone, day, time and number of people. Phone required."
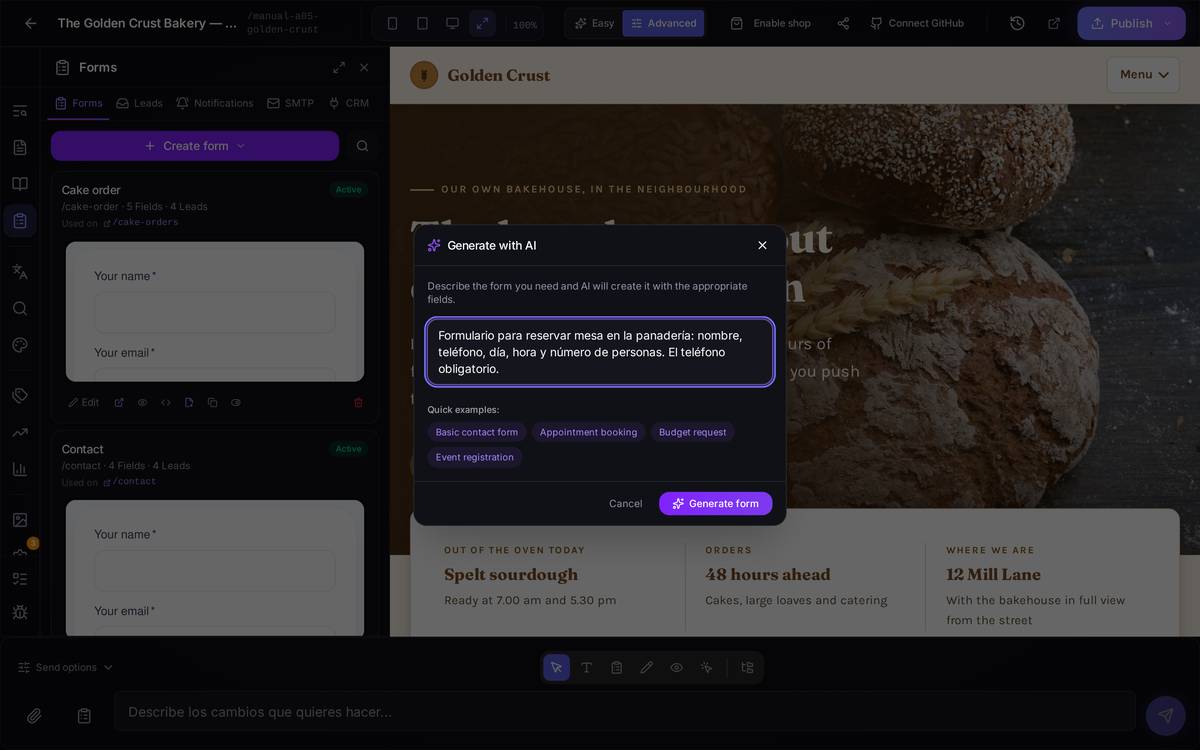
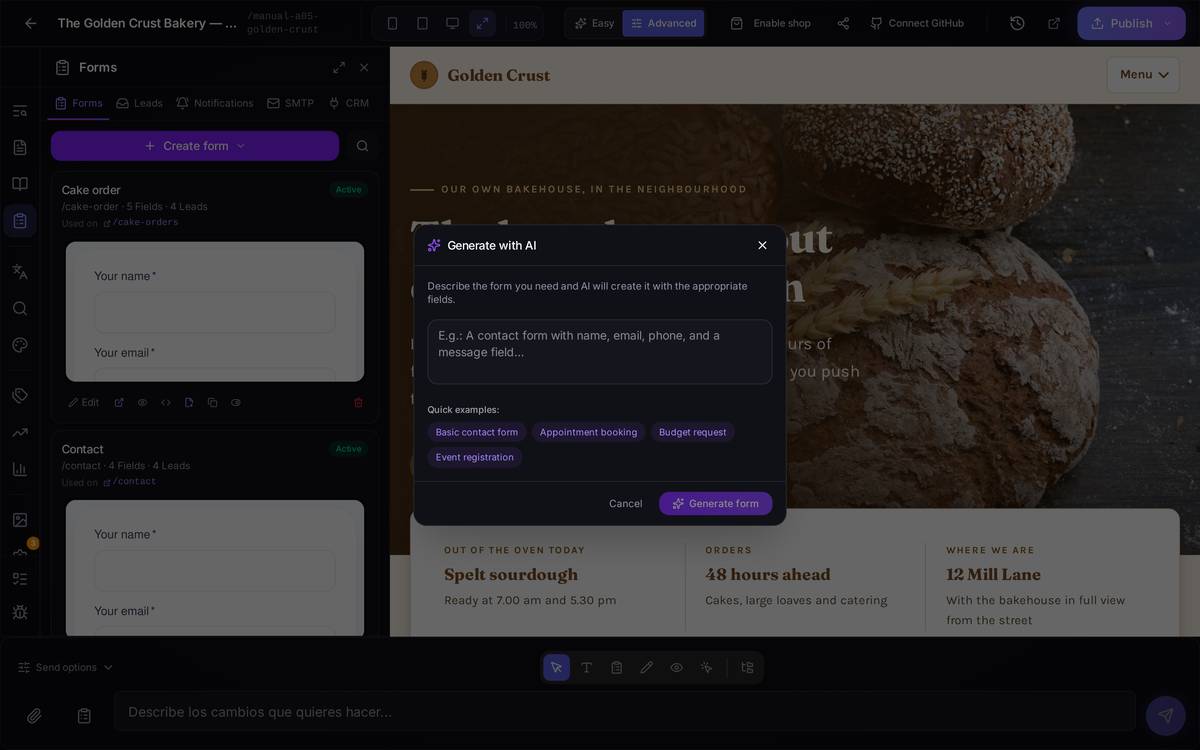
Watch out for… taking the result on trust without looking at it. The AI gets it right most of the time, but always review the labels and which fields it has marked as required before putting the form on your site. Generating a form uses up queries from your plan (you can see how many you have left at the top right).
5.7Putting the form on a page of your site
What it's forCreating the form doesn't put it on your site. This is the missing step, and the reason the list says "Not embedded on any page yet".
How to get thereThere are two ways. The most direct is the Forms mode on the floating bar, explained in the next section: you click the page where you want the form and insert it right there. The other is the insert icon on the form's card, which is what this photo shows.
What's on screen. The form you're about to insert, a Select page dropdown with the pages of your site and three ways of placing it: At the end of the page (the platform writes it itself, in its own design and without spending queries), Replace the existing form (if that page already has one with the same name) and Let the AI place it, with an Additional instructions box in case you want to say where ("in the contact section, below the map").
When the AI places it, it inserts it adapted to your site's visual style: it takes your colours and your typefaces, it doesn't paste in a form that looks like a stranger. Whichever way you choose, the panel checks afterwards that the form is actually on the page.
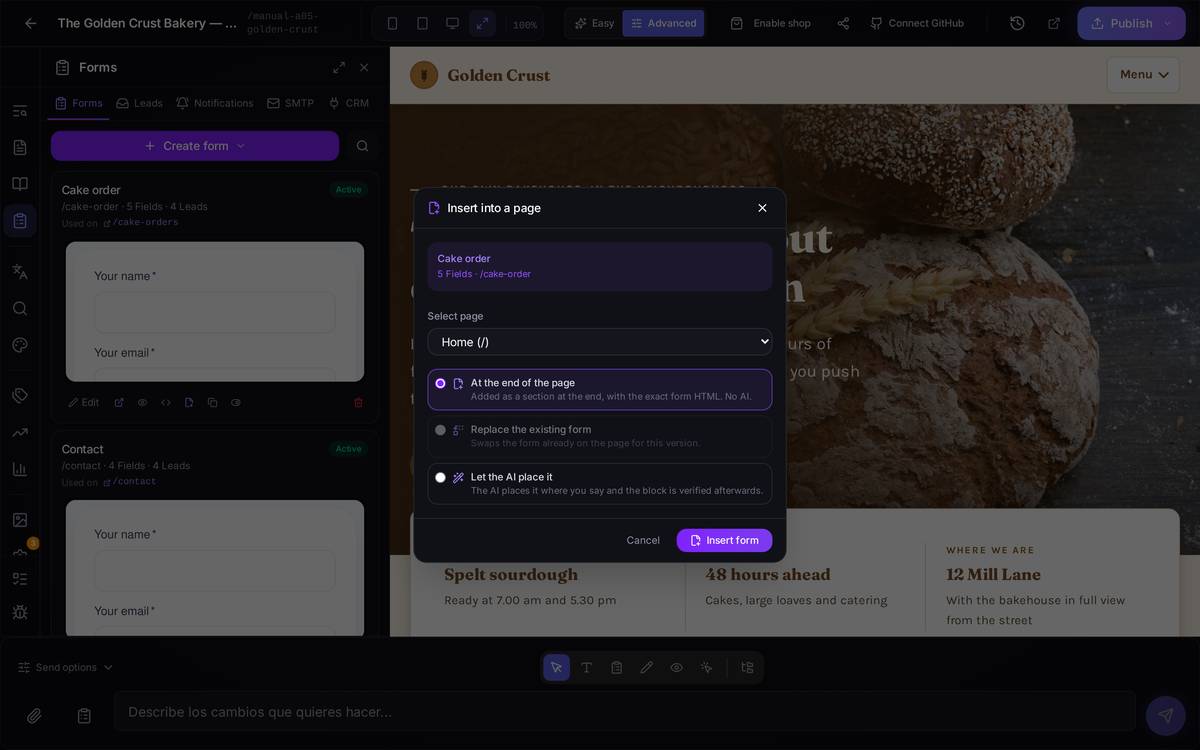
Watch out for… two things. Only the AI route uses up queries from your plan. And, like any other change in the editor, afterwards you have to Publish for your visitors to see it: until then the orange "Unpublished changes" notice stays at the top.
5.8Working with forms on the page itself (Forms mode)
What it's forUntil now everything went through the panel on the left: you created the form and then asked the AI to put it on a page. The Forms mode on the floating bar lets you do it on the page: you see the form where the visitor sees it, you work on it right there and you decide where the next one goes.
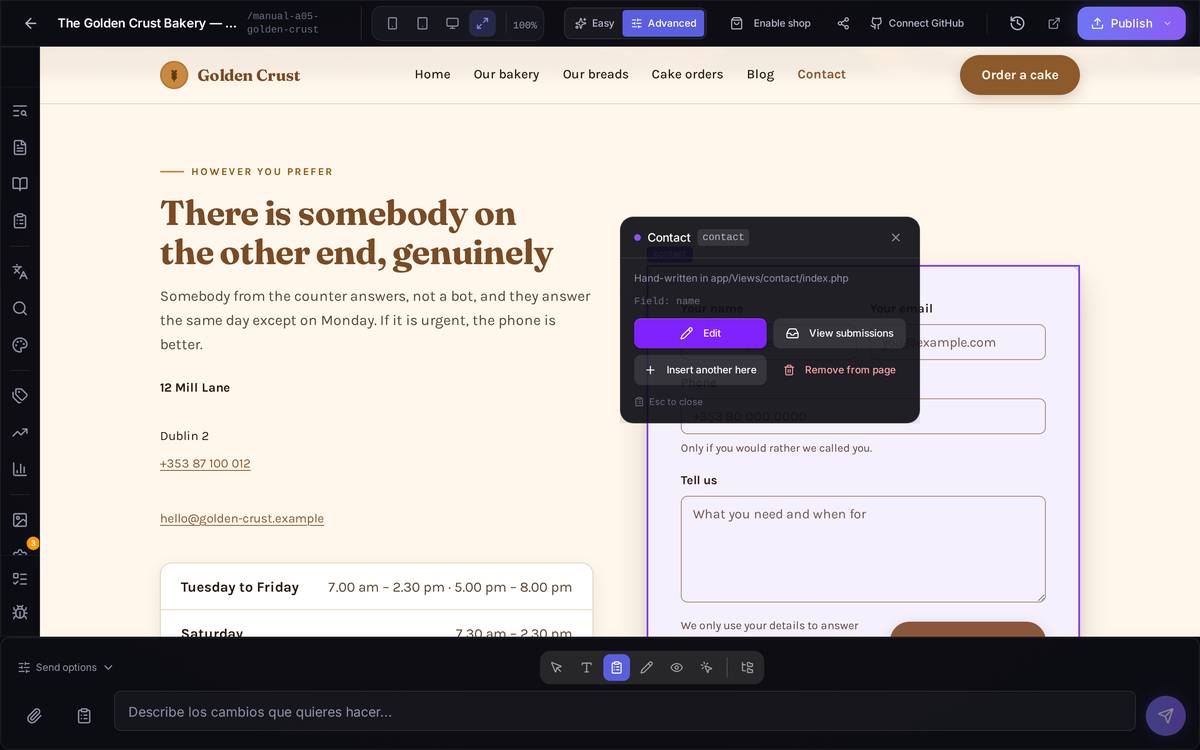
How to get thereOn the floating bar under the preview (the select, text, draw, view and navigate icons) there's one more with a clipboard: "Forms". Click it. While it's active, hovering over the page outlines every form in purple with its name, and every other element gets a dashed outline: those are places where you could insert one.
What's on screen. Click a form and a small panel appears next to it with:
- Its name and, underneath, whether it's a form managed by the platform (Speaksite put it there and can rewrite it) or hand-written in a file of your site (in which case it tells you which one).
- Edit: opens its record in the Forms panel with live editing (next section).
- View submissions: takes you to the Leads tab.
- Insert another here: puts another form right after this one.
- Remove from page: takes the form off this page. The record and the messages you received are kept; it only disappears from the page.
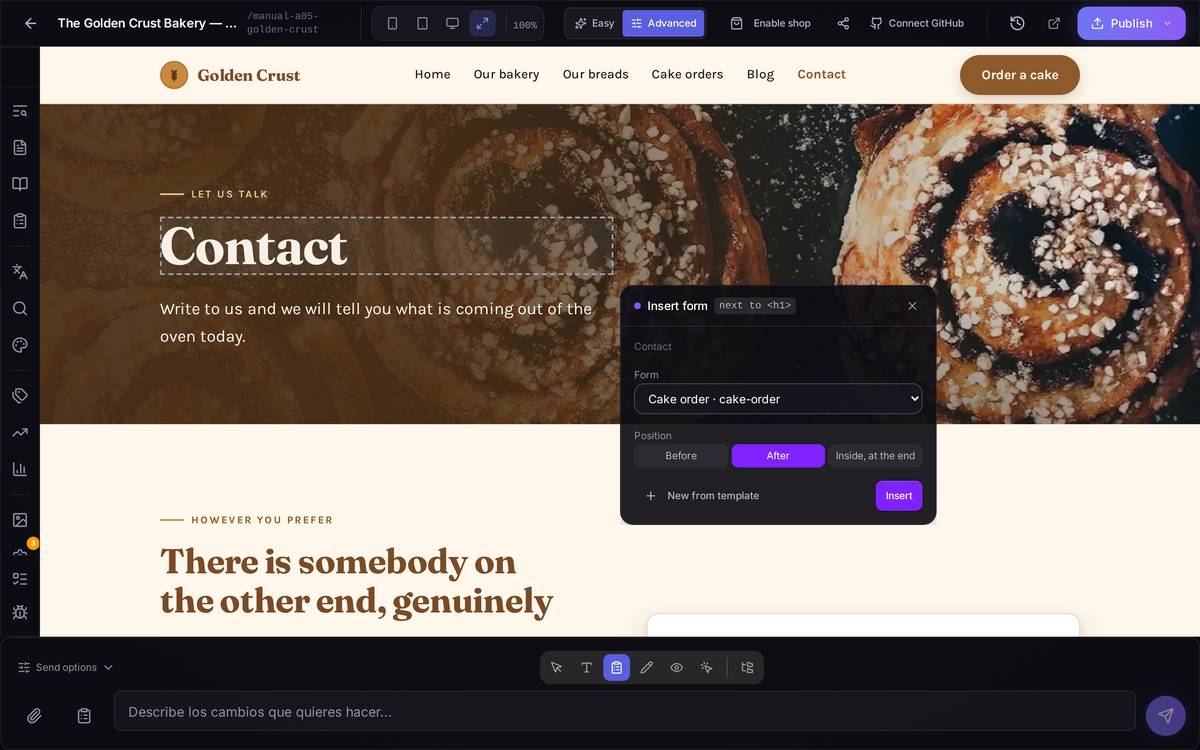
Inserting next to any element. With the mode on, click a heading, a paragraph or a section of the page. The insert panel opens: you pick which form (or New from template), the position — Before, After or Inside, at the end — and click Insert. The form appears on the page straight away, in the platform's design and without spending AI queries. If that exact spot can't be found in the page's code, the panel offers to put it at the end of the page or to let the AI place it.
Watch out for… a page that is really several pages. On some sites one file draws several pages (each centre's page, each service's page). If you insert there, the form will show up on all of them, and the panel warns you before inserting with "This view serves N pages". For a different form on each page you need a partial with a variable, which is a job for whoever programs your site.
And as always in the editor: whatever you insert or remove is seen by your visitors once you publish.
5.9Editing a form and watching it change on the page
What it's forChanging a label, adding a question or tweaking the look and seeing the result on the page, immediately, without reloading and without publishing.
How to get thereIn Forms mode, click the form and then Edit. Its record opens in the panel on the left with a "Live on the page" badge next to the title.
What's on screen. The same record as always (questions, steps, appearance and settings), with one difference: every change you make is drawn on the form in the page as you type. When you click Save, the record is saved and the form is rewritten on the page (and on any other page where the platform put it). If you go back without saving, the page gets the form back exactly as it was.
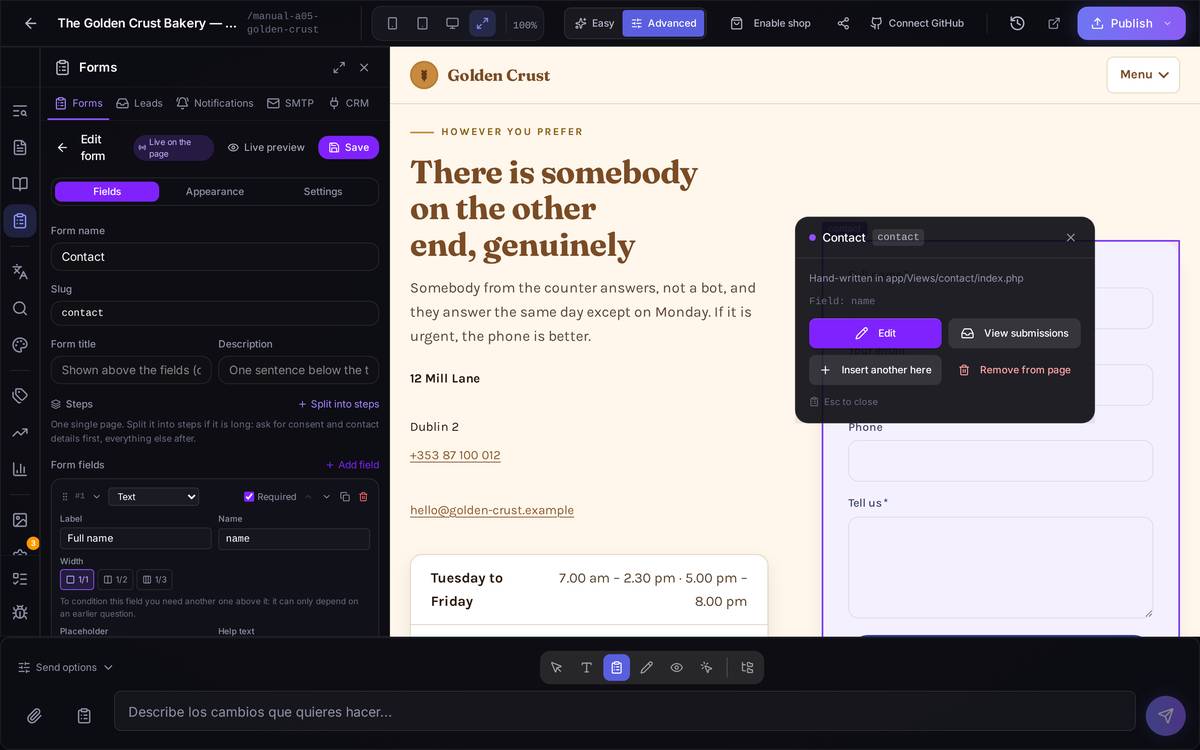
Watch out for… hand-written forms. If someone wrote the form directly in your site's code, the panel tells you ("Hand-written in …"): live editing shows you how it would look, but saving only updates the record and leaves the page alone. And the technical name of a question that is already saved doesn't change when you change its label: it's the key the messages arrive under.
5.10Templates: starting from a ready-made form
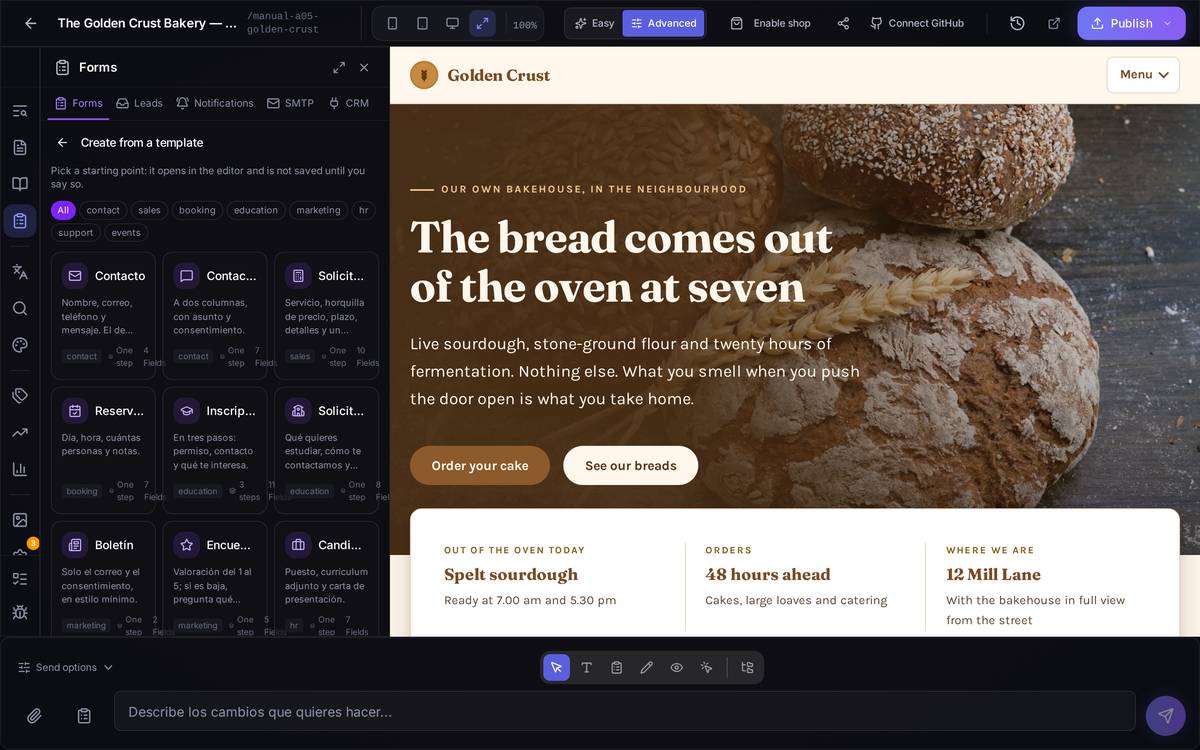
What it's forNot starting from scratch. There are eleven ready-made forms — contact, full contact, quote request, appointment booking, multi-step enrolment, information request per centre, newsletter, satisfaction survey, job application with CV, support and RSVP — in your site's language.
How to get thereIn the list of forms, Create form offers three ways: Blank, From template and With AI. Also from the insert panel in Forms mode, with New from template.
What's on screen. A gallery with each template's name, what it's for and how many steps it has. Picking one opens it in the editor unsaved: change whatever you like and click Save.
5.11Appearance: how the form looks
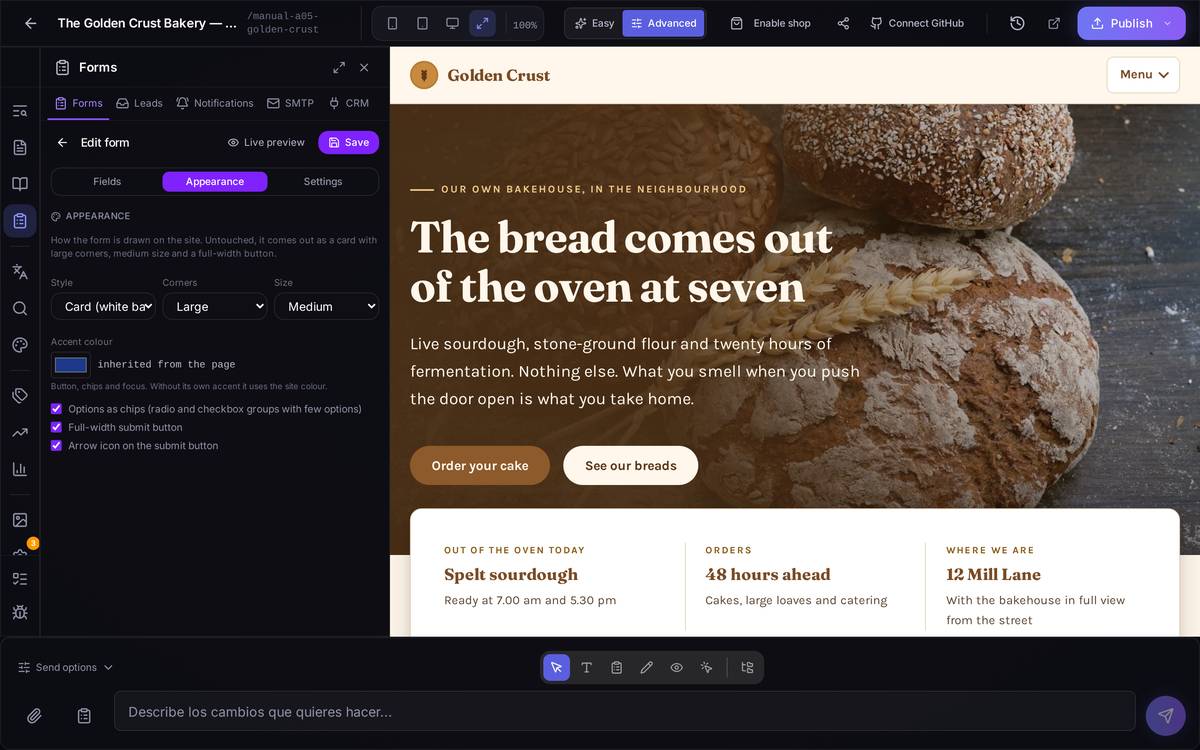
What it's forMaking the form look good without touching code. The forms the platform places come with a careful design (white card, rounded fields, options as chips, a button in your site's accent colour) and this is where you adjust it.
How to get thereIn the form's record, the Appearance tab.
What's on screen
- Theme: Card (white background and shadow), Plain (no card, inherits the background) or Minimal (just the bottom line of each field).
- Corner radius, field size, chips for option questions, whether the button goes full width and whether it has an icon.
- Accent colour: by default it uses your site's; you can set another one.
There are also new settings on each question: a help text under the field, an initial value, the rows of a text area and, for files, which types are accepted and whether more than one can be attached. And on the record, a title and a description shown above the questions.
5.12Multi-step forms, questions that depend on others, and columns
What it's forA long form is tiring; one in steps asks a little at a time. And some questions only make sense depending on an earlier answer.
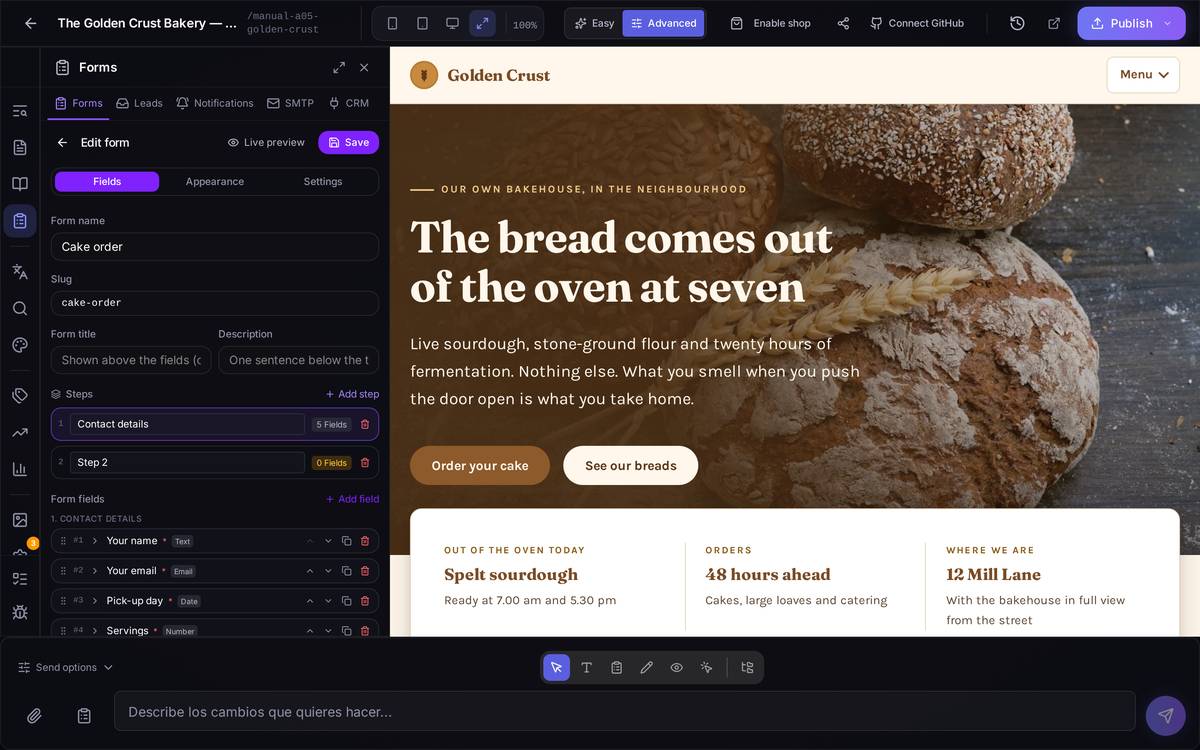
How to get thereIn the record, the Steps block ("Split into steps") and, on each question, Show only if… and the width (1/1, 1/2 and 1/3).
What's on screen
- Steps. When you split the form, each question is assigned to a step, each step can have a title and a description, and the visitor sees a progress bar with Back and Next buttons. House advice: ask for consent and contact details in the first steps; that way a half-abandoned form is still a contact.
- Show only if… A question can be shown only when an earlier one has a certain value (or any, or none). Whatever is hidden isn't required and isn't sent.
- Width. With 1/2 or 1/3, two or three questions share a row; on mobile they go back to one under another.
5.13Code for pasting the form outside your site
What it's forIf you want the form somewhere else — a site that isn't built with Speaksite, a campaign landing page — here's the code, ready to paste.
How to get thereOn the form's card, the <> icon.
What's on screen. The form's HTML code and the Copy code button. It gets pasted as-is into the other site. The messages will keep arriving in the Leads tab of this very panel.
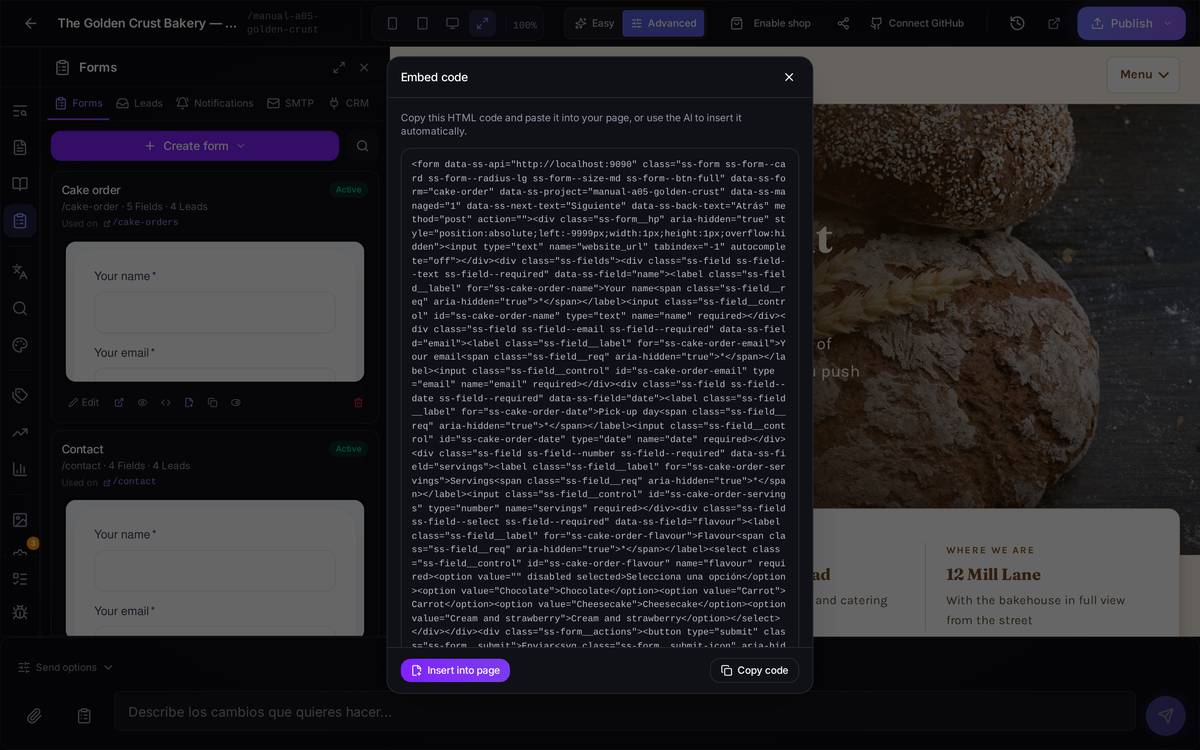
Watch out for… editing that code by hand after pasting it. If you change the field names, they'll stop matching the form's record and the data will arrive incomplete (explained further down, in "If something goes wrong").
5.14Forms that were already on your site
What it's forIf your site already had forms written into the code — because the AI generated them when it built the site, or because they came from before — Speaksite can find them and adopt them, so their messages reach your panel like all the others.
How to get thereIn the list of forms, the magnifying glass button ("Detect forms").
What's on screen. Speaksite walks through your project's files and lists what it has found: the form's name, how many questions it has, the file it lives in and a Relevance score of High, Medium or Low telling you how confident it is that this really is a contact form. Each one comes with its Import button.
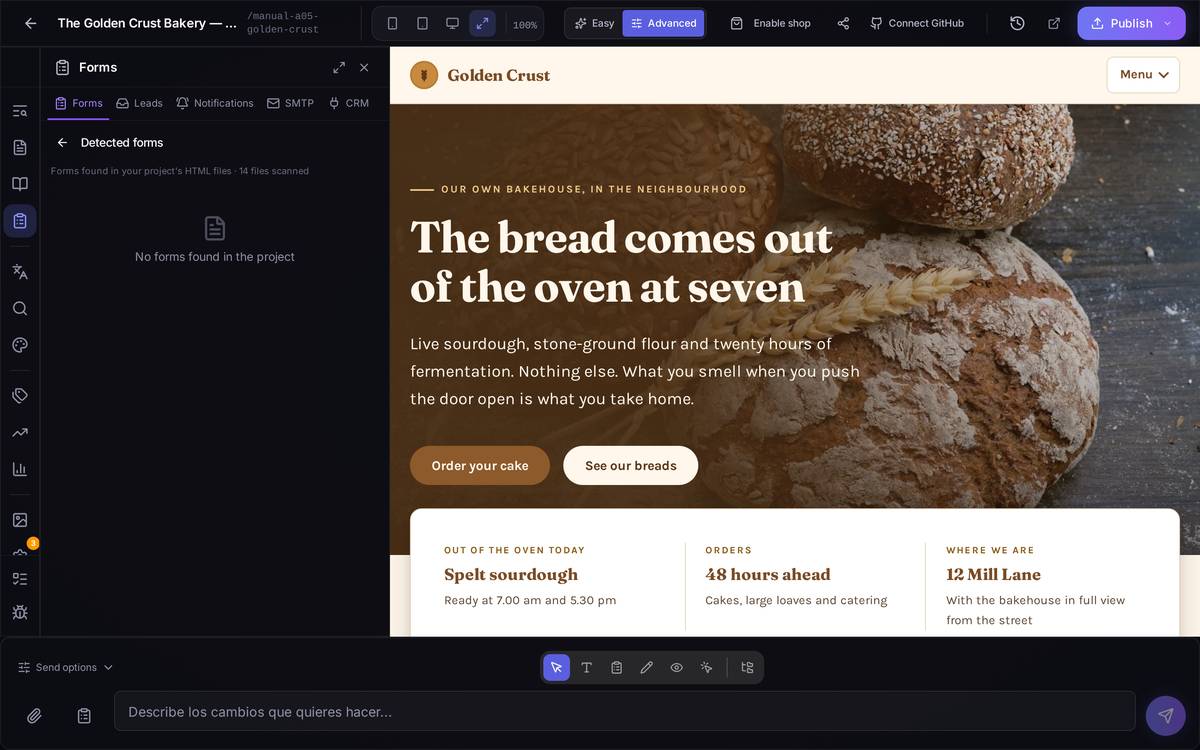
Watch out for… what comes immediately below. Forms adopted this way are the ones that spring the most surprises, and they deserve a section of their own.
5.15Two things that bite in silence
You add a new question and that answer never turns up
In one line. If your form is an old one that registered itself, a new field you add may not be saved even though the visitor sees the thank-you message. After adding a field, submit the form to yourself and check that the answer arrives: it's the only way to know, because nothing warns you.
The symptom. You have a form that Speaksite registered on its own (one of the detected ones, or one that auto-registered when your site was generated). You add a new question to it from the panel — "How did you hear about us?", say — you save, and everything looks fine. A visitor fills in the form on your site, gets the usual "Thanks!"… and when you go to Leads, that message is there but the answer to the new question is nowhere to be found. Not even empty: it isn't there.
Why it happens, in two sentences. In these forms there are two separate things: the record in the panel (where you add questions) and the actual form written into the page. Adding the question in the panel changes the record, but the new box doesn't appear on the page by itself: the visitor never sees it, so they can't fill it in, and the submission is saved all the same — hence the "Thanks!".
What to do. After adding a question to one of these forms, add it to the page too: ask the AI in the editor's chat box ("add a question 'How did you hear about us?' to the contact form"), or insert it again with the Insert with AI button. Then check it yourself: open your site, fill in the form and check in Leads that the new answer arrives.
How to spot one at a glance: if you see the Auto badge on the form's card, it's one of these. Forms placed by the platform itself (with Forms mode or with Insert) don't have this problem: when you save the record, the page is rewritten automatically. And it works the same way in reverse: if the page has a box the record doesn't know about, that piece of data is discarded on arrival, with no warning.
The page it tells you the form is on comes from your site's routes
The symptom. The form's card says "Not embedded on any page yet" even though you know it's in place and working. Or you click the link to view the form on the page and it takes you to a page that doesn't exist.
Why it happens. To tell you which page each form is on, the panel looks at your project's route table: the list of which address serves which file. If the form lives in a file that has no address of its own — a shared template used across several pages, such as a footer — the panel can't give you a specific address and would rather not invent one.
What to do. Don't panic: it's a notice from the panel, not a fault in your form. The messages still arrive in Leads just the same, which is what matters. To check it properly, open your site in another tab and look at the page with your own eyes. When the form is embedded from a shared template, the panel qualifies it on that same line instead of claiming it isn't anywhere.
5.16The messages people have sent you
What it's forReading everything that comes in through any of your forms, all in one place.
How to get thereIn the Forms panel, the Leads tab (at the top, the second one). "Lead" is what the panel calls each message received.
What's on screen. At the top, a dropdown for filtering by form (All forms), the Export CSV button and the total number of messages. Below, the list: for each one, who is writing, their email, which form it came from, the date and a source badge telling you how that visitor reached your site — direct (they typed your address), Organic (they found you in a search engine) or Referral (they came from another site). It's gold dust for knowing what's working for you.
To the right of each row you can mark it as spam or delete it.
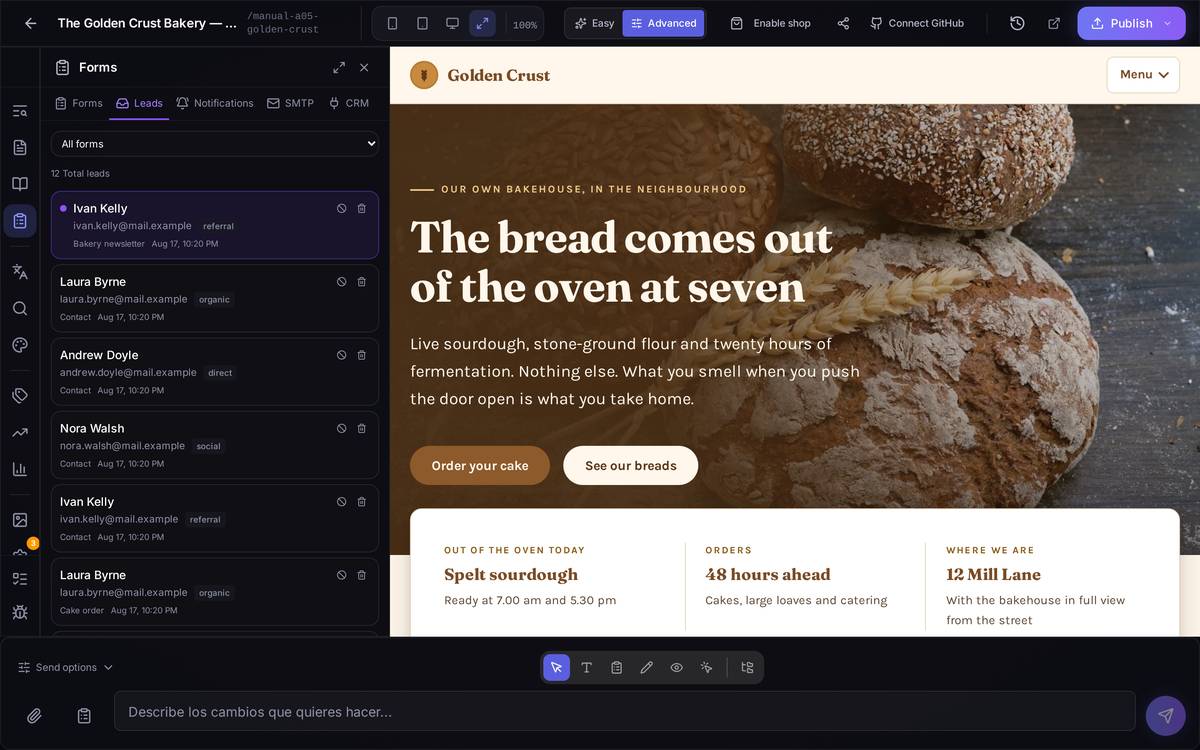
Export CSV downloads the whole list as a file you can open in Excel or upload to another tool. It's the simple way to take your contacts with you.
5.17The detail of a message
How to get thereIn Leads, click on any row.
What's on screen. Three blocks:
- Form data: each question with its answer, exactly as the visitor wrote it.
- Tracking data: where they came from (the Source), which page they were on when they wrote to you, the first page they saw and how many visits they'd made.
- Technical info: the exact date and time and what kind of device and browser they wrote from.
If your form had a File field, the attachments appear here to download.
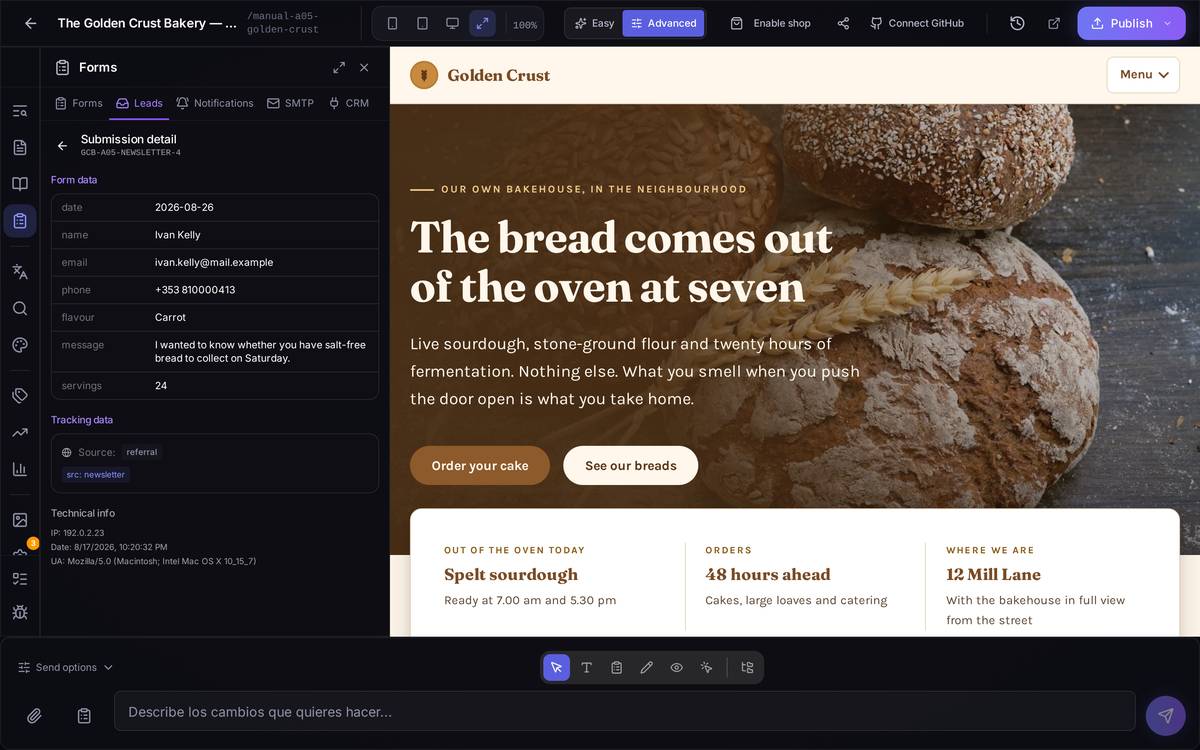
Watch out for… the personal data you collect. All of this belongs to a real person: ask only for what you genuinely need, and remember to have your privacy notice linked from the form.
5.18Notifications: which address your forms land in
What it is forThe alert address used to live tucked away inside each form, in its own settings: if you left it empty, that form told nobody and there was no clue that anything was wrong. This tab gives you a single list of addresses that works for the whole site, and lets you test it before a real message arrives.
How to get thereIn the Forms panel, click the Notifications tab — the third one, between Leads and SMTP.
What is on screen. A Site notification emails box where you add one or more addresses. If you leave it empty the alert lands in your account's email — the panel tells you so right there, with the exact address it would land in. Two buttons: Save and Send a test, which sends a dummy alert that looks exactly like the real one and does not show up among your Leads.
Below that, Form by form: the list of your forms with, for each one, the address its alert really lands in and a label saying where that address comes from: own (the form has its long-standing address, typed by hand in its settings), site (it uses the addresses on this screen), your account (there is nothing anywhere and it falls back to your email) or silenced (it deliberately alerts nobody). If a form has its own addresses you will see an icon to use the site addresses instead — it clears its own and makes it depend on this screen — and the pencil icon takes you straight to editing that form.
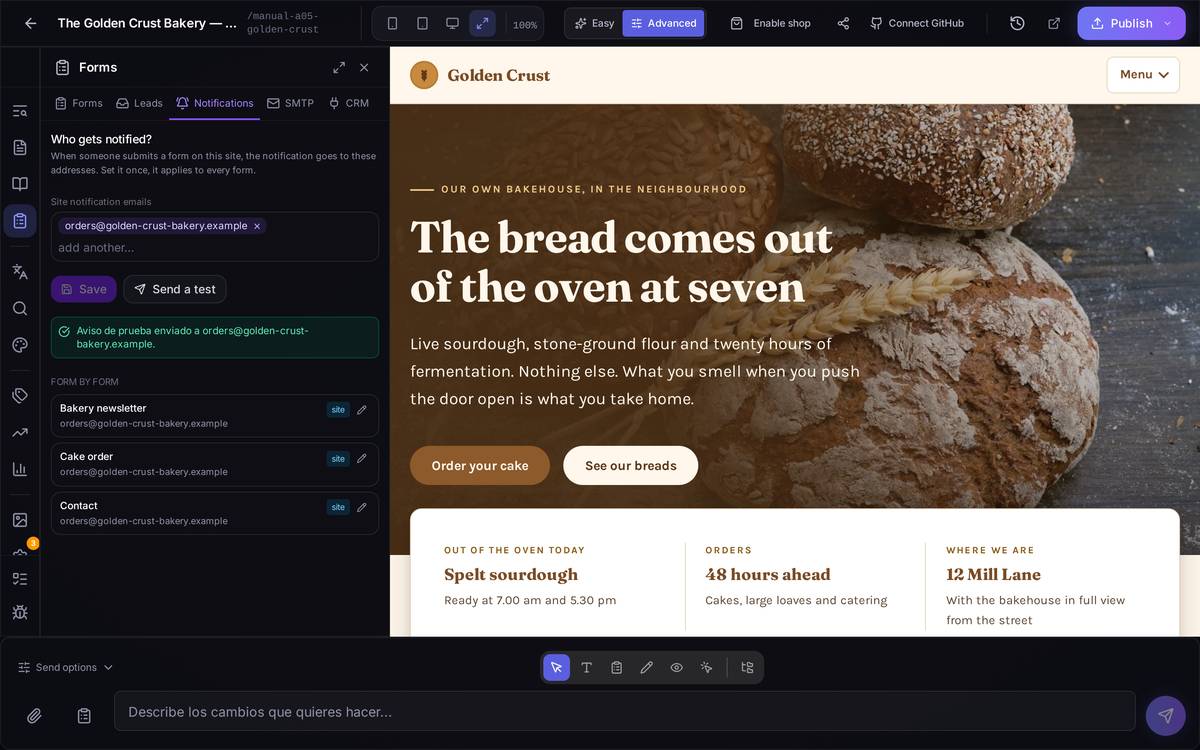
An example, step by stepYou want every alert from your site to reach orders@yourbakery.example as well as your personal email. You open Notifications, type the address into Site notification emails, press Save and then Send a test to check it arrives. If some particular form had its own address typed in by hand it will keep using its own — use the use the site addresses icon on that row if you want it to follow the list too.
Watch out for… Send a test proves the delivery works, not that the form does. A form marked silenced stays silent however many addresses you save here.
5.19The email address the alerts are sent from (SMTP)
What it's forMaking sure the "someone has written to you" alerts go out from your email address rather than a generic one. It's what gets the alert into your inbox instead of the spam folder.
How to get thereThe SMTP tab.
What's on screen. The details your email provider gives you:
- SMTP server and Port (for example
smtp.gmail.comand587). - Username and Password for that account.
- Encryption: normally TLS.
- From email and From name: what whoever receives the alert will see.
At the bottom, Save and Send test.
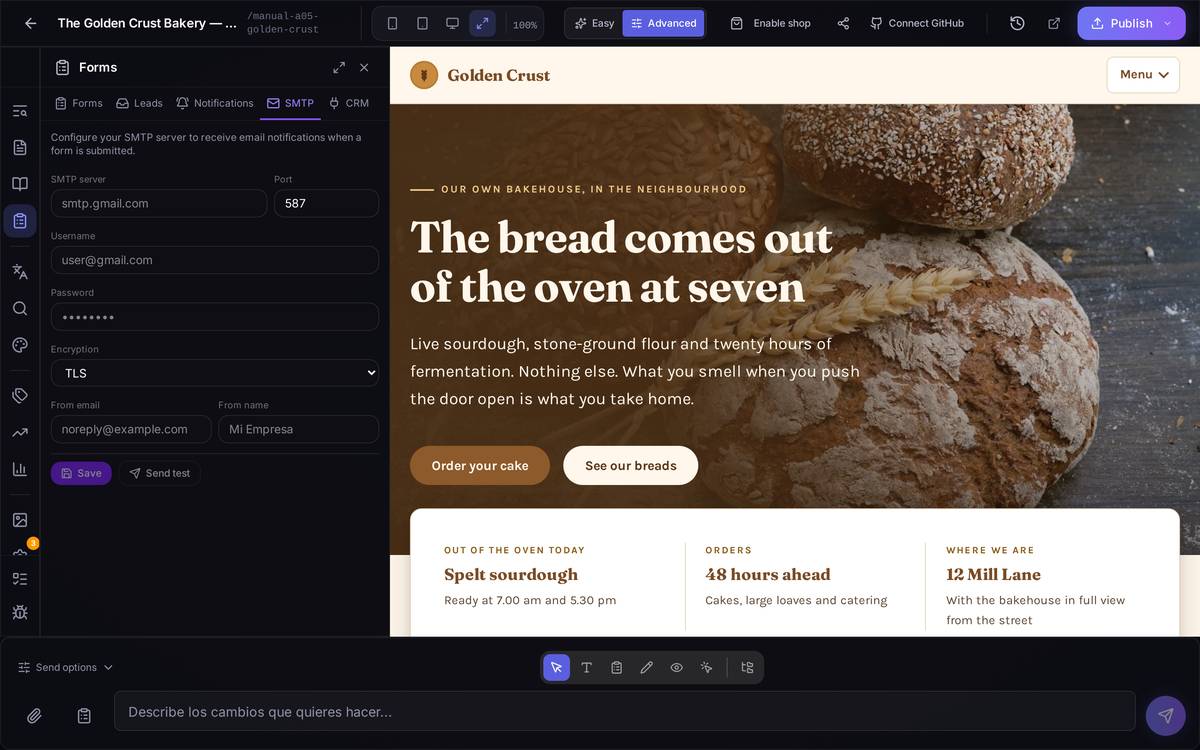
A concrete exampleFill in the details, click Save and then Send test. If the test email arrives, you're done. If it doesn't, check the username and password before anything else: that's the culprit nine times out of ten.
Watch out for… putting your normal email password here. Gmail, Outlook and almost everyone else require an app password, generated separately from your account's security settings. Your usual password will give you an error.
If you don't set this up, the alerts still go out, but from Speaksite's own sender. With your SMTP they go out from your address and land in the inbox more reliably. Which address they land in isn't decided here but in the Notifications tab.
5.20Sending your contacts to your CRM
What it's forMaking sure everyone who writes to you goes automatically into the program where you keep your customers, with no copying and pasting.
How to get thereThe CRM tab.
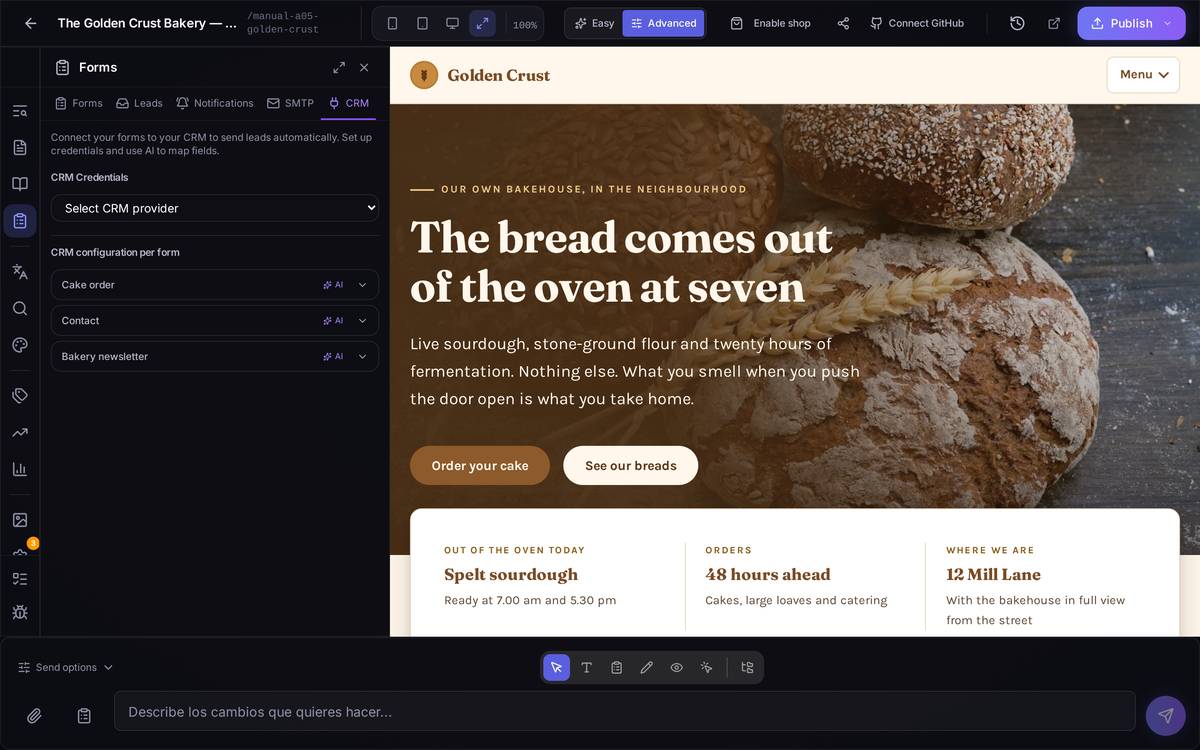
What's on screen. Two blocks:
- CRM Credentials: you choose your provider from the dropdown and enter the keys it gave you. There's a Test connection button to check that the keys work before going any further.
- CRM configuration per form: the list of your forms, each with its switch for sending to the CRM and an AI button.
5.21Connecting the CRM and matching the fields
What it's forTelling the system that your question "Your email" is what your CRM calls "email", and so on for all of them. It's the tedious part, and the AI does it for you.
How to get thereIn the CRM tab, the AI button on a form's row.
What's on screen. A box where you describe your CRM in your own words ("We use Clientify, the credentials are in .env as CLIENTIFY_API_KEY") and another for optional instructions ("map as a sales lead, include company as a required field"). The AI analyses your form and proposes the complete mapping.
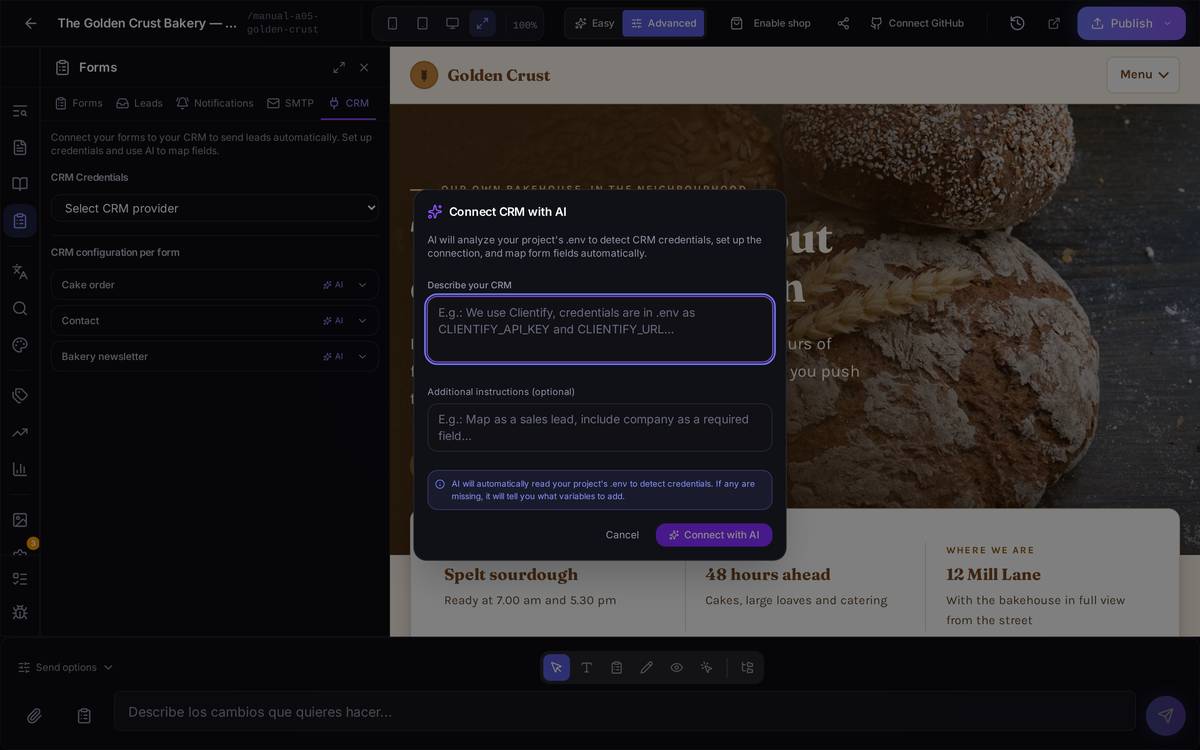
When it finishes it shows you the proposed mapping, field by field, and if it's missing credentials it tells you exactly which keys to add. Review it before taking it as good: you can correct by hand any pairing that doesn't look right, and leave any questions you don't want to send as Not mapped.
Then use Test submission: it sends a made-up contact to your CRM and shows you both what was sent and what the CRM replied. It's how you make sure before a real customer comes through.
Watch out for… switching on sending to the CRM without having tested it. If the mapping is wrong, contacts land in your CRM incomplete or duplicated, and cleaning that up afterwards costs more than reviewing it now.
5.22Watch out for: what can't be undone
Of everything in this chapter, these are the ones worth looking at twice before you click:
- A form's bin. It takes every message you had received through it down with it. There's no recycle bin and no "undo". If what you want is to stop receiving, use Deactivate: that one can be undone.
- Deleting a message from the Leads tab. Same story: it's gone and it doesn't come back. Before you have a clear-out, click Export CSV and keep the file.
- Changing the technical Name of a question that is already receiving messages. The old messages keep the old name and there's no way to bring them back together afterwards. Change only the Label unless you have a clear reason.
- Leaving a form without clicking Save. Everything you built on that screen is lost: it doesn't save itself.
- Switching on sending to the CRM without clicking "Test submission" first. Badly matched contacts go into your CRM all the same, and cleaning them up there costs more than reviewing the mapping here.
And one that breaks nothing but costs money: generating and inserting with AI use up queries from your plan. Write the request properly first time rather than trying five times.
5.23If something goes wrong
"I can't find the Forms icon." It's the clipboard in the left-hand bar, just below Blog, and it's there in both modes. On a phone, open it from the round Tools button.
"I created the form but I can't see it on my site." Creating it and placing it are two steps. Place it with the Forms mode on the floating bar (or with Insert from its card) and then Publish.
"The messages arrive but nobody emails me about them." Look at the Notifications tab: the alert goes to the form's own addresses; if it has none, to the site's; and if there are none either, to your account's email. Only a form with "Don't notify about this form" ticked stays quiet, and on purpose. Send a test tells you where it's landing.
"I inserted a form on one page and it shows up on several." That page shares its file with others (the panel warned you when inserting). Remove it from Forms mode and ask whoever programs your site for a partial with a variable.
"The alert lands in my spam folder." Set up SMTP with your own domain rather than a free account.
"I added a question and that answer never reaches me." That's the first warning in the "Two things that bite in silence" section: add it to the page too, and check by submitting the form to yourself.
"I'm getting a lot of spam." Check that Anti-spam protection (honeypot) is switched on in the form's settings, and mark the ones that get through as spam: that's also how you keep the Leads list clean.
"The panel says the form isn't on any page, but it is." That's the second warning: the panel works out the page from your project's routes and sometimes it can't. As long as the messages reach Leads, your form is working.